Add a New User
To add a new user:
-
Click your profile icon, and then select the Settings option.
-
On the Operations page, go to the Users section.
-
In the Users section, click Add User.
The Add/Edit User page opens with the following tabs:
Profile
Define the following information for a new user:
-
Display Name—enter the name for the user you want to display on all screens and reports.
-
Job Title—enter the job title of the user you want to display on all screens and report.
-
Email—enter the email address of the user you want to use for all notifications and emails. This must be a valid email address.
-
User Name—enter the name for the user to log in to the application. The username must be in the email address format (for example, username@domain.com).
-
Account Expiration—define the user account expiration date.
-
Account Enabled—select the checkbox to activate the account and allow the user to log in to the application. The account is inactive by default.
-
Email Notifications—select the checkbox if you want the user to receive email notifications when an item is shared or reassigned to them.
-
Alert Email Notifications—select the checkbox if you want the user to receive email notifications when an Alert is generated by an Enforced Policy that they own. Only Allow SSO Authentication—select the check box if you want the user to use single sign-on authentication to log in to the application.
Password Management
On the Password Management tab, you can find the following fields:
-
New Password
-
Confirm Password
You can set a user password in two ways:
-
Manually—to manually set the password, enter a new password in the Password field, and then confirm the password.
-
Randomly – to randomly set the password, click the Generate a Random Password button
 . The generated password is displayed in the field to the right. To remove the random password and create a new one, click the delete button
  .
.
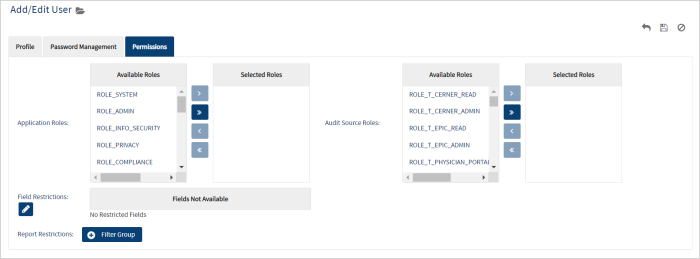
Permissions
The Permissions tab consists of four sections:
-
Application Roles
-
Audit Source Roles
-
Field Restrictions
-
Report Restrictions
Typically, you only need to assign the Application and Audit Source Roles to the user. You can edit Field and Report Restrictions to manage advanced permissions and audit data access controls within Imprivata Access Intelligence. Field Restrictions allow you to control user access to specific fields in the audit source data. Report Restrictions let you limit user access to specific data within an audit source.
It is recommended to review the restrictions with your Implementation Manager prior to user setup to ensure proper access control.
Application Roles
To assign an Application Role to a user:
-
On the Permissions tab, go to the Application Roles section.
-
From the Available Roles list, select the roles that you want to assign to a user.
-
Click the right arrow button or drag the role from the Available Roles list to the Selected Roles list.
-
If you want to assign all roles to a user, click the right double arrows button. To cancel the assignment, click the left arrow button or the left double arrows button.
It is recommended to assign one role to a user.
Audit Source Roles
When users are added to Imprivata Access Intelligence, they have read access to the Audit Sources by default. This access can be modified for individual users.
If a user is created after uploading Audit Sources to Imprivata Access Intelligence, access to these Audit Sources should be configured for a user.
To assign an Audit Source Role to a user:
-
On the Permissions tab, go to the Audit Source Roles section.
-
From the Available Roles list, select the roles that you want to assign to a user.
-
Click the right arrow button or drag the role from the Available Roles list to the Selected Roles list.
-
If you want to assign all roles to a user, click the right double arrows button. To cancel the assignment, click the left arrow button or the left double arrows button.
By removing an Audit Source Role from a user, you prevent access to the Audit Source data from all Reports that the user runs. This also affects Shared Reports. For example, if you share a report that contains Cerner data, but a user does not have access to the Cerner Audit Source, the report will not return any results.
Field Restrictions
By default, users have access to all Audit Source fields added to Imprivata Access Intelligence. If there are fields, for example, Medicare Number or other sensitive data, that a particular user should not have access to, you can remove them.
To remove access to a field:
-
In the Field Restrictions section, click the Edit button
 .
. -
From the Fields Available to User list, select the fields to which you want to remove access.
-
Click the right arrow button or drag the field from the Fields Available to User list to the Fields Not Available list.
-
If you want to remove access to all fields, click the right double arrows button. To cancel the restrictions, click the left arrow button or the left double arrows button.
Report Restrictions
By default, users have access to the Audit Source data added to Imprivata Access Intelligence. If there is certain data that should not be available to the user, you can filter it by adding Report Restrictions. The system scans each record in the Reports and filters based on the specified criteria.
To add a Report Restriction:
-
In the Report Restrictions section, click the Filter Group button.
-
Fill out the necessary fields.
-
To add additional filters, click the Add Filter button.
Once you have completely configured user data, click the Save icon  . An email is sent to the user's email address with their login credentials. The user must change the password when they first log in to the application.