Installing the Imprivata Agent on Thin Clients With Microsoft Windows Embedded Operating Systems
This
Does not apply to Windows IoT.
For more information on supported versions of Microsoft Windows Embedded, see the Imprivata OneSign Supported Components in the Imprivata Environment Reference.
If your enterprise is only licensed for Imprivata Enterprise Access Management with MFA (formerly Imprivata Confirm ID), only the Single-User Computer agent (Type 1) is supported.
Before You Begin
Uninstall the Microsoft Embedded Device Manager or Windows Embedded Device Manager Client
Some thin clients may already have the Microsoft Embedded Device Manager Client or Windows Embedded Device Manager installed; it is designed to integrate with the Windows login (GINA or Credential Providers) and can be used to help manage thin client devices. However, Imprivata recommends that you uninstall the Microsoft Embedded Device Manager or Windows Embedded Device Manager Client before installing the Imprivata agent because it can interfere with the Imprivata agent.
Some versions of Windows Embedded integrate the Windows Embedded Device Manager at the operating system level. As a result, the Windows Embedded Device Manager cannot be uninstalled, but should be disabled. See step 5 for complete details.
Installation Sequence
Log in to the endpoint computer as a local administrator:
-
Before the endpoint computer is started: If the endpoint computer is set up to auto-login, press Shift while the system boots.
-
After you are logged in to the endpoint computer: Click Shift+log off to access a login screen.
-
Typically, there is a green and red icon on the desktop or Control Panel that changes the settings for installing software:
-
Green icon — Write Filter Enable
-
Red icon — Write Filter Disable
-
Select the red icon.
After selecting the red icon (Write Filter Disable), the endpoint computer may automatically reboot. If not, then manually restart the endpoint computer.
-
Log in to the endpoint computer as the local administrator.
-
Open the Control Panel and locate the RAM DISK option (or a similar option, depending on the thin client).
-
Open RAM DISK and change the RAM setting to 64 MB (or the highest available setting). This may require restarting the endpoint computer.
-
Log in to the endpoint computer as the local administrator.
-
Log in to the Imprivata Admin Console.
-
Download the Imprivata agent .MSI file to the desktop. Alternatively, install the agent from a USB flash drive (this may be required in some cases).
-
During the installation, specify the DNS FQDN of the appliance.
-
When the agent has finished installing and you are prompted to reboot, select No.
-
Open the Registry Editor.
-
Navigate to HKEY_LOCAL_MACHINE\SOFTWARE\Microsoft\Windows\CurrentVersion\Authentication\Credential Provider Filters.
-
Locate {CE231077-6891-4336-9D82-7C196AB29F45} (the WriteFilter Credential Provider Filter) and create the Disabled registry key with a Data Type of DWORD and a value of 1. The WriteFilter Credential Provider Filter controls which Credential Provider is displayed at login.
-
Navigate to HKEY_LOCAL_MACHINE\SOFTWARE\Microsoft\Windows\CurrentVersion\Authentication\Credential Providers.
-
Locate {11660363-9B10-02B9-BE55-02D5D7DC3242} (the Imprivata OneSign wrapper for the WriteFilter Credential Provider Filter) and create the Disabled registry key with a Data Type of DWORD and a value of 1.
-
If {507A6B3C-DF5A-4703-BE55-02D5D7DC3242}(the WriteFilter Credential Provider) is present, create the Disabled registry key with a Data Type of DWORD and a value of 1. This credential provider indicates that the endpoint computer is being serviced.
-
The changes take affect immediately and are preserved when the Imprivata OneSign agent is upgraded.
Users must be allowed to lock the desktop. This permission prevents the Imprivata agent from launching in a disabled state or from hanging in the "Imprivata Agent is securing the desktop" state.
Before restarting the endpoint computer, use the Group Policy editor to verify that the group policy allows users to lock the desktop.
To open the Group Policy editor:
-
Run gpedit.msc from a command line.
-
Locate the group policy at User Configuration > Administrative Templates > System > Ctrl+Alt+Del Options > Remove Lock Computer.
- Verify that the policy is Disabled.
If this setting is not disabled, the Imprivata agent cannot invoke winlogon.exe to lock the thin client after the Windows logon and the Imprivata OneSign Credential Provider is not displayed at login.
If the Group Policy setting is disabled and the Imprivata agent is still having issues starting, check if the Remote Desktop Services on the thin client is set to be started manually. You can access the services panel by running services.msc from the Run command line. The default setting is typically Manual, so you can try disabling the service or have it set to run automatically.
-
Restart the endpoint computer.
-
Log back in as local administrator.
-
The Imprivata Shared Kiosk Workstation Agent should launch successfully.
-
All drivers for proximity card readers or fingerprint readers should be available.
-
You should be able to plug in and use a USB reader. Make sure that the OneSign policy has these authentication options enabled.
-
Restart the endpoint computer.
-
Log back in as local administrator. The Imprivata agent should prompt you to authenticate.
-
Change the RAM DISK back to the original settings.
-
Change back to Write Filter Enable mode.
Imprivata OneSign should now be functional. Restart the endpoint computer and confirm that strong authentication and Imprivata OneSign Single Sign-On are available.
Troubleshooting
Not Enough Disk Space
During the Imprivata agent installation, an error message may appear stating that there is not enough disk space on the thin client:
-
The Imprivata agent typically requires 125-150 MB to expand the files and install the necessary components.
-
After installing, the Imprivata agent only uses about 45-50 MB.
Change the location of the TEMP and TMP directories by pointing them to a USB flash drive, or another hard drive with sufficient space. For example, most thin clients have a C: drive and a Z: drive. The TEMP and TMP directories may be pointing to the Z: drive. The C: drive may have more space available.
- Create a TEMP folder on your USB drive, or another drive on the thin client with sufficient space (for example, F:\TEMP or C:\TEMP)
- On the endpoint computer, go to the start menu > Control Panel > System Properties > Advanced tab.
- Click Environmental Variables. The default locations for the TEMP and TMP directories are displayed.
- Change the default settings for both TEMP and TMP to the new location (for example: F:\TEMP or C:\TEMP).
- If you use a USB drive, change these settings back to their defaults after the Imprivata agent installation is complete and the endpoint computer is rebooted.
Known Issue After Installation
After installing the Imprivata Shared Kiosk Workstation agent, Imprivata OneSign Extension Objects (EXOs) do not run, or take too long to run, when a non-administrator user (e.g., a generic account, usually auto-logged on) logs in, tries to auto-launch an application, etc.
This issue occurs because the Imprivata agent process (ISXAgent.exe) is started automatically by a service (SSOManHost.exe) when the endpoint computer is logged on. Because of Microsoft security measures, any EXOs do not execute in the context of the non-admin user who is logged on. Disabling UAC does not resolve the issue. The initial permissions under which ISXAgent.exe is launched by SSOManHost services are not enough to allow the EXOs to run.
Workaround
To work around this issue, start ISXAgent.exe external to the Imprivata OneSign SSOManHost service; this ensures that the Imprivata agent running in the context of the generic account auto-logs in and does not require this account to be a "local administrator."
OPTION 1 – Use a Shortcut to Start ISXAgent from the Windows Startup Folder
Always back up the registry before making any changes.
- Open regedit and disable the Imprivata agent launch from the SSOManHost service by setting the DisableLaunch registry key from 0 to 1. This key is located in:
-
-
64—bit: HKLM\Software\SSOProvider\ISXAgent
-
- Create a shortcut to ISXAgent using the following command: "C:\Program Files (x86)\Imprivata\OneSign Agent\x64\ISXAgent.exe" /norelaunch
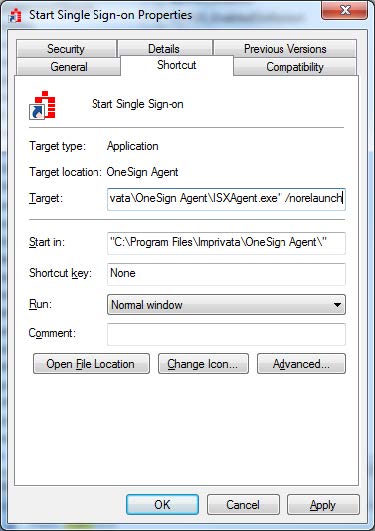
- Copy this shortcut to the Windows Startup folder for All Users.
OPTION 2 – Start ISXAgent by adding an entry to "userinit" in the registry
Always back up the registry before making any changes.
-
Open regedit and disable the Imprivata agent launch from the SSOManHost service by setting the DisableLaunch registry key from 0 to 1. This key is located in:
-
-
64-bit: HKLM\Software\SSOProvider\ISXAgent
-
- Go to HKLM\SOFTWARE\Microsoft\Windows NT\CurrentVersion\Winlogon
- Edit the Userinit key by adding the following command: "C:\Program Files (x86)\Imprivata\OneSign Agent\x64\ISXAgent.exe" /norelaunch.
- The new value of Userinit should be: C:\Windows\system32\userinit.exe, "C:\Program Files (x86)\Imprivata\OneSign Agent\x64\ISXAgent.exe" /norelaunch
-
