Multiple Accounts
The Multiple Accounts feature is for users who have multiple sets of credentials (accounts) for an application profiled with the Imprivata Application Profile Generator.
You can enable multiple accounts globally or for a limited set of users.
- To enable the multiple user accounts feature for all users, see Enabling Multiple User Accounts for All Users.
- To implement the multiple user accounts feature for a subset of your users, see Enabling Multiple Application Accounts for a Select Population.
NOTE: If you need to use the multiple accounts and the shared credentials feature together, see Using Multiple Accounts with a Credential Store.
When a user authenticates to an application that supports multiple accounts, Imprivata OneSign opens a dialog that lists the user’s accounts for that application as seen in the following image:
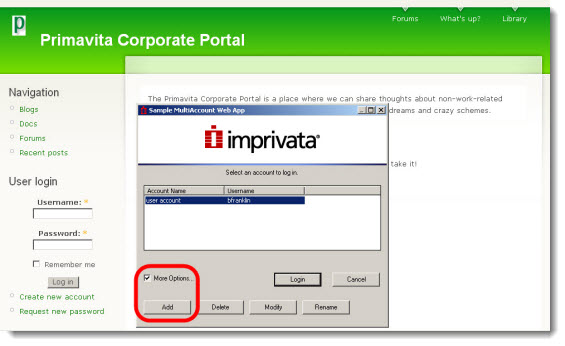
The user has the option to select one of the listed accounts or to create a new account.
You can deploy the application profile with the multiple accounts feature to selected users, or you can deploy it to all users, and then allow users to opt in or out of the multiple accounts feature.
When you enable credential-sharing between applications, the multiple user accounts option must be managed through the credential store. If the credential store shares credentials with a domain, then the account name is always Network Account and users cannot cannot be delete or rename it.
NOTES:
- If a user opts out of Imprivata OneSign Single Sign-On (SSO) for this application by clicking Cancel, the user’s application activity would not be subject to Imprivata OneSign reporting. To prevent this, disallow the bypass option in the Security section of the application record.
- The Reset Credentials feature on the Imprivata agent menu does not reset credentials for applications with multiple accounts. Users can use Modify on the Multiple Accounts dialog to enter new credentials if they are not shared with a domain.
You can allow some or all users to maintain multiple accounts for an application. This is common in situations in which a user accesses an application with different set of credentials for different purposes.
To enable multiple accounts for all enterprise users, select All Users as shown in the following image:
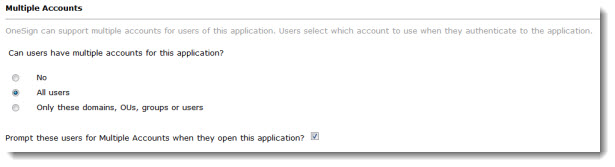
You can also select Only these domains, (OUs), groups or users, as described in Enabling Multiple Application Accounts for a Select Population.
You can restrict the number of users allowed to maintain multiple accounts for an application.
To restrict the multiple accounts option to users in a domain, an OU or a group:
- Select Only these domains, OUs, groups or users.
- Select the domain that you want.
- If you want to apply multiple application accounts for all users in the selected domains, select For All Users, and then click Save.
- If you want to further restrict the population, select These OUs, groups and users.
NOTE: Applications that share credentials in a credential store must configure Multiple Accounts and Password Policy features through the credential store. See Using Multiple Accounts with a Credential Store
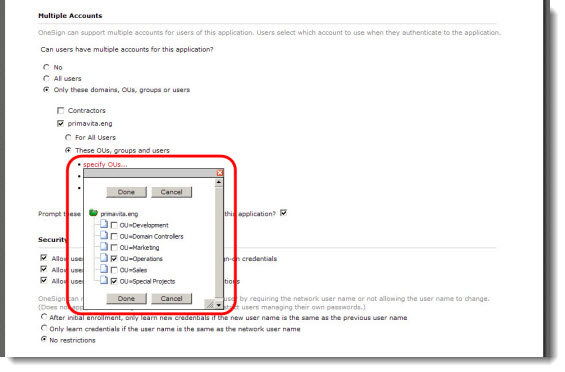
Specifying OUs
To specify OUs:
- Click Select OUs... A dialog opens showing the OUs in that domain.
- Select the organization units to include, and then click Done.
- At the bottom of the application profile page, click Save.
The following image shows multiple OUs selected:
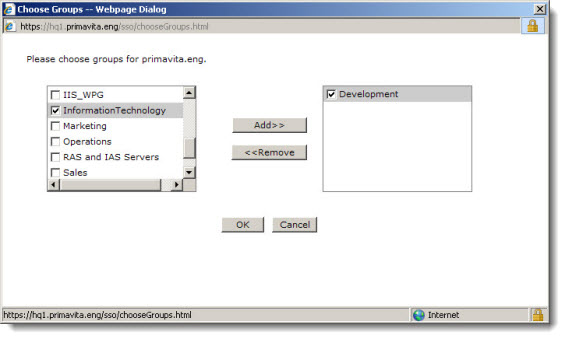
Specifying Groups
To specify domain groups:
- Click Select groups...
- Select the groups to include. A check mark appears next to each selection.
- Click Close.
- At the bottom of the application profile page, click Save.
Note: There is no Save button. Imprivata OneSign saves the selected groups automatically.
The following image shows multiple domain groups selected:
Specifying Individual Users
- Enter one or more user names in the Specify users field. If you enter multiple user names, separate each name with semicolon.
- At the bottom of the application profile page, click Save.