Creating Imprivata Accounts for Non-Domain Users
An Imprivata Directory Domain is a virtual domain that you create to provide accounts for users who are not members of any of your network domains.
For example, if you have a group of temporary workers to whom you want to provide Imprivata services but do not want to have regular network accounts, you can create an Imprivata Directory Domain from which you create user accounts.
NOTE: Imprivata Directory Domain users must use the Imprivata shared kiosk workstation agent.
Imprivata domains are managed on the Directories page (Imprivata Admin Console > Users menu).
Before You Continue
Imprivata recommends that you create one or more user policies for new users. When you import the new users, you will assign a user policy to the entire batch. If you plan to assign different policies, you can assign one to all new users on import and then change them later from the Users page, or you can create a different CSV file for the users that will get each policy.
The CSV file must be created in the five-columns-with-a-header format. A sample image, like the following image, is available from a link in the Upload CSV File section at the bottom of the page.
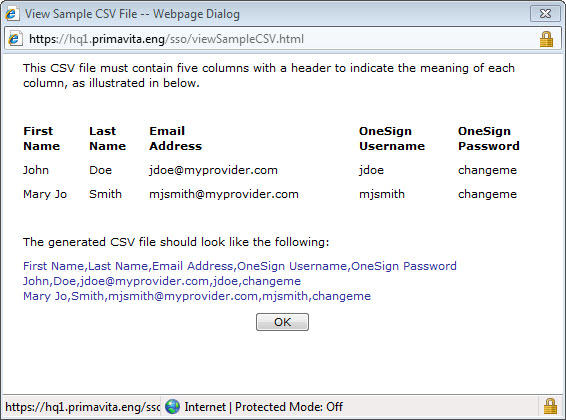
The CSV file must include a header row. No information is taken from the header row, but Imprivata Enterprise Access Management (formerly Imprivata OneSign) assumes a header row is present and ignores its content. If you have no header row, then the first user in the file will be ignored.
The password column can be empty, but it must exist. You will have the opportunity to have Imprivata Enterprise Access Management apply a generic or a random password for these users.
To create an Imprivata Directory Domain from a CSV file:
-
On the the Directories page (Imprivata Admin Console > Users menu), click Add. The Add New Imprivata Domain page opens.
-
Select CSV File under Imprivata Directory.
-
Click Next.
-
In the Imprivata Domain Name field, enter a name for this virtual domain.
-
In the Password Policy section, enter the password requirements. A password policy is required for security.
-
In the Upload CSV File section, enter an initial password for each user. You can:
-
-
Assign a single password for all users (like changeme) .
-
Include passwords in the CSV file (the password column is required).
-
Let Imprivata generate a random password for each user.
-
-
(Optional) Users must change password on their first logon is Yes by default. Change this to No if you do not want users to be prompted to change their password when they first authenticate to Imprivata.
-
(Optional) Send email notification to the new users? is Yes by default. This automatically sends an email notification to each new user, as described in Step 2: Notify Users for Self-Install.
-
Assign a user policy to the new users. If you have not yet created a user policy for these users, see Creating and Managing User Policies.
-
Assign an enabled/disabled status for the new users. For more on enabled/disabled status, see When synchronizing with any directory server: .
-
Upload the CSV file.
-
Preview the import by clicking Preview User.
-
Click Synchronize Now. The new domain is listed on the Directories page.
You can implement a password change policy by selecting Implement Password Change Policy? in the Password Policy section of the domain details (click a domain on the Directories page). A password change policy changes the user’s passwords at an interval that you set. Users will not know their new passwords and will be forced to authenticate by whatever strong authentication method you assigned in their user policies.
You can reuse the CSV file, adding users as needed and deleting others. Then you can keep the Imprivata Directory Domain updated by synchronizing with the same CSV file. Updating from a CSV file updates only the users’ first and last names and email addresses, not passwords.
To update an existing Imprivata Directory Domain:
-
Click the name of the Imprivata Directory Domain to open the record.
Most of the record is the same as when you created the domain, but now you have the option to add and delete users if the source file has changed since the domain was created.
This is an easy way to delete the Enterprise Access Management accounts of users who are no longer in the source CSV file.
-
To add the new users and leave existing user accounts untouched, select Add Only.
To add all the new user accounts and also delete all SSO accounts of users who are no longer in the source CSV file, select Add and Delete.
-
You also have an additional option under the email settings to send a reminder to users who have not logged in.
-
If all the users are new, then select Yes, to all users in this domain.
-
If you have a mix of new users and existing users, select Yes, only to the users who have not logged in. This sends a notification to both new users and users who have not used their Enterprise Access Management accounts.
-
Select No if you do not need to notify these users.
NOTE:You can edit the text of the notification email; see Setting the Mail Server and Standard Messages.
-
-
Assign a user policy to the new users. If you have not yet created a user policy for these users, see Creating and Managing User Policies.
-
Assign an enabled/disabled status for the new users. For more on enabled/disabled status, see When synchronizing with any directory server: .
-
Upload the CSV file.
-
Automate a password change policy as described in Implementing a Password Policy.
-
Preview the import by clicking Preview User. See Preview the synchronization before running or scheduling it. This allows you to verify your expected result when the Imprivata database synchronizes with the directory server: for a description of the Preview page.
-
Click Synchronize Now.