Managing Proximity Cards
This topic provides instructions and best practices for both pre-enrolling/allowlisting and denylisting proximity cards in bulk.
- To configure user policies, including proximity card usage, see Configuring Authentication Methods in User Policies.
- To assess audit reports of proximity card usage, see Using Reporting Tools.
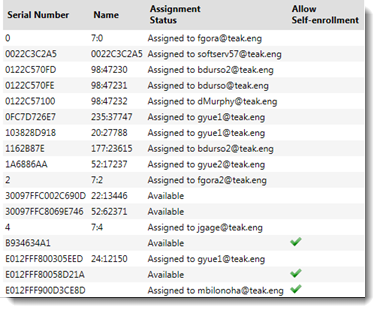
In the Imprivata Admin Console, go to the Devices menu > Proximity cards page. The table lists all the proximity cards that are assigned to users and cards that are available to be assigned.
All the fields are described in Proximity Card Database Fields.
On the Proximity cards page, you can:
-
Export a CSV file of your complete Imprivata proximity card list to assess your proximity card usage;
-
Import a CSV file to add, delete, and modify cards in the list. You can use Imprivata's exported CSV file as a basis for your import, or create your own CSV file.
-
Create an allowlist or denylist to control users self-enrolling unauthorized cards. This can be done by range of card serial numbers to ensure less time spent importing CSV files.
You can also manage your Imprivata proximity card list programmatically via a third-party provisioning system. You can add, delete, and modify proximity cards in the list, but you cannot modify the "allowlist" attribute. Service Provisioning Markup Language (SPML) is used to exchange information between Imprivata and your provisioning system.
This proximity card list directly affects your current proximity card users in your production environment. Before completing any add, delete, or modify operation, save a copy of the list. Saving a copy makes restoring the list easy when necessary:
- In the Imprivata Admin Console, go to the Devices menu > Proximity cards page.
- At the top of the proximity cards list, click the ellipsis button (...) > Export.
- Save the CSV file.
- If you need to restore your proximity card list to this state again, open this CSV file.
- For all cards to be restored, set the Operation field to modify.
- After you successfully import this CSV file, these proximity cards will be restored to their settings from when the list was exported.
When you enable the proximity card allowlist or denylist, you control what specific proximity cards users can self-enroll.
NOTE: The ability to let users self-enroll proximity cards is limited to the Super Administrator.
To create an allowlist:
- In the Imprivata Admin Console, go to the Devices menu > Proximity cards page.
- Select Enforce self-enroll setting.
With this selection, users can only self-enroll a proximity card when:
- The card is listed on the Proximity cards page, and
- the assignment status is set to Available, and
- a check mark appears in the column Allow Self-enrollment.
-

If a user attempts to enroll a proximity card that does not appear on the allowlist, or does appear on the denylist, an error message appears.
NOTE: This setting does not affect cards already assigned to or self-enrolled by users, and it does not prevent you from enrolling a card on behalf of a user.
Another option for restricting enrollment to specific card IDs is to allowlist or denylist by a range of cards. For example, some organizations may choose to enroll in the HID Corporate 1000 program. This program ensures unique card IDs for every user in their organization.
NOTE: The ability to let users self-enroll proximity cards is limited to the Super Administrator.
To manage proximity cards by range:
- In the Imprivata Admin Console, go to the Devices menu > Proximity cards page.
- Select Enforce self-enroll setting.
- Under Proximity card rules is a table where you enter the necessary card range with the respective minimum/maximum value and Rule Type.
- After creating a card range and assigning either an Allowlist or Denylist rule type, click Save.
Note: Enrolled cards with an enrolled ID will not be affected by the addition of an allowlist or a denylist because this process is enforced only at enrollment.
Managing Your Proximity Cards
This section describes the following tasks:
You can assess the current state of your enterprise's proximity card usage by exporting the Imprivata proximity card list as a CSV file:
- In the Imprivata Admin Console, go to the Devices menu > Proximity cards page.
- At the top of the proximity cards list, click the ellipsis button (...) > Export.
- Save and open the CSV file.
- Sort the list as needed to assess your proximity card usage.
For example, even with the Enforce self-enroll setting allowlist enabled on an existing enterprise, there may be enrolled proximity cards in use that are not included on your allowlist. (The Enforce self-enroll setting allowlist does not affect cards already in use.)
With the export and import functions, you can:
- Examine the exported CSV file to locate any cards you want to exclude from your environment;
- Assign new cards to the affected users;
- Delete the unauthorized cards from Imprivata, and
- Prevent users from self-enrolling unauthorized proximity cards in the future.
To import all your proximity cards while retaining the enrollment status of cards already in use, first you must create a list of all cards to be imported, and a list of currently enrolled cards.
Create A List of Cards To Be Added
- In the Imprivata Admin Console, go to the Devices menu > Proximity cards page.
- At the top of the proximity cards list, click the ellipsis button (...) > Bulk update proximity cards.
- Click Download a sample CSV file.
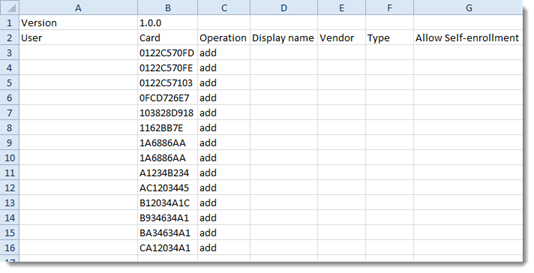
- Use this CSV file as a template for adding all your unenrolled proximity cards:
-
- Enter all your cards in the Card column.
- Set the Operation field to add. This list can include a mix of unenrolled cards and cards already enrolled and in use: after you import this list, you will immediately import and re-enroll the list of currently enrolled cards. Their enrollment status will be immediately restored.
- Optional — You can also add proximity cards to the allowlist and pre-enroll cards. See Database Fields
-
- Save this file and set it aside. Next you need to export a CSV of the currently enrolled cards.
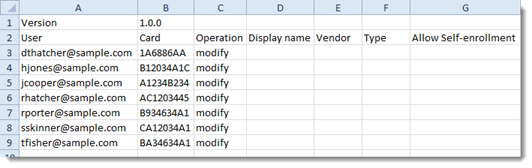
Create A List of Currently Enrolled Cards
- At the top of the proximity cards list, click the ellipsis button (...) > Export.
- Open the CSV file and sort the list by the User field.
- Delete all rows without a user listed. The remaining rows are your enrolled cards.
- Set the Operation field for all rows to modify.
-
- Save the file. Next you need to import both lists.
Import Both Lists
To import all your proximity cards while retaining the proper enrollment status of cards already in use, import all your cards, then immediately overwrite that list with a list of enrolled cards.
- At the top of the proximity cards list, click the ellipsis button (...) > Bulk update proximity cards.
- Click Browse and choose the CSV file that contains your unenrolled proximity cards.
- Click Next.
- Confirm the quantity of cards to be updated is accurate, and click Go.
- Click Close when the import is complete.
-
NOTE: At this point in the process, all your cards are imported, but cards on the list that were already enrolled with Imprivata are unassigned from their users. Proceed immediately to Step 6.
- Immediately repeat this process with the CSV file that contains your currently enrolled proximity cards. This step reassigns your cards to their users.
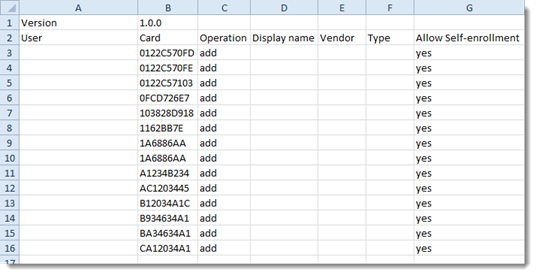
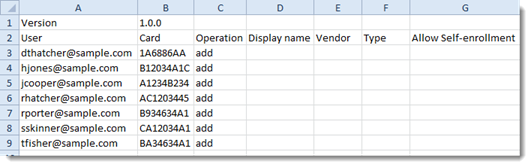
By importing your proximity card data via a CSV file, you can add available proximity cards to the allowlist for users to self-enroll.
In the example CSV file below, the User field is blank for each card, Operation is set to add, and Allow Self-enrollment is set to yes.
After you successfully import this CSV file, these proximity cards are available for self-enrollment by users.
Imprivata does not replace all proximity cards in its database with the contents of the CSV file. Only the cards listed in the imported CSV file are added, deleted, or modified. The remainder of the Imprivata proximity cards remain intact.
By importing your proximity card data via a CSV file, you can enroll proximity cards to users. The user will not have to enroll the proximity card; the card is ready to use when they receive it.
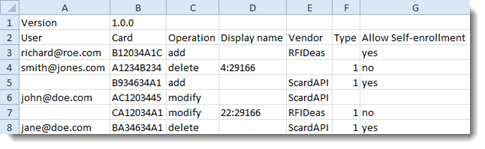
In the example CSV file below, the User field includes the user@domain data for each card, and Operation is set to add. Allow Self-enrollment does not need to be set.
After you successfully import this CSV file, these proximity cards are ready to use.
Imprivata does not replace all proximity cards in its database with the contents of the CSV file. Only the cards listed in the imported CSV file are added, deleted, or modified. The remainder of the Imprivata proximity cards remain intact.
To un-enroll users from their proximity cards but keep the cards in Imprivata, use the modify operation and remove the user@domain information from the User field. Allow Self-enrollment can be set to yes or no.
After you successfully import this CSV file, these proximity cards are available to be assigned to a user.

You can also un-enroll a user from a proximity card on the user's details page:
- In the Imprivata Admin Console, go to the Users menu > Users page.
- Select the user who you want to un-enroll from their card.
- Go to the Authentication Methods section > Proximity Card > Delete Proximity Card Enrollment Data?
- Select the card or cards you want to un-enroll from the user.
-

-
Click Save.
To delete a proximity card from Imprivata (for example, if it is lost, stolen, or an unauthorized card), use the delete operation.
To prevent anyone from self-enrolling this proximity card in the future, you must also have the Enforce self-enroll setting selected at the top of the Proximity cards page. See Creating an Allowlist.

Proximity Card Database Fields
This section describes all the available fields for importing proximity card data to Imprivata.
Version
The version of the format of the CSV file, to track Imprivata's changes to this feature in the future.
User
The username@domain for the user as it appears in the Imprivata list.
This field populates the Assignment Status column on the Proximity cards page. When the proximity card is assigned to a user, this does not necessarily mean the user has received the card or started using it yet, only that they are assigned to use the card.
When enrolling users to proximity cards via the CSV file, Imprivata does not enforce the number of cards a user is allowed to enroll as set in user policy.
To make a card available to be assigned or enrolled, leave this field blank.
When a user is entered in this field, Imprivata will try to resolve the user against all the usernames in the Imprivata database from the specified domain. Any misspellings or mismatches with the Imprivata user database will return an error message and the user cannot be added.
Card
This field must exactly match the proximity card number as it appears in the Imprivata database.
This field is not validated against the Imprivata database except to prevent duplicate entries from being created. If a card number already appears in the database, the existing entry will be modified as needed rather than a duplicate card being added.
NOTE: The number printed on the card and the number in the Imprivata database are not necessarily the same. Also, the card number that appears in the Imprivata database may differ depending on the model of proximity card reader from which the card is read. Contact Imprivata Customer Support for assistance with correctly formatting the Card entries to be successfully imported.
Operation
Valid entries in the Operation field - note that these values must be lowercase:
- add — Adds the card and its associated information to the database.
- delete — Deletes the card and its associated information from the list. Do not use the delete operation if you want to unenroll a user from a card but keep the card in the database.
- modify — To make edits to the card data, including unenrolling the user from the card.
This field is validated when the CSV file is imported. If this field is blank or includes any other entry, the row is skipped regardless of changes in the other fields.
Display name
May be the same as the serial number printed on the outside of the proximity card. This field may be populated in the Imprivata database when the card is first tapped on a proximity card reader. The field can be populated or edited with the CSV import as well. This field is not validated against the proximity cards in the Imprivata database and is not currently used.
Vendor
The proximity card vendor. This is field may be populated in the Imprivata database when the card is first tapped on a proximity card reader. The field can be populated or edited with the CSV import as well. This field is not validated against the proximity cards in the Imprivata database and is not currently used.
Type
This field may be populated in the Imprivata database when the card is first tapped on a proximity card reader. The field can be populated or edited with the CSV import as well. This field is not validated against the proximity cards in the Imprivata database and is not currently used.
Valid entries in the Type field:
- any integer — If a non-integer character is entered in this field, the row is skipped.
- (blank) — This field may be left blank.
Allow Self-enrollment
When Enforce self-enroll setting is selected at the top of the Proximity cards page, the Allow Self-enrollment field controls whether this proximity card can be self-enrolled by a user.
NOTE: The ability to let users self-enroll proximity cards is limited to the Super Administrator.
This setting does not affect cards already self-enrolled by users, and it does not prevent you from enrolling a card on behalf of a user.
Valid entries in the Allow Self-enrollment field:
- yes — The card is on the allowlist. The card can be self-enrolled by a user if the User field is blank.
- no — The card is excluded from the allowlist. If a user attempts to enroll the card, they will receive an error message.
- (blank) — Proximity cards that are already in the database might have no entry in this field.
This field is validated when the CSV file is imported. If this field includes any other entry, the row is skipped and an error message is returned.
Troubleshooting
When a user attempts to enroll a proximity card not included on the allowlist, an error message appears, "This card cannot be used. Try another card or contact your help desk."