Deploy the Imprivata Agent via MSI Push
When you distribute the Imprivata agent to multiple endpoint computers by using an MSI push, you need the MSI file for the agent that matches the target computer’s operating system, either 32-bit or 64-bit.
NOTES:
-
The user’s computer must have Windows Installer 3.1 or later.
-
If you want to install the agent from the command line, see Distributing the Imprivata Agent from the Command Line.
-
For standard msiexec options, you may want to run "msiexec /?" on the target operating system. Options vary by Windows Installer version. If that is not an option, see https://msdn.microsoft.com/en-us/library/cc185688(VS.85).aspx.
-
If you want to install the agent on thin clients on Microsoft Windows Embedded thin clients, see Installing the Imprivata Agent on Thin Clients With Microsoft Windows Embedded Operating Systems
When installing the Imprivata agent, an Internet connection is not needed. However, the endpoint computer must have an Internet connection for the Chrome browser to acquire the Imprivata OneSign extension from the Chrome Web store. Without it, Imprivata OneSign will not work for Chrome profiled applications. Also, an Internet connection will be necessary when any updates or upgrades are applied to the extension through the Chrome Web store. To confirm the Imprivata OneSign extension was installed, use the "Customize and control Google Chrome" tab to the right of the search bar. Click More tools > Extensions to view the Imprivata OneSign extension.
You can download the MSI files directly from Imprivata Admin Console: go to the Computers menu > Deploy agents option.
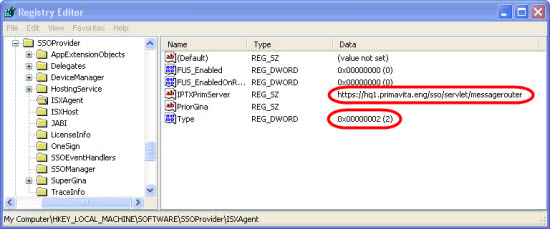
Each endpoint on which the Imprivata agent is installed needs an IPTXPrimServer value that tells the agent where to download Imprivata enterprise information when the agent first communicates with the Imprivata enterprise.
Also in the registry is the setting that controls the Imprivata agent behavior:
-
Type 1 — The Imprivata agent for single-user computers
-
Type 2 — The Imprivata agent for shared kiosk workstations
-
Type 3 — The Imprivata agent for Citrix or Terminal servers
If your enterprise is only licensed for Imprivata Enterprise Access Management with MFA (formerly Imprivata Confirm ID), only the Single-User Computer agent (Type 1) is supported.
The IPTXPrimServer value and agent type are located at:
- 64—bit Windows agents — HKEY_LOCAL_MACHINE\SOFTWARE\SSOProvider\ISXAgent
IPTXPrimServer value is in the format: https://<fully-qualified domain name>/sso/servlet/messagerouter
To install the Imprivata agent:
-
In the Imprivata Admin Console, go to the Computers menu > Deploy agents option and select the installer type you want to run (32-bit or 64-bit).
-
Save or run the file, Click Open to run the InstallShield Wizard, and complete the wizard by entering appliance details and agent type.
On the Installation Options page, you must enter a fully-qualified domain name in the Appliance DNS field.
After the computer has restarted and a user authenticates:
-
The Imprivata icon appears in the Windows Notification area.
-
The computer is listed in the computers list on the Computers page.
-