Deploy to a VMware ESX Thin-Provisioned Environment
Download a PDF of this guide.
Imprivata virtual appliances can be deployed using VMware ESX thin-provisioning. These appliances have the same performance as standard virtual appliances, as determined by the ESX infrastructure. Disk provisioning selection does not affect memory, CPU, and other Imprivata virtual appliance allocations.
Thin-provisioned virtual appliances never shrink in size when space is allocated by the hypervisor. This is a limitation of ESX Thin Provisioning, and is not limited to the Imprivata virtual appliance. You may see significant increases in Imprivata virtual appliance disk sizes if an appliance is unreachable for replication traffic in a problem situation. The only way to recover disk space is to replace appliances (see Replacing Existing Imprivata Virtual Appliances with Thin-Provisioned Imprivata Virtual Appliances).
Managing Thin-Provisioned Virtual Appliances
Carefully monitor the virtual appliance deployment space, for both the hypervisor (datastore) and the storage device (local disk, SAN, NFS). The initial thin-provisioned size of the virtual appliance is about 20 GB. The maximum thin-provisioned virtual appliance disk usage is 250 GB plus 8 GB of memory. The virtual appliance guest assumes it has a 250 GB disk available. If the storage device or datastore runs out of space, then the virtual appliance fails at the first event that requires more disk space. You can monitor virtual appliance disk usage in ESX, in the Imprivata Appliance Console System page Operations tab
There is no warning if the hypervisor cannot allocate more disk space for the Imprivata virtual appliance. The host and Imprivata continue to operate normally until disk space runs out, and then unpredictable problems occur. Assume that, in this case, Imprivata Enterprise Access Management shuts down and does not provide service to users.
Replacing Existing Imprivata Virtual Appliances with Thin-Provisioned Imprivata Virtual Appliances
To replace existing virtual appliances with thin-provisioned virtual appliances:
-
Remove the existing Imprivata virtual appliance from the enterprise. Confirm that the virtual appliance is powered off.
-
Deploy the new thin-provisioned Imprivata virtual appliance.
-
Synchronize the enterprise database from the Imprivata Appliance Console System page > Operations tab.
-
Add the thin-provisioned virtual appliance to the enterprise.
-
Delete the original virtual appliance.
Deploying a Thin-Provisioned Imprivata Virtual Appliance
To deploy a virtual appliance to a thin-provisioned ESX disk:
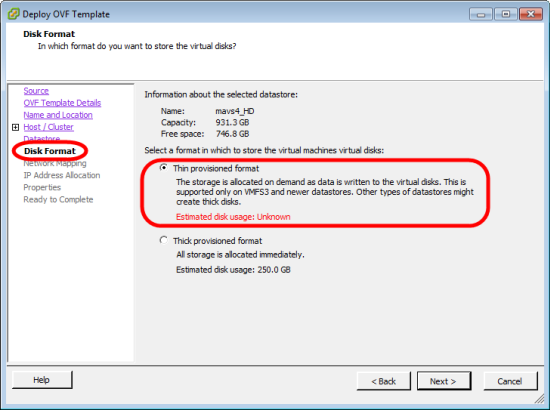
- Log into VMware vSphere Client and Create a new virtual machine as you would for a standard VM, but for Disk Format, select Thin provisioned format instead as shown in the following image:
- Complete the process and deploy as you would for a thick-provisioned VM.
NOTE: As with all thin-provisioned VMs, the Used Storage grows over time and never diminishes of its own accord.
As the SAN fills up, you may want to recover some of that space. See Replacing Existing Imprivata Virtual Appliances with Thin-Provisioned Imprivata Virtual Appliances