Configuring Citrix Workspace App for Imprivata Enterprise Access Management
This
For more information on how to create a Group Policy to enable Fast Connect, see Citrix Support.
Download a PDF of this guide
Before You Begin
Review the following requirements and prerequisite steps before you begin.
Before you begin:
-
See the Enterprise Access Management with SSO Supported Components to identify supported Citrix Workspace app versions.
-
Download the Citrix Workspace app installer from the Citrix Support site.
Support for Citrix Workspace app requires the following:
-
Install Citrix Workspace app with a user that has administrator privileges.
-
Single sign-on (pass through) authentication must be enabled during the installation.
- Do not specify an account (Store URL or XenApp Services URL) as part of the installation. This guide details how to configure a GPO to automatically connect endpoint computers to the required account when Citrix Workspace app starts.
-
Restart the endpoint computer after the installation.
Configuring the GPO with the Citrix store URLs prevents you from having to:
-
Add them when installing Citrix Workspace app
-
Provide them to end users to add them manually to Citrix Workspace app.
Before you begin, use Citrix Studio to note the required URLs.
Additional Citrix configuration is required to support the Citrix FastConnect API.
The Citrix store must be configured with the following authentication methods to support the Citrix FastConnect API:
-
User name and password
-
Domain pass-through
-
HTTP basic — Even if the store is configured for HTTPS, this authentication method is required.
To configure the required authentication methods:
-
Open Citrix Studio.
-
Go to Citrix StoreFront > Receiver for Web.
-
Select the store you want to manage.
-
In the Store Web Receiver pane, click Choose Authentication Methods.
-
Click Add/Remove Methods and enable the required methods.
The Citrix store logon method (logonMethod) must be configured for single sign–on to support the Citrix FastConnect API.
To verify the logon method:
-
From the Citrix StoreFront server, go to the following location:
C:\inetpub\wwwroot\Citrix\<name_of_store>
-
Open the web configuration file and find logonMethod.
-
Verify that the value is set to sson. For example:
pnaProtocolResources changePasswordAllowed="Never" logonMethod="sson"
Configuring Citrix Workspace app with Enterprise Access Management requires the following template files:
-
receiver.admx
-
receiver.adml
To make these templates available to the Group Policy Management Editor, add them to the Central Store on the domain controller.
Locate the Templates
You can locate the templates in the following ways:
-
Citrix makes the templates available separately from the Citrix Workspace app installer. Go to the Citrix Workspace app for Windows download page. The ADMX/ADML templates are available in the Admin Tools section.
-
The templates are installed with Citrix Workspace app.
-
The ADMX file is located at "C:\Program Files (x86)\Citrix\ICA Client\Configuration".
-
The ADML file is located at "C:\Program Files (x86)\Citrix\ICA Client\Configuration\en-US".
-
Add the Templates to the Central Store on the Domain Controller
Managing Group Policy settings requires that all ADMX/ADML files be added to the Central Store on the domain controller. To add the administrative templates:
-
Log into the domain controller.
-
Go to C:\Windows\SYSVOL\domain\Policies and create a PolicyDefinitions folder to function as the Central Store.
-
Go to C:\Windows\PolicyDefinitions and copy all of the contents, including the en-US folder, to C:\Windows\SYSVOL\domain\Policies\PolicyDefinitions.
-
Add receiver.admx to C:\Windows\SYSVOL\domain\Policies\PolicyDefinitions.
-
Add receiver.adml to C:\Windows\SYSVOL\domain\Policies\PolicyDefinitions\en-US.
-
If the Group Policy Management Editor is open, close the console for the changes to take affect.
The procedures in this guide detail how to configure the GPO to control how Citrix Workspace app reconnects to existing application sessions. Citrix Workspace app SelfService must be configured with the Disabled option.
The Disabled option is required, regardless of the desired end user workflow and application session (roaming) requirements.
NOTE: For information about configuring SelfService, see Configuring Citrix Workspace App for Imprivata Enterprise Access Management.
The following sections detail common end user workflows.
Session Roaming — Enterprise Access Management does not Launch Applications Automatically
Desired end-user workflow:
-
The user authenticates to workstation A.
-
The applications to which the user is entitled are loaded automatically to the start menu, desktop, or both.
-
The user launches one or more applications manually.
-
The workstation becomes locked through user action/inaction or remains active and unlocked.
-
The user authenticates to workstation B.
-
The applications to which the user is entitled are loaded automatically to the start menu, desktop, or both.
-
All applications that remain open from step 4 are launched automatically (roamed).
Session Roaming — Enterprise Access Management Launches Applications Automatically
Desired workflow:
-
The user authenticates to workstation A.
-
The applications to which the user is entitled are loaded automatically to the start menu, desktop, or both.
-
The applications that are configured in the user policy automatically launch.
-
The workstation either becomes locked through user action/inaction or remains active and unlocked.
-
The user authenticates to workstation B.
-
The applications to which the user is entitled are loaded automatically to the start menu, desktop, or both.
-
The applications that are configured in the user policy automatically launch.
Applies to Citrix 2109 and later.
In Citrix 2109 and later, the Virtual channel allow list policy setting is enabled by default. This causes the Imprivata virtual channel to fail. For more information, see the Citrix documentation.
The Virtual channel allow list policy setting enables the use of an allow list that specifies which virtual channels are allowed to be opened in an ICA session. There are two ways to allow the Imprivata virtual channel to run in Citrix 2109 or later:
-
When disabled:
-
All virtual channels are allowed.
NOTE:The Imprivata virtual channel must be explicitly allowed in the allowed list. While Citrix has documented that disabling all virtual channels is allowed, Imprivata testing has determined that to be insufficient.
-
This is not recommended.
-
-
When enabled:
-
Only Citrix virtual channels are allowed
-
The Imprivata virtual channel must be added to this allow list.
For example:
IMP1166,C:\Program Files (x86)\Imprivata\OneSign Agent\x64\SSOManHost.exe
-
To use custom or third-party virtual channels, add the virtual channels to the list.
To add a virtual channel to the list:
-
Enter the virtual channel name followed by a comma, and then the path to the process that accesses the virtual channel.
-
You can add additional executable paths, separating the paths by commas.
For example:
CTXCVC1,C:\VC1\vchost.exe
CTXCVC2,C:\VC2\vchost.exe,C:\Program Files\Third Party\vcaccess.exe
IMP1166,C:\Program Files (x86)\Imprivata\OneSign Agent\x64\SSOManHost.exe
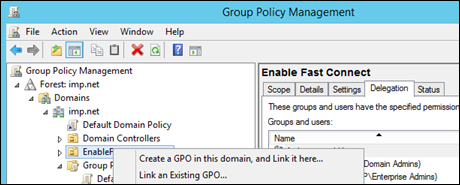
Create A Group Policy to Manage Fast Connect Configuration
Create an organizational unit (OU), add your endpoint computers to it, and then create a GPO to configure the endpoint computers.
-
From the domain controller, open the Active Directory Users and Computers console.
-
In the console tree, create an organizational unit (OU) for your endpoint computers.
-
Add or move the required endpoint computers to the OU.
-
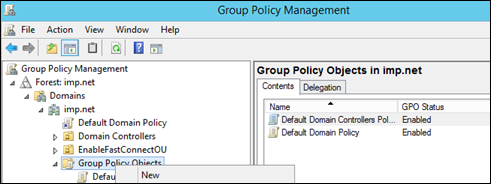
From the domain controller, open the Group Policy Management Console.
-
In the required domain, select Group Policy Objects > New.
-
In the New GPO window, name the GPO and click OK.
Click to enlarge.
To add the Citrix Administrative templates to the group policy object:
-
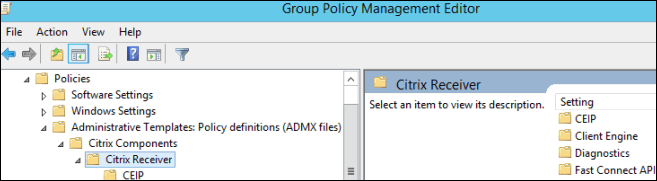
Right-click the new GPO and select Edit. The Group Policy Management Editor opens.
-
Go to Computer Configuration > Policies > Administrative Templates Policy Definitions (ADMX files) retrieved from the central store > Citrix Components > Citrix Workspace app.
Click to enlarge.
Configure the Group Policy
To configure the required settings:
-
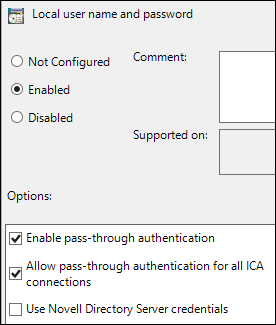
In Group Policy Management Editor tree, select User authentication.
-
In the details pane, double-click Local user name and password.
-
In the Local user name and password window, select Enabled.
-
In the Options pane:
-
Select Enable pass-through authentication.
-
Select Allow pass-through authentication for all ICA connections.
-
Deselect Use Novell Directory Server credentials.
-
-
Click OK.
The settings should match the following screen capture.
Click to enlarge.
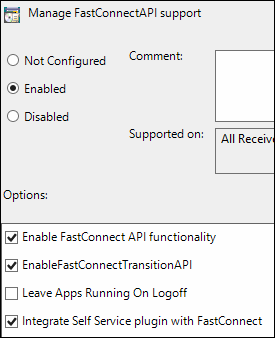
To configure the required settings:
-
In the Group Policy Management Editor tree, select FastConnect API Support.
-
In the details pane, double-click Manage Fast ConnectAPI support.
-
In the Manage FastConnectAPI support window, select Enabled.
-
In the Options pane, select:
-
Click OK.
The settings should match the following screen capture.
Click to enlarge.
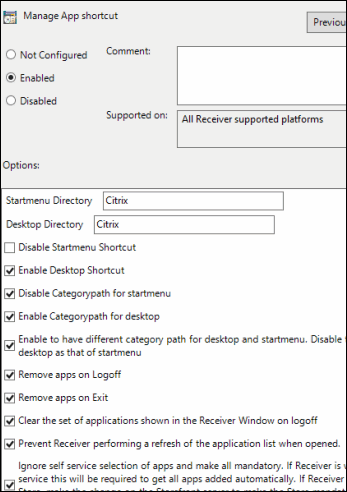
To configure the required settings:
-
In the Group Policy Management Editor tree, select Self Service.
-
In the details pane, double-click Manage App shortcut.
-
In the Manage App Shortcut window, select Enabled.
-
In the Options pane, select:
-
In the Startmenu field: if you want your Citrix apps in a folder on the Start menu, enter a name for that folder here. If this field is left blank, the apps will appear directly on the Start menu.
-
In the Desktop Directory field: if you want your Citrix apps in a folder on the desktop, enter a name for that folder here. If this field is left blank, the apps will appear directly on the desktop.
-
Deselect Disable Startmenu Shortcut.
-
Select Enable Desktop Shortcut.
-
Select Disable Categorypath for startmenu.
BEST PRACTICE: Use Citrix StoreFront categories in the Start menu instead.
-
-
-
Select Enable Categorypath for desktop and Enable to have different category path startmenu.
-
Select Remove apps on Logoff.
-
Select Remove apps on Exit.
-
Select Clear the set of applications shown in the Receiver Window on logoff.
-
Select Prevent Receiver performing a refresh of the application list when opened.
-
Select Ignore self service selection of apps and make all mandatory.
-
-
Click OK.
The settings should match the following screen capture.
Click to enlarge
To configure the required settings:
-
In the Group Policy Management Editor tree, select Self Service.
-
In the details pane, double-click Control When Receiver Attempts to Reconnect to Existing Sessions.
-
In the Control when Receiver attempts to reconnect to existing sessions window, select Enabled.
-
In the Options pane, open Choose the appropriate combination of reconnect conditions, and select Disabled.
-
Click OK.
To configure the required settings:
-
In the Group Policy Management Editor tree, select Storefront.
-
In the details pane, double-click StorefrontAccounts List.
-
In the Storefront Account List window, select Enabled.
-
Click Show.
- In the Show Contents window, enter the store account (Store URL or XenApp Services URL) details using the following syntax:
store_name;store_url;store_enabled_state;store_description
store_name is the name users see for the store.
store_url is the Services URL for the store.
store_enabled_state specifies if the store is available to users. Set to On or Off.
store_description is the description users see for the store.
XenApp Services example: SalesStore;https://example.com/Citrix/SalesStore/PNAgent/config.xml;On;Store for Sales Staff
Store example: SalesStore;https//example.com/Citrix/SalesStore/;On;Store for Sales Staff
NOTE: The store_enabled_state syntax is case-sensitive.
(Optional) This step is required only if your Citrix environment is using Store URLs. Configuring the registry keys requires that you:
-
Add the ConnectionSecurityMode and the ProtocolOrder values to the Citrix AuthManager registry key.
-
Create the Protocols registry key with a httpbasic subkey, which has a value of Enable.
Add the ConnectionSecurityMode Value
To add the value:
-
In the Group Policy Management Editor tree, go to Computer Configuration > Preferences > Windows Settings.
-
Right–click Registry and select New > Registry item.
-
In the New Registry Properties window, select Create from the Action list.
-
From the Hive list, select HKEY_LOCAL_Machine.
-
Enter the following in the Key Path field:
-
64–bit — Software\Wow6432Node\Citrix\AuthManager\
-
-
In the Value name field, enter ConnectionSecurityMode.
-
From the Value type list, select REG_SZ.
- In the Value data field, enter Any. Click OK.
Add the Protocol Order Value
To add the value:
-
In the Group Policy Management Editor tree, go to Computer Configuration > Preferences > Windows Settings.
-
Right–click Registry and select New > Registry item.
-
In the New Registry Properties window, select Create from the Action list.
-
From the Hive list, select HKEY_LOCAL_Machine.
-
Enter the following in the Key Path field:
-
64–bit — Software\Wow6432Node\Citrix\AuthManager\
-
-
In the Value name field, enter ProtocolOrder.
-
From the Value type list, select REG_MULTI_SZ.
-
In the Value data field, enter httpbasic. Click OK.
Create the Protocols registry key
To create the key:
-
In the New Registry Properties window, select Create from the Action list.
-
From the Hive list, select HKEY_LOCAL_Machine.
-
Enter one of the following in Key Path:
-
64–bit — Software\Wow6432Node\Citrix\AuthManager\Protocols\httpbasic
-
-
In the Value name field, enter Enabled.
-
From the Value type list, select REG_SZ.
-
In Value data field, enter true. Click OK.
Configuring Internet Explorer requires that you:
-
Add the domain of the Services URL as a trusted site.
-
Configure user authentication for automatic logon.
Add a Trusted Site
To add a trusted site:
-
In the Group Policy Management Editor tree, go to Windows Components > Internet Explorer > Internet Control Panel > Security Page.
-
In the details pane, open Site to Zone Assignment List.
-
In the Site to Zone Assignment List window, select Enabled.
-
In the Options section, click Show.
-
In the Value name field, type the scheme and domain of the Services URL.
Example: If the URL is
https://example.com/Citrix/SalesStore/PNAgent/config.xml, then enterhttps://example.com. -
In the Value field, type 2 and click OK.
-
Apply the changes to the Site to Zone Assignment List.
Configure User Authentication
To configure user authentication:
-
In the details pane, open Trusted Sites Zone.
-
In the details pane, open Login options.
-
In the Logon options window, select Enabled.
-
From the Logon options list, select Automatic logon with current username and password.
-
Click OK.
Closing the Group Policy Management Editor saves the changes to the GPO. The Group Policy Management utility opens. Your GPO appears in Group Policy Objects in the Group Policy Management tree.
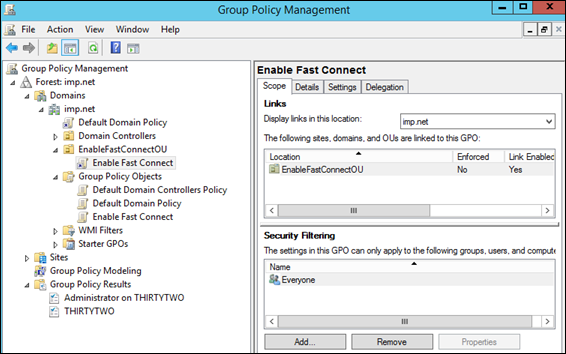
Link The Group Policy Object to the Organizational Unit
-
In the Group Policy Management window, right-click the new OU you created and select Link an Existing GPO.
-
In the Select GPO window, select the new GPO and click OK.
Click to enlarge.
Configure Security Filtering
-
In the Group Policy Management window, navigate to your new OU, select your new GPO, and click the Scope tab.
-
In the Scope tab > Security Filtering section, set the filter as necessary. In this example, the filter is set to Everyone to make this policy accessible to everyone.
Click to enlarge.
Verify the Configuration
All endpoint computers in the OU receive the new GPO settings at the next Group Policy refresh interval. The default interval is 90 minutes. You can verify the configuration with the following methods.
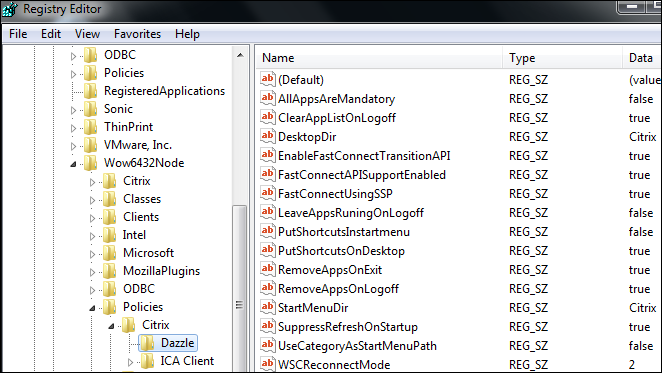
On an endpoint computer in the OU, you can verify the GPO settings are applied by viewing the settings in the registry:
-
Go to:
-
64—bit – HKEY_LOCAL_MACHINE > SOFTWARE > Wow6432Node > Policies > Citrix > Dazzle
-
32—bit – HKEY_LOCAL_MACHINE > SOFTWARE > Policies > Citrix > Dazzle
-
-
Review the settings as configured in Configure Group Policy.
Click to enlarge.
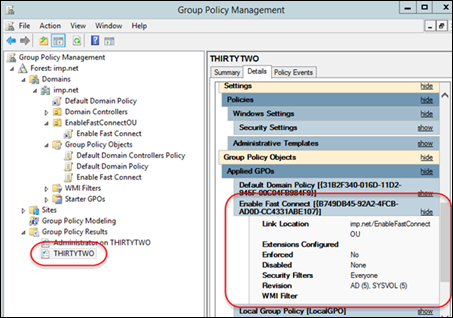
By generating a Group Policy Result Report, you can select a specific endpoint computer to query; the report indicates which GPOs are applied.
-
In the Group Policy Management window, right-click Group Policy Results > Group Policy Results Wizard...
-
In the Computer Selection page, select the computer for which you want to display policy settings, and click Next.
-
In the User Selection page, enter a domain administrator and click Next.
-
Click Finish to close the wizard.
-
The report is not actually run yet; in the Group Policy Management window > Group Policy Results section, right-click the report you just created and click Rerun Query.
NOTE: If the Windows WMI service is disabled or restricted on the endpoint computer, the report will not work.
-
After the report is generated, select the report from the left navigation. In the example below it is named after the endpoint computer THIRTYTWO.
-
In the details pane, select the Details tab. Your GPO is listed in the section Applied GPOs.
Click to enlarge.