Additional Profiling Techniques
The Imprivata APG offers additional profiling techniques for unusual or difficult-to-profile applications, including:
-
Advanced Screen Learning Techniques — Outlines methods for learning screens that are not well understood by the default screen learning probes.
-
Advanced Screen Recognition Techniques — Includes instructions for complex screens, and for using one screen profile to recognize multiple similar screens.
-
Advanced Credential Capture Techniques — Explains how can you can create an independent authentication screen from which you can capture credentials if the standard methods are not effective.
-
Advanced Credential Proxy Techniques — Outlines using the customized keystrokes and mouse clicks featureto help proxy credentials from an authentication screen.
The Imprivata APG includes four additional probes that you can use when you cannot learn the necessary screen fields and credential input controls with the default probe.
|
Use Probe |
Modifier Key |
|
|
UIA |
Alt Alt + Shift |
|
Java applications |
Java |
Alt |
|
MDI nested screens |
MDI |
Ctrl |
|
Hidden fields and controls, not used with IE9 |
GDI |
Shift |
Using the UIA Probe
The UIA probe takes advantage of the Microsoft UI Automation API to learn about the application user interface. This probe can reveal fields and controls that are hidden to the default probe. To invoke the UIA probe, hold down the following while learning the screen:
- Alt
- Alt +Shift if profiling a Java application
NOTE: Due to a known Oracle issue, if the Abstract Windows Toolkit (AWT) UI framework is used to display user controls, the Java application exits unexpectedly when the Imprivata agent proxies credentials. Other Java UI frameworks, such as the Standard Widget Toolkit (SWT) or SWING may not result in this behavior.
Using the JavaHook and Java Access Bridge Probes
When employed on a Java application, Alt-learn invokes the JavaHook probe for Windows/Java applications, and the Java Access Bridge probe for Web/Java applications.
Using the MDI Probe
MDI (multiple document interface) screens appear inside a running application and cannot be dragged outside of the parent application. To use the MDI probe, relearn the screen, while holding down the Ctrl key.
Using the GDI Probe
The GDI probe uses Microsoft’s Graphics Device Interface API to learn about an application’s user interface. To use the GDI probe, relearn the screen while holding down the Shift key. Beginning with Imprivata OneSign version 6.0, this probe no longer supports web applications.
SSO profiles that work for web applications on Internet Explorer 8 may not work at all on Internet Explorer 9 or later. This is because the Graphics Device Interface (GDI) technology of earlier versions of Internet Explorer is no longer supported on Internet Explorer 9 or later. As a result, web applications that were profiled with the Imprivata OneSign Application Profile Generator GDI probe must be re-profiled with the new UIA probe introduced in Imprivata OneSign 4.6 Service Pack 1.
Applications that were not profiled with the GDI probe do not need to be re-profiled. Most web applications do not require the GDI probe and do not need the UIA probe.
BEST PRACTICE: The GDI Probe learns a lot of information. This can lead to bloated profiles and slower performance. The GDI probe should be your tool of last resort.
When a screen opens, the Imprivata agent matches it to the application profiles enabled for the user. The Imprivata agent only recognizes the screen and proxies credentials when the fields and controls in the screen presented match those in one of the application profiles.
Using Wildcards, Escape Characters, Operators, and Expressions
The Imprivata APG supports two wildcard characters and an escape character, three logic operators, and nested parenthetical expressions. You can use Imprivata pattern-matching in all screen recognition fields.
Use the ^ escape character if you need to include the literal *, ?, ^, or parentheses in the string. Put the ^ immediately before the character being escaped.
You can escape a wildcard:
- The string “Hello *” reads the * as a wildcard, so it matches any string that starts with “Hello” and a space.
- The string “Hello ^*” reads the * as a *, so it matches only “Hello *”.
To use wildcards in fields and expressions, see Wildcards.
Logic Operators
You can also use three logic operators to add flexibility. The logic operators can be used in both URL and text-recognition parameters as arguments in a logic expression. To use the logic operators, create two arguments and enclose each argument in single quotes.
- OR confirms screen recognition if one or both arguments are true.
- AND confirms screen recognition only if both arguments are true. AND takes precedence over OR.
- NOT modifies an argument by switching a value from true to false or from false to true. Use NOT to disqualify a specific string. NOT takes precedence over AND and OR.
Parentheses
Parentheses let you group logic expressions to prioritize them and to make them easier to read. Parentheses must be used in pairs and can be nested. There is no practical limit to the number of parentheses you can use.
Expressions are processed from left to right, and arguments in parentheses take precedence. When an expression includes multiple parenthetical arguments, the most deeply nested parenthetical arguments are resolved first.
If a literal string includes parentheses, remember to escape each parenthesis: ^(sample text^)
Wildcards
Use the Imprivata APG wildcards to let the Imprivata agent recognize screens even when there is some minor variation, which could be the result of server load-balancing, directory changes, and other changes that you cannot predict:
- The * matches any set of continuous characters, including spaces.
- The ? matches any single character.
If the URL or title includes a segment that is liable to change, either with each session or each user, then replace that segment with an asterisk wildcard character.
You can also use wildcards for Query Parameters, if you think a value might change every time a user goes to that URL. You can also remove the value in the Imprivata APG by clearing Always Present?
Examples of Wildcard Usage
You can use the wildcard:
- In the hostname as the first character to account for load balancing in URLs:
- In the port address as the only character following the colon:
- In the path at very end:
- For a screen with a changing URL, in the variable part of the URL:
- For a screen with minor text changes between versions or OS, use a wildcard to accept either version:
- or you could use an OR operator (note the single quotes):
- When the Login Failure screen is the Login screen with an error message, use AND NOT to recognize the login page, but disqualify it if the error message is present (note the escaped question mark):
- When the Login failure screen is the Login screen with one of two error messages, use AND NOT and parentheses to accept the Login page, but to disqualify it if either error is present:
https://*.hotmail.passport.com/cgi-bin/login
https://123.45.6.78:*/login.html
https://123.45.6.78:8080/anydirectory/*
https://123.456.*.*/login.htm
Welcome to MyApp version *
’Welcome to MyApp version 5’ OR ’Welcome to MyApp version 6’
’Please log in’ AND NOT ’error:Forget your password^?’
’Please login’ AND NOT (’error:wrong username’ OR ’error:wrong password’)
You can use any combination of the above to resolve a complex situation. For example, if an application uses both http and https protocols to access the login page, you can use: *123.45.6.78:*/login.html
|
Symbol |
Usage |
|
|
* |
Matches any set of continuous characters, including spaces and no characters. |
|
|
? |
Matches any single character. |
|
|
Escape character |
^ |
Includes any of the characters in the symbol column of this table in the string. Put a ^ immediately before the character being escaped. |
|
no symbol |
Confirms screen recognition if one or both arguments are true. |
|
|
no symbol |
Confirms screen recognition only if both arguments are true. |
|
|
no symbol |
Modifies an argument by reversing the logical value. Use this to disqualify a specific string. |
|
|
Parentheses |
Use to prioritize logic operations and to make an expression easier for another Administrator to edit. |
When an Imprivata OneSign-enabled application requests authentication from a user, the user’s Imprivata agent proxies the user’s credentials to the application. Before it can proxy the credentials, the Imprivata agent must first capture them.
The Imprivata APG offers two tools to help ensure reliable credential capture:
NOTE: When learning a Windows application, you may discover more fields if you hold down Shift or Alt+Shift while learning the screen. Try all three methods to see which option gives you the most useful information and the fewest distractions.
The Get Text? Check Box
Get Text is a tool for capturing screen content of a field instead of capturing keyboard input. This is useful when an application pre-populates a credential field, so the user does not have to enter a value from the keyboard. When the Imprivata APG learns the screen controls, it automatically selects the Get Text option for any fields that may need it.
You should always use the default settings first. If an application profile needs more work before it can reliably capture user credentials, examine the application behavior for various user workflows and deselect Get Text? if it makes sense for the application.
NOTES:
- This feature is available for Windows applications and Web applications with Java components only.
- The Send Text feature is used when proxying credentials. See The Send Text? Check Box.
The Imprivata OneSign Credential Enrollment Window
Use an Imprivata OneSign Credential Enrollment Window when Imprivata OneSign cannot find some or all of the user input fields, or when they fail to capture credentials correctly. Imprivata OneSign creates a second, OneSign-readable authentication screen. The new screen opens in front of the application’s login screen.
When you opt to use a Imprivata OneSign Credential Enrollment Window, the Imprivata APG displays a new form for building the OneSign-readable screen.
Some applications can be difficult to profile because they, in some way, modify the credentials proxied to the application for authentication. If an application profile fails to successfully proxy credentials with the default proxy settings, the Imprivata APG offers tools to help:
-
Send Text — Makes sure that the credentials submitted to the application are the characters typed by the user. This feature is described in the The Send Text? Check Box section.
-
Specifying keystrokes before and after individual fields — Lets you make sure that the login fields and controls behave the way the Imprivata agent expects them to. This is available only for Windows applications. Smart Controls are described in the Specifying Keystrokes Before and After Individual Fields section.
-
Specify the entire keystroke sequence to use — Lets you control exactly what keystrokes are typed and proxied during a successful authentication, and substitute Imprivata variables for the user credentials. You may need to use this feature for applications that require a credential enrollment window to capture credentials. This tool is described in the Specifying the Entire Keystroke Sequence .
The Send Text? Check Box
Send Text directly sets text in the screen control, instead of proxying the user’s keyboard input to a field. This is useful when an application obfuscates a credential field so the characters entered by the user do not appear on the screen. When the Imprivata APG learns the screen controls, it automatically selects the Send Text option for any fields that may need it.
You should always use the default settings first. If an application profile needs more work before it can reliably proxy user credentials, examine the application behavior for various user workflows and deselect Send Text? if it makes sense for the application.
NOTES:
- This feature is available for Windows applications and Web applications with Java components only.
- The Get Text feature is used when capturing credentials. It is detailed in The Get Text? Check Box.
Specifying Keystrokes Before and After Individual Fields
Some Windows applications exhibit behavior that makes it difficult to proxy user credentials. These applications may require keystrokes before and after the screen, and before and after each field within the screen. The Imprivata APG lets you modify the controls as needed.
- When you select Use customized keystrokes and mouse clicks, the text becomes a link. When you click the link, a window opens that lets you customize the information submitted for each field in the screen.
- Try Specifying keystrokes before and after individual fields before trying to specify the entire keystroke sequence. You do not have to modify all controls. If you know which controls are causing problems, then you can restrict your modifications to those controls.
For more information, see Features of the Specify Keystrokes Before and After Individual Fields Tool and Example: Using the Specify Keystrokes Before and After Individual Fields Tool.
NOTE: This feature is not available for all application types. If it does not appear, then it is not supported for the application type you are profiling.
Features of the Specify Keystrokes Before and After Individual Fields Tool
NOTE: Specifying keystrokes before and after individual fields is applicable only to Windows Applications.
The Imprivata APG uses the flexible Imprivata OneSign Keystroke Vocabulary. A summary of keystroke syntax and the glossary of variables is available from a link on the page where you edit the control fields. Imprivata OneSign keystroke syntax and variables are fully detailed in Imprivata OneSign Keycodes and Variables.
The Imprivata APG keystrokes can be concatenated, but they take no logical operators, wildcards, or escape characters.
-
Keystrokes to activate or set focus on the screen — Some screens do not have focus when they are presented. Enter the keystrokes that set focus on the screen, so Imprivata OneSign can capture or inject the credentials.
{CLICK 30,30} is a common pre-screen keystroke. It sends a keystroke that would be sent if you positioned the cursor 30 pixels horizontally and vertically into the screen and then clicked with the mouse.
-
Keystrokes to activate or set focus on the field — Some fields have unselected text already in them when you open the screen. For example, the username may be pre-populated from the last use. If Imprivata OneSign injects credentials where there is unselected text, then it simply gets appended to the text. The resulting string is not the intended credentials.
- {HOME}+{END}{DEL} is a common pre-field keystroke sequence. It selects and deletes any pre-existing unselected text in the field.
-
Keystrokes to submit the credentials for the field — Some applications are relatively slow, and Imprivata OneSign injects credentials sooner than the application can take them.
{PAUSE 30} is a common keystroke. It causes Imprivata OneSign to wait for 30 milliseconds before continuing. {PAUSE 30} also finds common use in Keystrokes that must follow entry of credentials, for the same reason.
For the complete list of Imprivata OneSign keystrokes, refer to the Imprivata OneSign Keycodes and Variables.
Example: Using the Specify Keystrokes Before and After Individual Fields Tool
Advanced profiling can be challenging. The most common problems follow a pattern that the following procedure can solve.
To work out a difficult authentication screen:
-
Launch the target application. If it is already open, close it and launch it again, but do not click anywhere in any screen.
-
Open the application profile to the Configure Screen page.
-
Does the application screen have focus? If not, establish focus: In Keystrokes to activate or set focus on the field, enter {CLICK 30,30}, then save and test the profile.
-
Is the credential field prepopulated and unselected? If there is unselected text in the field, then select and delete it: in Keystrokes to activate or set focus on the field enter {HOME}+{END}{DEL}, then save and test the profile.
-
Are the credentials being correctly injected into the field? If you know a password is 8 characters and only 5 are being injected, then Imprivata OneSign may be getting ahead of the application: in Keystrokes to submit the credentials for the field enter a {PAUSE 30} to slow down a little. Then save and test the profile. If the situation is improved but not resolved, increase the pause to 60 or 100 ms.
-
When the application profile works, click Save.
-
If you are editing a previously deployed application profile, you can re-deploy it now. If it is a new application profile, then deploy it from the Imprivata Admin Console SSO page.
-
If it is still difficult, especially if you used a Credential Enrollment Window, then you may need to record the entire keystroke sequence, as described in Specifying the Entire Keystroke Sequence.
Specifying the Entire Keystroke Sequence
Sometimes Imprivata OneSign’s default method of proxying credentials does not match an application’s login process. Some applications do not use standard practices, implement proprietary technologies, or have custom workflows. For example, a password box may only appear after the user name has been validated. In these cases, the Customized Keystrokes and Mouse Clicks feature lets you reproduce the steps the user takes to manually enter credentials.
Use the Customized Keystrokes and Mouse Clicks feature to define specific keystroke sequences to bring focus to fields, navigate between them, and submit credentials into the form.
When you select Use customized keystrokes and mouse clicks, the form expands to allow you to enter keystrokes.
Entering Keystrokes
To enter keystroke information:
-
Use the glossary to type credential variables enclosed in braces {}: as shown in the following image:
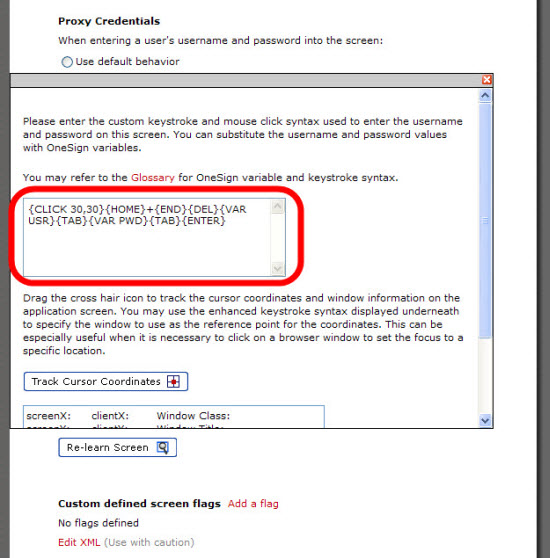
-
Click Save to save the information to the profile.
-
Test the profile before deploying it.
NOTE: The glossary of credential variables keystrokes is available in Imprivata OneSign Keycodes and Variables.
NOTE: Keyboard simulation is an exact process and can be challenging. For additional assistance, contact Imprivata Support.
The Cursor Coordinates Finder tracks the mouse on a target screen. This feature provides the coordinates you need when you use the {CLICK x,y}, {DBCLICK x,y} , or {CTLCURSOR x,y} keystrokes.
To track cursor coordinates:
- Drag the Cursor Coordinates tool to the target screen.
- The mouse cursor coordinates are tracked in the blue Track Cursor Coordinates window.
- Release the mouse button at the point you want tracked.
- The coordinates appear in the upper blue window, along with the window class and title. These help you verify that you have the correct screen.
- The lower window shows the {CLICK} command that you would use to set the cursor at that location in your application profile.