Managing OneSpan (VASCO) OTP Tokens
Imprivata provides support for VASCO (now known as OneSpan) OTP tokens out-of-the-box. Imprivata embeds VASCO's VACMAN middleware and management components within the Imprivata appliance. There is no separate token management server to purchase or maintain.
You can manage VASCO OTP tokens on the VASCO OTP tokens page of the Imprivata Admin Console (Devices menu > VASCO OTP tokens)
Tasks related to managing individual tokens, including assigning available tokens, are described in Managing an Individual OneSpan (VASCO) OTP Token.
When configuring external OTP tokens that are allowed for e-prescribing controlled substances, you are required to attest that the OTP token server is FIPS-compliant and that OTP tokens are properly enrolled per DEA EPCS regulations. This action is logged in the Imprivata audit records. FIPS 140-2 Level 1 compliant tokens are required when used to e-prescribe controlled substances. See Configuring External OTP Tokens for more information.
NOTE: If you are transitioning from RSA SecurID or Secure Computing SafeWord tokens to OneSpan OTP tokens, you can use both SecurID or SafeWord and OneSpan OTP tokens in the same Imprivata system.
This topic includes instructions on managing OneSpan OTP support.
To review the VASCO kernel parameter values, go to the gear icon > License > Additional Features section > VASCO OTP Token Authentication option, then click Configure Kernel Parameters
NOTE: Consult your VACMAN Controller documentation before changing these values.
Use the VASCO OTP Tokens page to manage existing or imported VASCO OTP tokens.
To sort the tokens by token Serial Number, Assignment Status, or Model, click on the column heading.
If you have a long list of tokens, you can search by Serial Number and by Assignment Status (Available, Assigned, and Lost).
When searching by serial number, the search looks for any VASCO OTP token serial number containing the string you enter; you can enter only a portion of a serial number to display a list of tokens that include that string.
You can import VASCO OTP tokens at any time. You can have an unlimited number of VASCO OTP tokens on the VASCO OTP Tokens page, but you can only enable as many users as you have VASCO OTP Token Authentication licenses.
To import VASCO OTP tokens, you need:
To import tokens via DPX file:
- On the VASCO OTP Tokens page, click Import tokens...The Import DPX File window opens.
- Enter the shipping code.
- Select Yes or No for These tokens are configured only for Imprivata application? (that is, if the tokens are pre-configured for one application only or if they are configured for multiple applications).
- If you selected No, then enter the application name or number that is reserved for Imprivata. If you selected Yes, proceed to the next step.
- Browse to and upload the DPX file.
You can assign or unassign multiple VASCO OTP tokens simultaneously by importing a CSV file containing usernames, associated VASCO OTP token serial numbers, and the token status (assign or unassign)
NOTES:
- You cannot assign or unassign VASCO OTP tokens via CSV file if your enterprise is licensed for Imprivata Enterprise Access Management with MFA. .
- Only Super Administrators can perform this task. Assign Tokens must be selected in the Tokens section of the Super Administrator role record.
To assign or unassign the VASCO OTP tokens via CSV file:
- On the VASCO OTP tokens page, click Assign tokens... The Assign VASCO OTP tokens window opens.
-
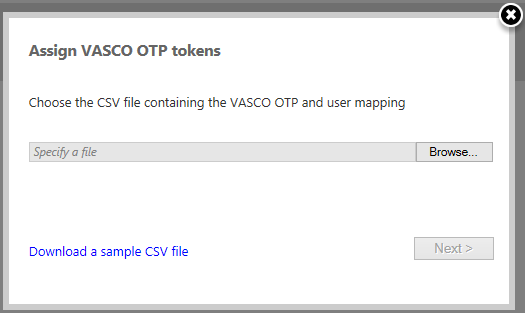
- Browse to and select the CSV file. To download a correctly formatted template, click Download a sample CSV file.
- Click Next. If the CSV file contains valid tokens, then the next screen displays the number of VASCO OTP tokens and the status that will be imported from the CSV file, including a preview of the first three tokens by serial number and associated user name.
- Review the information and click Go if it is correct.
- If the information is not correct, click Back and upload a corrected CSV file.
- The next screen displays the number of tokens that were assigned and/or unassigned. Click Close.
You can delete VASCO OTP tokens when you remove the physical tokens from service. If you want to reassign a token, then do not delete the token but instead change its status as described in Changing Token Status. You can change status to lost, available, or assigned to another user.
To delete VASCO OTP tokens, select them on the VASCO OTP Tokens page and then click Delete.
You can perform a bulk reset operation for multiple VASCO OTP static token PINs, which immediately clears static pins on selected tokens. This feature allows each user with a new token to set her PIN at login.
To reset multiple token pins:
- On the VASCO OTP Tokens page, select multiple tokens.
- Click Reset PIN.
- A message prompts you to confirm resetting the PINs to zero digits.
- Click OK. The user will need to enter a new PIN at login.
VASCO OTP (One-Time Password) plus password authentication provides secure two-factor authentication for PIN-less VASCO OTP token users by employing the user’s Windows network password as a PIN. You can use the same User Policy for both types of VASCO OTP token users.
You assign authentication options through User Policies, and you can override them locally with Computer Policies. For more information see Creating and Managing User Policies and Creating and Managing Computer Policies.
You set remote authentication options separately from local authentication options. Requiring OTP+Password for local authentication does not automatically set the same requirement for remote authentication. To require password with OTP for remote authentication, see Using Password Plus OTP for Remote Authentication.
You can require password-plus-OTP authentication only for remote users, or allow remote users to use OTP alone. This is configured in user policy.
If an Administrator has not assigned VASCO OTP tokens to users, users must self-enroll. See Allow Self-Enrollment to learn how to configure the user policy for VASCO OTP token self-enrollment.
To self-enroll a VASCO OTP token:
-
Log into the computer to invoke an Imprivata authentication.
-
Use your password to log in. The Imprivata enrollment utility prompts you to enroll the OTP token.
-
Follow the utility prompts to enroll the OTP token.
NOTE: If you have a PIN number associated with your VASCO OTP token, enter it with your passcode. For more information, contact your system Administrator.
To create and run an Enrollment report, in the Imprivata Admin Console, go to Reports > Add new report.
The authentication workflow for users with enrolled OTP tokens follows:
- Log into the computer. The Imprivata login window opens.
- Click Use my OTP.
- In the Passcode field, enter the passcode shown on the VASCO OTP token display.
-
NOTE: If you have a PIN or a password, include it with your passcode. Enter a PIN or a password immediately before the passcode. For example, if the PIN or password is “1234” and the passcode is “98765”, then enter “123498765” in the passcode field.
- Click OK.
The VASCO OTP tokens properties page displays information about a specific VASCO OTP token. Each VASCO OTP token has its own properties page. See Managing an Individual OneSpan (VASCO) OTP Token.