PagerDuty: Imprivata Web SSO Setup
Configuring Imprivata Web SSO establishes trust between Imprivata as the Identity Provider (IdP) and PagerDuty as the Service Provider (SP).
PagerDuty does not support Single Log Out with Imprivata WebSSO. For best security, at the end of their session, users must log out of PagerDuty and close the browser. This will prevent a user from accessing another user’s session by mistake.
Imprivata Web SSO with SAML extends Single Sign-On functionality to SAML applications. Imprivata Web SSO uses SAML 2.0 federation standards.
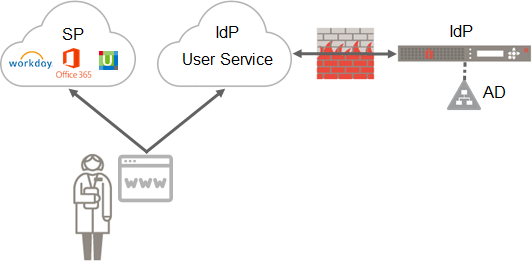
Imprivata Web SSO provides single sign on and secure multi-factor authentication for web applications. Imprivata Web SSO provides a SAML 2.0 Identity Provider (IdP) web service, with which the SAML 2.0-ready applications will integrate. This service in the cloud acts as a front end, with a secure bi-directional connection to your on-premises Imprivata appliances, which in turn access Active Directory. Imprivata Web SSO provides identity management, authentication, and policy enforcement to your SAML applications inside your firewall, extending the Imprivata experience when users themselves access these applications from outside the firewall.
-
The user points her browser to the application — the Service Provider (SP).
You have configured the application to integrate with Imprivata as the Identity Provider (IdP).
-
The application redirects the user's browser to the IdP, sending a SAML Authentication Request.
-
The IdP executes Imprivata's login screen.
-
The user supplies the necessary credentials to authenticate.
NOTE:When the workstation has the Imprivata agent online and the user already logged into the workstation, the user is not prompted for their credentials. See Expected Endpoint Workflows.
-
The IdP generates a digitally signed SAML assertion, and puts it in the HTTP response to the browser, along with instructions to POST the response back to the SP.
-
The browser POSTS the signed SAML assertion to the SP, which validates that the SAML assertion has come from a trusted source.
-
The SP grants access to the user, logging her into the application.
In an Imprivata environment where applications are federated with Imprivata Web SSO IdP, all users need to be licensed for Imprivata Web SSO. As soon as the integration between Imprivata and the web application is completed, users not licensed for Imprivata Web SSO won’t be able to access the application. Imprivata does not support manual password authentication in this environment.
Imprivata Web SSO only supports Service Provider-initiated interactions. Identity Provider-initiated interactions, where the user points their browser to the IdP, are not supported.
Imprivata Web SSO only supports the following SAML standard bindings:
- SP to IdP: HTTP Redirect binding; HTTP POST binding
- IdP to SP: HTTP POST binding
Validate SAML integration settings on the Imprivata Admin Console:
| Setting | Required / Optional | Imprivata Admin Console location |
|---|---|---|
| Imprivata Enterprise Access Management 7.0 or later | Required | Help menu |
| Imprivata Single Sign On is licensed | Required | Gear menu > License |
| Imprivata enterprise is provisioned and connected to the cloud | Required | Gear menu > Cloud connection |
| SAML applications are added and enabled in Imprivata Admin Console | Required | Applications > Single sign-on application profiles |
| SAML applications are deployed to selected set of users | Required | Applications > Single sign-on application profiles |
| Imprivata users are assigned to user policy enabled for Single Sign On | Required | Users > User policies |
| User policies are assigned to Remote Access workflow | Optional; required for multi-factor authentication when the Imprivata agent is offline or not present | Users > Workflow policy |
Cloud Connection
Imprivata Services will enter the Enterprise ID and one-time cloud provisioning code required to establish trust between your Imprivata enterprise and the Imprivata cloud:
- If you're not on the Cloud Connection page already: In the Imprivata Admin Console, click the gear icon > Cloud connection.
- Services will enter your Enterprise ID and cloud provisioning code.
- Click Establish trust.
The cloud connection must be established by Imprivata Services.
Cloud Connection Status
You can review the status of your enterprise's connection to the Imprivata cloud at any time. Status notifications are displayed on the Imprivata Admin Console, and the cloud connection status of every appliance at every site is also available:
-
In the Imprivata Admin Console, go to the gear icon > Cloud connection.
-
Every appliance host is listed with its status. If there are problems with a connection, recommendations for resolving the problem are displayed here.
Imprivata: View and Copy IdP Metadata
-
In the Imprivata Admin Console, go to the gear icon > Web app login configuration
-
Click View and copy Imprivata (IdP) SAML metadata.
-
Download the IdP metadata XML file. You will need to edit this file in the following section.
-
Copy the SSO POST URL. You will need to provide this URL in the following section.
PagerDuty: SAML SSO Login
-
Login to the PagerDuty web app.
Login as the account owner; who has rights to configure SAML SSO Login settings.
-
In the PagerDuty console, go to Configuration > Account Settings.
-
Select the Single Sign-On tab.
-
Select the SSO radio button.
-
There are five fields in this section. Only two of them need to be configured.
X.509 Certificate
This is the signing key of Imprivata OneSign as the IdP:
-
Open the IdP metadata XML file you downloaded earlier.
-
Copy the X509 certificate data from the file.
-
Remove all spaces and line breaks from the string. The result should be an unbroken block of characters with no line breaks.
-
Add to the beginning:
-----BEGIN CERTIFICATE-----
-
Add to the end:
-----END CERTIFICATE-----
-
Paste the result into the X.509 Certificate field.
Login URL
The URL used for logging into the IdP:
-
From the IdP metadata, paste the SSO POST URL into this field.
-
Click Save Changes.
Add PagerDuty as SAML Application
Only the superadmin role is able to configure Web SSO application profiles:
-
In the Imprivata Admin Console, go to Applications > Single sign-on application profiles.
All Single sign-on application profiles, including conventional Imprivata APG profiles, Mobile app profiles, and SAML application profiles, are all managed from this page.
-
Click Add App Profile > Web application using SAML. The Add web application using SAML page opens.
-
Give the application profile a name. This name is visible only to administrators.
Give the application a user-friendly name. This is the name your users will see when they log in.
-
Click Get SAML metadata.
-
Select From URL and enter the following with your subdomain included:
https://YOURSUBDOMAIN.pagerduty.com/sso/saml/metadata -
Click OK.
-
Click Save SAML application.
-
Deploy the profile: go to Applications > Single sign-on application profiles.
-
Select the application profile you just created, and click Deploy.
The IdP certificate for your Imprivata enterprise expires two years after it is enabled. You will receive an alert on the Imprivata Admin Console beginning 60 days before it expires. When the Service Provider or Relying Party certificate is expiring for a web app enabled for Web SSO, you will receive an alert 90 days in advance.
User Management
Consider how your SP manages its users: To successfully authenticate, the user information managed by your SP (SAML NameID, username, password, and so on) and the user data synchronized by Imprivata (the IdP) from your Active Directory (AD) must match. In the Imprivata Needs section, set the NameID format preference and User Attributes as needed:
- AD Sync — If your SP syncs its user data with the same AD users and groups as your Imprivata IdP, then no special configuration should be needed.
- Create Users Manually in SP — If your SP admin creates user accounts manually, they must use the same NameID format (for example User Principal Name (UPN), email address, and sAMAccountName), so the Imprivata IdP can successfully match them.
- Automatic Account Provisioning — When the SP automatically creates an account as the user logs in for the first time. This functionality is supported in Imprivata Web SSO.
Available Attributes
-
Email address (mail)
-
First name (givenName)
-
Last name (surname)
-
Static value:
-
User domain
-
User logon name (userPrincipalName)
-
User logon name - Pre W2K (sAMAccountName)
-
User security identifier (objectSID)
-
User unique ID (objectGUID)
-
User unique ID (UUID)
IT Pilot — Deploy to Select Users
Imprivata Web SSO application profiles offer flexible deployment options.
Deploy your profile to select users for testing:
-
In the Imprivata Admin Console, go to Applications > Single sign-on application profiles, find your App Profile, and click Not Deployed.
-
Click Deploy This Application?
-
Un-check Deploy to All Users and Groups.
-
Check the domain your test users are located in.
-
Check These OUs, groups and users
-
Specify your test users.
-
Click Save.
-
On the list of application profiles, check the box next to the profile and click Deploy.
Deploy To Users and Groups
Imprivata Web SSO application profiles offer flexible deployment options.
Deploy your profile to specific OUs, users, and groups as needed:
- In the Imprivata Admin Console, go to Applications > Single sign-on application profiles, find your App Profile, and click Not Deployed or Not Deployed.
- Check Deploy This Application.
- You can Deploy to All Users and Groups, or uncheck this option and deploy to select OUs, users, and groups.
- Check the domain your users are located in.
- Select For All Users (in this domain) or check These OUs, groups and users
- Select specific OUs, groups, and users as needed.
- Click Save.
- On the list of application profiles, check the box next to the profile and click Deploy.
For complete details, see Deploying Application Profiles.
All Imprivata users synced to the same domain in Active Directory as the Service Provider or Relying Party users, who are licensed for Single Sign On with Imprivata, will immediately be able to log into the Web SSO app using their username and password authenticated by Imprivata Web SSO.
When the workstation has the Imprivata agent online and the user is already logged into the workstation, the user will not be prompted for their credentials.
For complete Web SSO workflow details, see Expected Endpoint Workflows.
Expected Endpoint Workflows
The expected Imprivata Web SSO workflow has the following variations:
Imprivata Agent Online
-
The user logs into desktop with Imprivata Enterprise Access Management.
-
The user provides the URL for an app enabled for Imprivata Web SSO.
-
The app opens. The user does not need to log into it manually.
Subsequent apps are automatically authenticated within the same browser and the same session.
If the user closes an app without logging out of the app, he can return to the app during the same session without logging in again.
Imprivata Agent Not Present or Unavailable
-
The user provides the URL for an app enabled for Imprivata Web SSO.
-
The user is prompted to log in:
- If the enterprise does not have an Imprivata Enterprise Access Management Remote Access license, he will be prompted to authenticate with username and password.
- If the user is included in a user policy associated with the MFA Remote Access Log In workflow, he will be prompted to complete the Log In workflow.
- If the user is not included in a user policy associated with the MFA Remote Access Log In workflow, he will be prompted to authenticate with username and password.
-
The app opens.
Subsequent apps are automatically authenticated within the same browser and the same session.
If the user closes an app without logging out of the app, he can return to the app during the same session without logging in again.
Imprivata Web SSO on an Unsupported Browser
The expected Imprivata Web SSO workflow on an unsupported browser is the same as when the Imprivata agent is not present or unavailable:
-
The user provides the URL for an app enabled for Imprivata Web SSO.
-
The user is prompted to log in:
- If the enterprise does not have an Imprivata Enterprise Access Management Remote Access license, he will be prompted to authenticate with username and password.
- If the user is included in a user policy associated with the MFA Remote Access Log In workflow, he will be prompted to complete the Log In workflow.
- If the user is not included in a user policy associated with the MFA Remote Access Log In workflow, he will be prompted to authenticate with username and password.
-
The app opens.
Subsequent apps are automatically authenticated within the same browser and the same session.
If the user closes an app without logging out of the app, he can return to the app during the same session without logging in again.
For complete details on supported browsers, see Imprivata Enterprise Access Management Supported Components
When Another User Logs In
When a subsequent user logs into a workstation, the Imprivata agent terminates the IdP session of the previous user.
Imprivata Web SSO cannot terminate user sessions:
- In browsers other than Microsoft Edge or Google Chrome;
- On workstations where the Imprivata agent is not present or unavailable;
- For applications not enabled for Imprivata Web SSO;
- For SAML applications that track the SP session with a persistent cookie.
In an Imprivata environment where applications are federated with Imprivata Web SSO IdP, all users need to be licensed for Imprivata Web SSO. As soon as the integration between Imprivata and the web application is completed, users not licensed for Imprivata Web SSO won’t be able to access the application. Imprivata does not support manual password authentication in this environment.
Implement Single Log Out for your Web SSO-enabled applications (where supported);
Turn off persistent cookies for Relying Parties; this prevents a user from accessing another user's session after a Fast User Switch.
Manually log out of applications where Imprivata Web SSO cannot terminate the user session;
Close browser windows.
Optional — Number Matching
Multi-factor authentication fatigue attacks, also known as "MFA bombing", are a common cyberattack strategy. In an MFA fatigue attack, the attacker sends MFA push notifications to a registered user. The user may accidentally or absent-mindedly accept one of these push notifications, giving the attacker access to protected resources. This type of attack is generally preceded by phishing of the registered user’s login credentials.
With Imprivata’s Number Matching authentication enabled, users must enter their username and password on their endpoint computer, then a 2-digit code into Imprivata ID that matches the randomly generated number displayed on the application being accessed.
This reduces the risk of the user accepting a push notification they did not initiate, and keeps your digital assets out of the hands of bad actors.
Setup
-
In the Imprivata Admin Console, go to Users > Workflow Policy.
-
On the MFA workflow policy page > Authentication Options, select Require Web SSO and remote access users to enter a code when using Imprivata ID for MFA (number matching)
Number Matching authentication is available for Enterprise Access Management Remote Access and Imprivata WebSSO only. Number Matching authentication is not available for the feature Imprivata ID for Windows Access.
This feature does not add Imprivata ID push notifications with number matching to workflows that do not already require the user to accept push notifications. This feature only requires users to enter the code within workflows that already require the user to accept Imprivata ID push notifications. See Expected Workflow, below.
Expected Workflow
In this example, the user is at an endpoint computer where the Imprivata agent is not present, and/or they are completing WebSSO or Remote Access workflows that require the user to accept an Imprivata ID push notification:
-
The user is logging in remotely, or provides the URL for an app enabled for Imprivata Web SSO.
-
The user is prompted to enter their username and password.
-
After the user successfully enters their username and password, they are prompted to approve a push notification sent to their enrolled Imprivata ID. A two-digit code will be shown on the application or resource being accessed.
-
Imprivata ID will display the username and the application the user is accessing.
The code expires in 30 seconds.
-
After the user enters the two-digit code on Imprivata ID, they are given access to the application/resource.
For WebSSO, subsequent apps are automatically authenticated within the same browser and the same session.
If the user closes an app without logging out of the app, he can return to the app during the same session without logging in again.
If the user fails to enter the code correctly, or the code expires, the user must begin authentication again.
For this workflow, users must upgrade to the latest version of Imprivata ID on their mobile device. Users with versions of Imprivata ID before 2023.2 (iOS) or 2023.1 (Android) will not have the option to simply accept a push notification; they must manually enter the six-digit Token Code to authenticate to all sites.
Optional — Web Login Customization
Configure the appearance of the web login application screens with the logo and color of your enterprise, and set a custom session log out value:
-
In the Imprivata Admin Console, go to the gear icon > Web app login configuration
- Select a background color for the login screen (hexidecimal value);
- Upload a PNG, GIF, or JPG logo (200 x 150 pixels, 250 KB max)
- User sessions are logged out after 2 hours by default. Turn off this automatic logout, or select a value between 30 minutes and 4 days.
- Click Save.
Optional — Specify The Returned Attribute
When required by the SP, you can specify the returned attribute the IdP sends to the SP when the SP NameID format preference is unspecified.
In the Service Provider (SP) metadata section, when the NameID format preference field is set to Unspecified,
you can set the Returned Attribute field to:
- Email address (mail)
- User logon name (userPrincipalName)
- User logon name - Pre W2K (sAMAccountName)
- User security identifier (objectSID)
- User unique ID (UUID)
Troubleshooting
Verify proper integration of Imprivata Web SSO (IdP) with the Relying Party (RP).
-
Imprivata IdP configuration (accessed through Imprivata Admin Console);
-
Relying Party SSO configuration (Relying Party administration)
-
Endpoint (device from which the user accesses the Relying Party application).
Validate endpoint configuration:
| Setting | Value |
|---|---|
| Endpoint is able to reach RP site | Check connection to RP host |
| Endpoint has Internet connection and can reach IdP site | Open in browser:https://idp.cloud.imprivata.com/<...>/saml2 |
| Browser supports/allows cookies |
Validate configuration for an endpoint with an Imprivata agent:
| Setting | Location/Value |
|---|---|
| Imprivata 23.2 or later agent is installed | Agent icon in Windows system tray |
| Imprivata agent is connected and logged in | Agent icon in Windows system tray |
| Single Sign On is enabled | Agent icon in Windows system tray |
| User uses supported browser | Google Chrome and Microsoft Edge |
| Imprivata browser extension is enabled | Google Chrome and Microsoft Edge |
Replacing Expiring Certificates
The IdP certificate for your Imprivata enterprise expires two years after it is enabled. You will receive an alert on the Imprivata Admin Console beginning 60 days before it expires. When the Service Provider or Relying Party certificate is expiring for a web app enabled for Web SSO, you will receive an alert 90 days in advance.