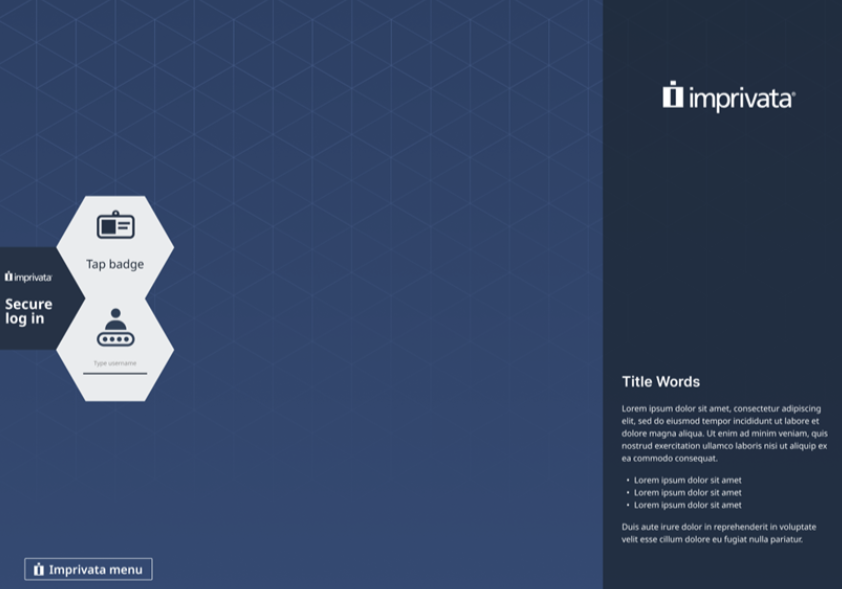
Branding the Login and Self-Service Experience
Branding lets you change the default Imprivata login, enrollment, and self-service experience to better reflect your corporate identity.
You brand Windows endpoints with a computer policy. You can:
-
Incorporate your organization's logo and colors.
-
Add a background image.
-
Add a custom message to the side banner.
-
Modify the text for the forgotten password link.
Before you upgrade Imprivata agents and configure the computer policy for the new login experience, the classic Imprivata login dialog remains available to users. All branding remains unchanged.
The following image represents the default login experience.
Click to enlarge thumbnail.
You can modify the default experience by:
-
Replacing the Imprivata logo with another.
-
Configuring the side banner to appear without a logo.
-
Changing the background image for the desktop.
The background image does not apply to the side banner. You manage the background color of the side banner separately.
To manage logo and background images:
-
In the Imprivata Admin Console, click Computers > Computer polices, and open the computer policy for the Windows endpoints.
-
Open the Customization tab.
-
Go to the Login UI experience section , and then select Imprivata login.
-
Go to the Login logo and background section, and do one or more of the following:
-
Click Upload to add a new logo or background image.
-
Deselect Show a logo on the lock screen to configure the side banner to appear without a logo.
-
- Click Save.
You can modify the default experience by:
-
Writing a new message.
-
Changing the background color.
-
Configuring the lock screen to appear without a side banner.
To change the appearance of the side banner:
-
In the Imprivata Admin Console, click Computers > Computer polices, and open the computer policy for the Windows endpoints.
-
Open the Customization tab.
-
Go to the Login UI experience section , and then select Imprivata login.
-
Go to the Customizable text and banner section and do one or more of the following:
-
Type a new message in the Custom message field.
-
Choose a color from the Banner and background color palette.
-
Deselect Show customizable banner to configure the lock screen to appear without the side banner.
-
- Click Save.
NOTE: You cannot remove the Imprivata logo in the Secure log in hexagon. However, to remove the background color, select Use gray scale start hex.
To modify the prompts for password authentication:
-
In the Imprivata Admin Console, click Computers > Computer polices, and open the computer policy for the Windows endpoints.
-
Open the Customization tab.
-
Go to the Login UI experience section , and then select Imprivata login.
-
Go to the Username and password text section.
-
Type the new label text in the Username text and Password text fields.
-
Click Save.
NOTE: If you are licensed for Confirm ID EPCS, changes to the default prompts are applied EPCS workflows as well.
To modify the prompt for the forgotten password link:
-
In the Imprivata Admin Console, click Computers > Computer polices, and open the computer policy for the Windows endpoints.
-
Open the Customization tab.
-
Go to the Login UI experience section , and then select Imprivata login.
-
Go to the Password self-service prompt section, and type the new label text in the Link text field.
-
Click Save.
No additional Imprivata Enterprise Access Management configuration is required.
By default, EAM honors the Microsoft Windows system locale date, time, language, and regional settings that are configured on the endpoint.
By default, EAM honors the Microsoft group policy setting (Do not display network selection UI) that is configured on the endpoint. This setting is located under the following group policy object path:
Computer Configuration > Administrative Templates > System > Logon
When this policy setting is disabled (not configured), users are able to access the network menu without having to log in. Users can do the following:
- Determine the status of the network connection, which includes:
Ethernet–connected
Wireless
Disconnected
-
View a list of wireless networks, including signal strength and whether the connection is secured.
-
Switch to a different wireless network.
NOTE: The list of available wireless connections is limited to previously connected networks. Connecting to a new wireless network requires the user to log into the endpoint.
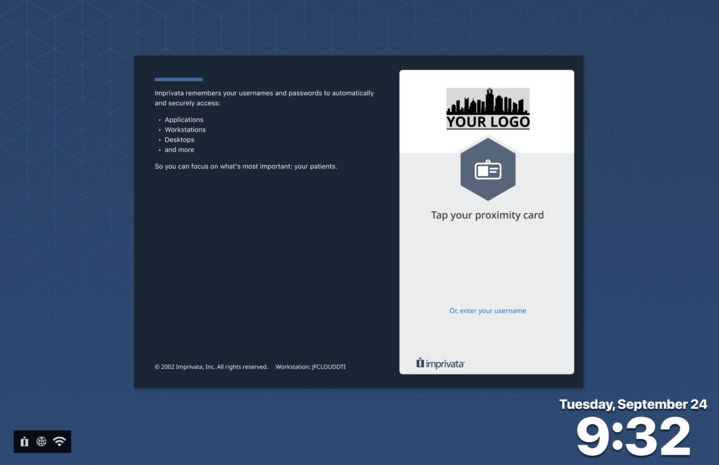
You brand Mac devices with a computer policy. You can:
-
Incorporate your organization's logo.
-
Add a background image.
-
Add a custom message to the side banner.
The following image represents the default login experience.
Click to enlarge thumbnail.
You can modify the default experience by:
-
Replacing the Imprivata logo with another.
-
Configuring the side banner to appear without a logo.
-
Changing the background image for the desktop.
The background image does not apply to the side banner.
To manage logo and background images:
-
In the Imprivata Admin Console, click Computers > Computer polices, and open the computer policy for the Windows endpoints.
-
Open the Customization tab.
-
Go to the Login UI experience section , and then select Imprivata login.
-
Go to the Login logo and background section, and do one or more of the following:
-
Click Upload to add a new logo or background image.
-
Deselect Show a logo on the lock screen to configure the side banner to appear without a logo.
-
- Click Save.
You can modify the default experience by:
-
Writing a new message.
-
Configuring the lock screen to appear without a side banner.
To change the appearance of the side banner:
-
In the Imprivata Admin Console, click Computers > Computer polices, and open the computer policy for the Windows endpoints.
-
Open the Customization tab.
-
Go to the Login UI experience section , and then select Imprivata login.
-
Go to the Customizable text and banner section and do one or more of the following:
-
Type a new message in the Custom message field.
-
Deselect Show customizable banner to configure the lock screen to appear without the side banner.
-
- Click Save.
NOTE: You cannot remove the Imprivata logo in the Secure log in hexagon.
No additional Imprivata Enterprise Access Management configuration is required.
By default, EAM honors the Mac language, region, date, and time system settings that are configured on the device.
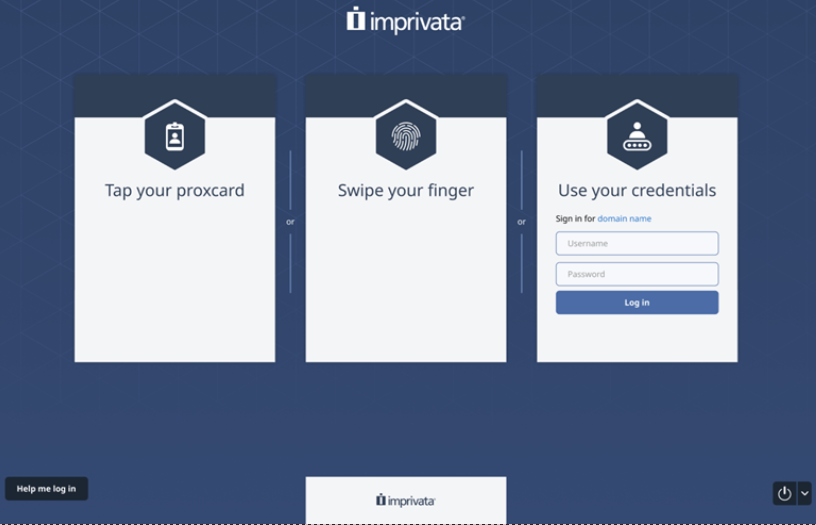
You brand Imprivata ProveID Embedded endpoints with a computer policy. You can:
-
Incorporate your organization's logo.
-
Add a background image.
-
Modify prompts that appears on the authentication panels.
-
Replace the default proximity card image with another.
-
Modify the text for the forgotten password link.
The following image represents an example of the login experience.
Click to enlarge thumbnail.
You can modify the default experience by:
-
Replacing the Imprivata logo with another.
-
Changing the background image for the desktop.
To manage logo and background images:
-
In the Imprivata Admin Console, click Computers > Computer polices, and open the computer policy for the ProveID Embedded endpoints.
-
On the Customization tab, go to the Login logo and background section.
-
Click Upload to add a new logo or background image.
-
Click Save.
NOTE: The required dimension for a background image depends on the screen resolution of your thin clients. The uploaded image is not resized.
You can modify the default experience for proximity card, security key, and/or password authentication by:
-
Modifying the prompts that appear on the authentication panels.
- Uploading different badge prompt icons.
To change the appearance of the authentication panels:
-
In the Imprivata Admin Console, go to Computers > Computer polices, and open a computer policy.
-
Go to Customization > Login authentication prompts:
-
Enter new label text in the prompt field.
-
Click Upload to add a new prompt image.
-
- Click Save.
To modify the prompts for password authentication:
-
In the Imprivata Admin Console, click Computers > Computer polices, and open the computer policy for the Imprivata ProveID Embedded endpoints.
-
Open the Customization tab.
-
Go to the Username and password text section.
-
Type the new label text in the Username text and Password text fields.
-
Click Save.
To modify the prompt for the forgotten password link:
-
In the Imprivata Admin Console, click Computers > Computer polices, and open the computer policy for the Imprivata ProveID Embedded endpoints.
-
On the Customization tab, go to the Password self-service prompt section.
-
Type the new label text in the Link text field.
-
Click Save.
You brand Chrome OS devices with a computer policy. You can:
-
Incorporate your organization's logo and colors.
-
Add a background image.
-
Add a custom message to the top banner.
-
Modify the text for the forgotten password link.
You can modify the default experience by:
-
Replacing the Imprivata logo with another.
-
Configuring the top banner to appear without a logo.
-
Changing the background image .
The background image does not apply to the top banner. You manage the background color of the top banner separately.
To manage logo and background images:
-
In the Imprivata Admin Console, click Computers > Computer polices, and open the computer policy for the Chrome OS endpoints.
-
Open the Customization tab, go to the Login logo and background section, and do one or more of the following:
-
Click Upload to add a new logo or background image.
-
Deselect Show a logo on the lock screen to configure the top banner to appear without a logo.
-
- Click Save.
You can modify the default experience by:
-
Writing a new message.
-
Changing the background color.
-
Configuring the lock screen to appear without a top banner.
To change the appearance of the side banner:
-
In the Imprivata Admin Console, click Computers > Computer polices, and open the computer policy for the Chrome OS endpoints.
-
Open the Customization tab, go to the Customizable text and banner section, and do one or more of the following:
-
Type a new message in the Custom message field.
-
Choose a color from the Banner and background color palette.
-
Deselect Show customizable banner to configure the lock screen to appear without the top banner.
-
- Click Save.
To modify the prompts for password authentication:
-
In the Imprivata Admin Console, click Computers > Computer polices, and open the computer policy for the Chrome OS endpoints.
-
On the Customization tab, go to the Username and password text section.
-
Type the new label text in the Username text and Password text fields.
-
Click Save.
To modify the prompt for the forgotten password link:
-
In the Imprivata Admin Console, click Computers > Computer polices, and open the computer policy for the Chrome OS endpoints.
-
On the Customization tab, go to the Password self-service prompt section.
-
Type the new label text in the Link text field.
-
Click Save.
Imprivata Self-Service lets remote users manage some of their credentials. The self–service home page startup URL is https://<appliance_ipaddress>/sso/passwordhelp.
To brand the self-service homepage:
-
In the Imprivata Admin Console, open the Settings page (gear icon menu > Settings).
-
Go to the EAM self-service web app section.
-
Enter your company name in the Browser title field. The label supports up to 32 characters.
-
Upload your organization's logo.
-
Click Save.
NOTE: An image larger than 200x75 pixels is resized to 200x75 pixels.