Configure Patient Access to Microsoft Entra ID
Download a PDF of this guide.
Microsoft recently updated the name of Azure Active Directory to Microsoft Entra ID. Imprivata has updated as many instances as possible, but in certain instances, the older name may be used.
The following sections detail how to configure Patient Access to your Microsoft Entra ID (formerly Azure Active Directory):
-
Prepare Microsoft Entra ID for Patient Access
-
Add Enterprise Access Management Cloud IP addresses to your allowlist in Microsoft Entra ID.
-
-
Start the setup wizard to grant Patient Access access to your Microsoft Entra ID, finalize the configuration, and sync an Admin group to Patient Access.
After completing these steps, the user will be able to authenticate into Patient Access successfully.
Assumptions
This topic assumes the following:
-
You are familiar with Microsoft Azure Portal and Microsoft Entra ID use and terminology.
-
You have an Microsoft Entra ID Directory Global Administrator or Privileged Role Administrator.
-
You have an active Microsoft Entra ID tenant and license.
-
You have users in Active Directory that have synced to Microsoft Entra ID through Microsoft Entra Connect (formerly Azure AD Connect).
Additional References
Before configuring Patient Access, review the following documentation:
-
Microsoft Entra ID documentation. Many configuration tasks in this topic are performed in the Azure portal.
For more information, see the Microsoft Entra ID documentation.
NOTE:Screenshots of the Microsoft Azure portal are included here as a courtesy to assist in the configuration.
Microsoft may update their Azure portal and associated documentation at any point. It may impact the tasks documented in this guide.
Prepare Microsoft Entra ID for Patient Access
Update Microsoft Entra ID to trust Imprivata's servers.
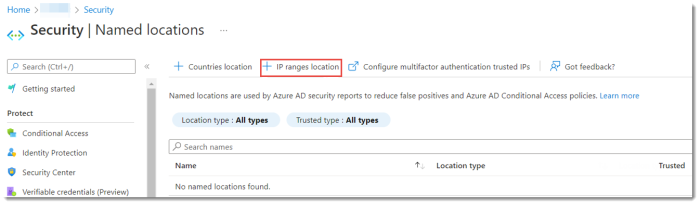
Step 1: Add Imprivata IP Addresses to the Microsoft Entra ID Allowlist
To add Imprivata IP addresses to your Microsoft Entra ID allowlist:
-
In your Microsoft Entra ID tenant, go to Security > Named locations, and select + IP ranges location.
-
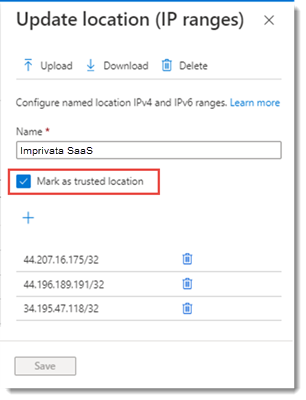
In the Name box, type a descriptive name for the new location and select Mark as trusted location.
-
Add the IP addresses:
(Static egress IP addresses)
-
44.207.16.175/32
-
44.196.189.191/32
-
34.195.47.118/32
-
-
Click Create.
Step 2: Add Imprivata IP Addresses to Multifactor Authentication Trusted IPs
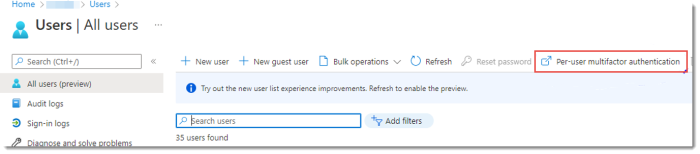
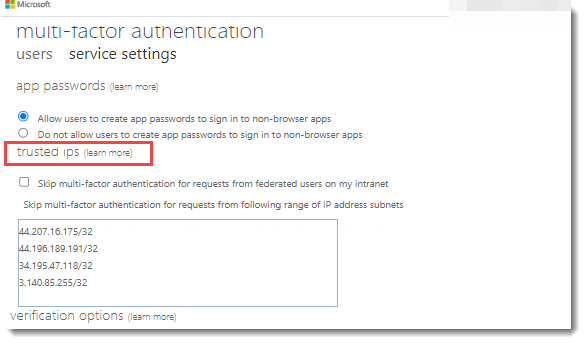
If users are in a "per-user" multifactor authentication, then add the Imprivata IP addresses to the Multifactor authentication trusted IPs list to successfully authenticate to Patient Access.
-
To configure multifactor authentication trusted IPs, go to Security > Named locations, and select Configure multifactor authentication trusted IPs.
-
Add the Enterprise Access Management Cloud IP addresses as trusted IPs:
-
44.207.16.175/32
-
44.196.189.191/32
-
34.195.47.118/32
-
Step 3: Create One Admin Group in Microsoft Entra ID to Sync to Patient Access
At a minimum, Patient Access user management requires one Admin group: Patient Access Admins.
This group can be created and maintained in Active Directory (AD), but will need to be synced into Patient Access during the setup wizard. After Patient Access has been set up, the admin can sync any additional Admin and user groups as needed.
-
Create the Patient Access Admin group.
Move the Microsoft Entra ID Global Admin and any other admins you’d like managing Patient Access into this group. They will have access to the Patient Access Admin Console.
Use Patient Access Setup Wizard, Complete Configuration, and Sync Groups
This is a one-time task.
Step 1: Launch the Patient Access Setup Wizard
-
Imprivata provisions your Patient Access tenant and sends you the setup URL to your email. Launch the wizard by clicking on this link.
-
In the Patient Access setup wizard, provide information to connect to your Microsoft Entra ID:
-
Enter or paste your Microsoft Entra ID tenant ID and click Continue to Microsoft Authentication.
The system connects to your Microsoft Entra ID.
-
Step 2: Grant Patient Access Required Permissions to the Customer Microsoft Entra ID Tenant
-
Log in to Microsoft Entra ID with Global Administrator or Privileged Role Administrator privileges.
-
You are redirected to a page where Imprivata’s verified application must be authorized for the following permissions:
-
Read directory data
-
Read all groups
-
Sign in and read user profile
-
Read all users' full profiles
-
-
Click Accept to grant Patient Access access to the AAD tenant.
Step 3: Complete Microsoft Entra ID Configs — Adjust Conditional Access Policies Requiring Multifactor Authentication
To adjust the conditional access policies requiring multifactor authentication (MFA):
-
In Microsoft Entra ID, go to Security > Conditional Access, and select a policy that applies to Patient Access users and requires MFA in the Access controls section.
-
To exclude the Imprivata SaaS Azure AD Sync application, go to Cloud apps or actions > Cloud apps > Exclude> Select excluded cloud apps, and selectImprivata Astra Azure AD Sync.
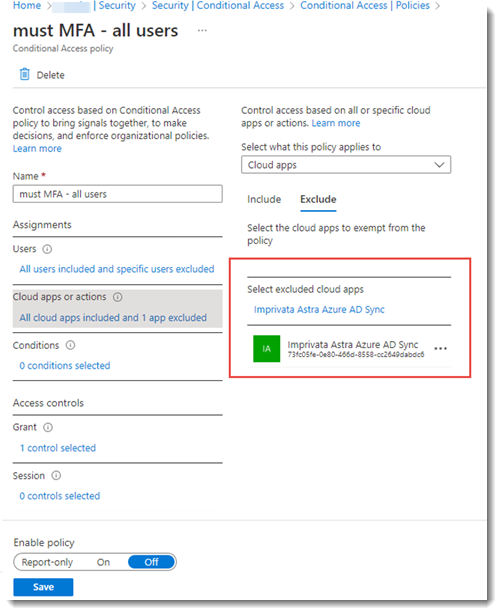
-
Exclude the Imprivata Astra Azure AD Sync application from all the conditional access polices that require MFA for users that will use Patient Access.
Step 4: Patient Access Setup Wizard — Create the Initial Patient Access Administrator
In the Patient Access setup wizard, you will create the first Patient Access administrator. This administrator does not need to be an AAD admin, it can be any Microsoft Entra ID user.
-
Enter the username (the Microsoft Entra ID UPN) for a person who will administer Patient Access. Click Next to continue.
For future use, the administrator will receive an email with a URL allowing them to log in to the Patient Access Admin Console if they have an email address associated with their Microsoft Entra ID UPN.
-
The administrator logs in to the Patient Access Admin Console.
Step 5: Identify All Microsoft Entra ID Admin Groups to be Synced into Patient Access
-
Select the Microsoft Entra ID admin group created in the preparation task. Select at least one group that contains administrator users.
You will be able to sync as many admin and user groups as needed afterwards.
-
Start typing a group name and select it from the resulting drop-down list.
Make sure that the admin group you select is a security group with at least one admin in it.
Add admin groups in the same manner. Click OK.
-
In the top left column, select Add groups to add any user groups. Click OK.
The Microsoft Entra ID setup is complete. Continue exploring the Admin Console.
-
-
Click Go to Patient Access Admin Console > Users tab to view your users.
Microsoft Entra ID setup is now complete. User sync will run in the background and display users on the users page.