Patient Access User Guide
Imprivata Patient Access matches a patient’s photo to their medical record to improve patient safety, streamline registrar operations, and help reduce the number of duplicate records.
This
Download a PDF of this guide.
Workflows
Registrars can use one of the following workflows in Patient Access.
Enroll |
Identify |
Verify |

|

|

|
|
|
|
Guidelines for Facial Biometric Capture
Environment
|
|
|
|
|
|


Cameras

|
|
Patients

|
|

|
|
|
|
|
Photo Quality Pass/Fail Color Scheme
The user interface assists you in capturing the patient's photo for enrollment, identification, and verification.
The Patient Access user interface displays a photo quality color scheme in the photo capture frame.
-
Green is Pass
-
Red is Fail
-
When enrolling patients, capture the highest quality photo possible. The higher the enrollment photo quality, the better Patient Access is able to identify and verify patients on their next visits.
-
Enroll the patient with nothing covering the face, including glasses or a mask. During enrollment, a patient's glasses can reduce the photo quality.
-
During identification or verification, a patient's glasses or masks may affect the photo quality.

Patient Minimum Age
Patients must be a minimum age to be enrolled in Patient Access. This limit is set according to your hospital's policies for the minimum age for enrolling a child's biometric information.
When a registrar attempts to enroll a patient who is under the minimum age, the Patient Access UI displays a message of "Patient too young: Must be <minimum age> or older to use Patient Access".
Duplicate Records Found During Enrollment
When enrolling a patient, Patient Access may find patient records with a similar face already enrolled in the system. This may be from a duplicate enrollment, but there are some instances where this can happen, for example, identical twins.
The Patient Access UI displays the search results of patient records with a similar face.
The UI highlights any differences between the patient demographic and contact information of the patient and similar records.

-
Ask the patient for a photo ID as proof of identity.
-
If multiple duplicates are found, use the arrows to scroll through the resulting records.
-
Compare the patient demographic and contact information details with the patient's photo ID.
-
Confirm that this the correct record before submitting the photo enrollment to avoid duplicates.
Re-enroll a Patient
There may be cases where you need to re-enroll a patient in Patient Access: when the patient's appearance has changed significantly, or there was an error in their existing enrollment.
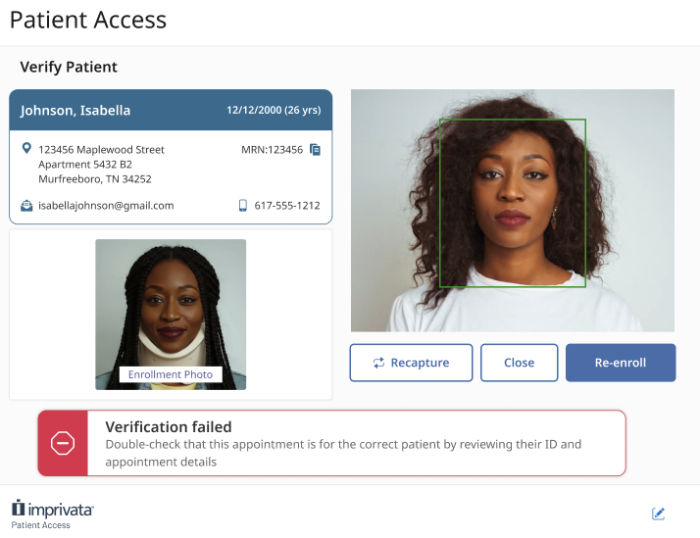
The Patient Access UI prompts you to take the following actions:
-
Verify that the appointment is for the correct patient. Ask the patient for a photo ID as proof of identity.
-
Compare the patient demographic and contact information details with the patient's photo ID and medical record.
-
Click Re-enroll to replace the current enrollment photo with a new photo capture.
Interface Navigation
-
Use the Tab and Enter keys to move through most workflows in the Patient Access UI.
-
Click the bell icon to view feature announcements.