Configure Personalized Lock Screen Using Live Activities
Applies to iOS devices only.
Use this feature to automatically add the Device User name and other information to the device Lock Screen, so that identifying information is displayed without the user needing to unlock the device.
Live Activities is the preferred method of configuring the device Lock Screen to display the user name, instead of the Set Wallpaper action.
Setting a wallpaper on the device is a separate feature.
-
After configuring this feature, users will see the change in Locker behavior after the next checkin and checkout.
Supported iOS Workflow Models
The Personalized Lock Screen feature supports the following Workflow models:
-
iOS Express Checkout
-
DEP
-
non-DEP
Behavior
-
At device checkout, the user is prompted to allow Live Activities on the device. Live Activities launches Imprivata Locker.
NOTE:If the user taps Don't allow at the Live Activities prompt, the feature will not work and the user will not be prompted to re-enable or allow. This is a one-time prompt; it will not appear at each checkout.
Live Activities can be re-enabled in Settings on the device.
-
The Lock Screen of the checked out device displays the Device User name, and additional optional attributes.
If you also configured the Overdue Devices feature, the device displays a dynamically updating timer indicating the remaining device lending period.
Click to enlarge

-
When the user returns the device, the Check In Workflow is run, clearing the Live Activities from the device.
-
Tapping the Live Activities widget opens the Imprivata Locker app.
Known Limitations
Personalized Lock Screen uses iOS Live Activities to display content directly on the Lock Screen.
Due to iOS platform limitations, Live Activities automatically expire after a maximum of 12 hours.
Requirements
Using the MAM console to configure the Personalized Lock Screen feature requires the following:
-
Requires that your MAM organization be enabled for Check Out.
-
MAM 7.3 or later
-
Imprivata Locker 4.3 (or later) installed on the iOS devices.
Configure Personalized Lock Screen Settings via the MAM Console
Supported in MAM 7.3 and later.
In MAM 7.0 through 7.2, you may have configured Personalized Lock Screen via a Locker Custom Options key/value pair.
In MAM 7.3, this feature has been enhanced to allow you to manage it via the MAM console.
To configure the Personalized Lock Screen feature:
-
In the MAM console, go to Admin > Check Out > Personalized Lock Screen.
For new customers, the Personalized Lock Screen setting is switched ON by default.
-
If you do not wish to use the feature, switch Personalized Lock Screen to OFF.
-
Click Configure.
-
In the Name section, select the format of the username to display on the Lock Screen.
-
In the Attributes section, specify up to three attributes to display on the Lock Screen.
IMPORTANT:You must add the Imprivata Display Name as one of the attributes, so it matches the attribute [Imprivata Display Name] in the setting Text to display when unlocked in your Check Out workflow.
-
Switch the Lending period setting to ON to display a count down timer indicating the time left until device is overdue.
-
-
Click Save.
After configuring this feature, users will see the change in Lock Screen behavior after the next checkin and checkout.
Migrate from Locker Custom Options to Global Personalized Lock Screen Settings
This section assumes that your organization implemented Live Activities in MAM 7.0 through 7.2 and you want to migrate from using the Locker Custom Options to the global Personalize Lock Screen feature settings available in the MAM console.
Assumptions
This section assumes that you previously enabled Live Activities using the Locker Customer Options key /value pair and you set the key value pair to true:
{
    "LiveActivityEnabled": true
}
Before You Begin
Before you start the migration from Locker Custom Options to the MAM console settings:
-
On the iOS devices, upgrade the Imprivata Locker app to 4.3 or later.
Migration Steps
To migrate from Locker Custom Options to global Personalized Lock Screen settings:
-
In the MAM console, go to Admin > Check Out.
-
Switch the toggle for Personalized Lock Screen to ON.
-
Locate where you previously set the Locker Custom Options for LiveActivityEnabled to true. It may be in one of the following locations:
-
At a global level by the Admin > Check Out setting.
-
On multiple devices, by Locker Custom Options in your Workflow.
-
On a single device, in its Device Details.
Remove the the key/value pair for LiveActivityEnabled and save the setting..
NOTE:The change in Lock Screen behavior happens after the next device checkin and checkout.
-
Verify the Device is Using Live Activities
To verify whether Imprivata Locker is using Live Activities:
-
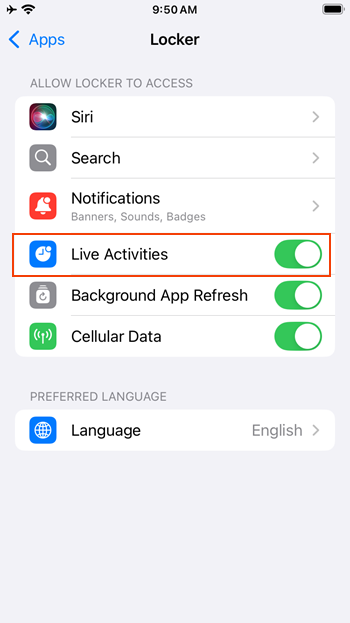
On the device, open Settings > Apps > Locker and ensure that Live Activities is switched on.
Click to enlarge