Troubleshooting
Log files can be a helpful troubleshooting tool. This article explains how to capture detailed log files and share them with Imprivata Support.
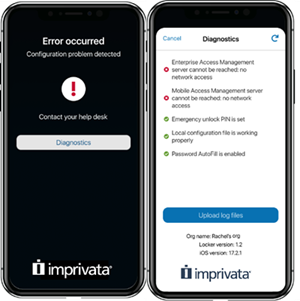
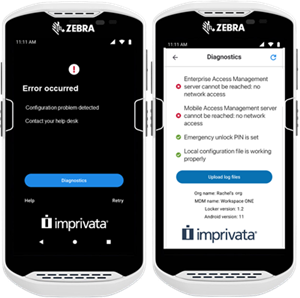
The Imprivata Locker app displays details about any failures it encountered when attempting to access resources that should be available. These include a number of local and network resources.
To send logs to Imprivata Support from the Imprivata app:
-
From an error screen:
-
Tap Diagnostics. The Diagnostics screen opens.
-
Communication with Mobile Access Management Server — the server cannot be reached due to network access, server errors, or response timeouts.
-
Communication with the Enterprise Access Management Server — the EAM (formerly Imprivata OneSign) server cannot be reached due to network access, server errors, or response timeouts.
-
Local configuration file — the local configuration file may be missing or is corrupt.
-
Password AutoFill is enabled — indicates whether Password AutoFill is enabled for the Locker app in iOS settings.
-
Emergency Unlock PIN — indicates whether the Emergency Unlock PIN is set in the MDM.
-
Push notifications test — displays the success or failure of a test push notification from the Locker app. Possible statuses are:
-
Push notifications test successful — indicates the test was successful
-
Test Push Received but delayed — indicates the test took longer than 5 seconds to be received
-
Test push not received in 10 seconds — indicates the test took longer than the 10 second timeout
-
Push Notifications are disabled —Locker detects that notifications are not allowed for the app
-
-
iOS
Click to enlarge
Android
Click to enlarge
-
-
Tap Upload log files.
-
Enter the case number and tap Upload to send logs to Imprivata support.
-
-
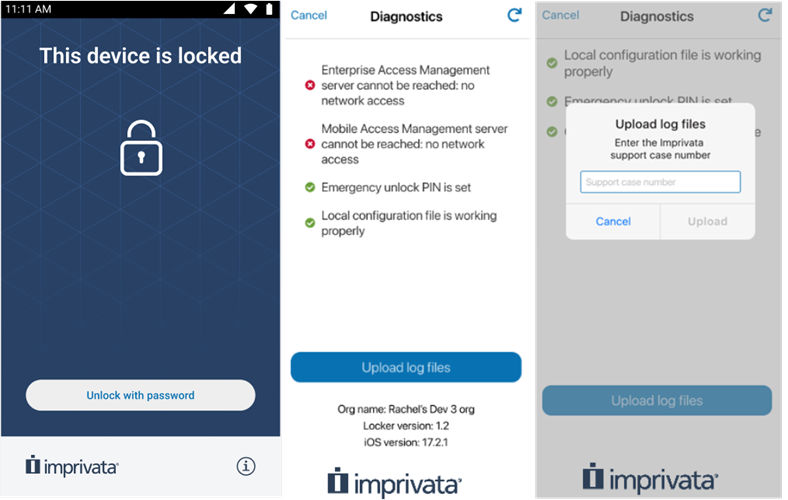
From the blue lock screen:
-
Tap the information icon next to the Imprivata logo. The Diagnostics screen opens.
-
Tap Upload log files.
-
Enter the case number and tap Upload to send logs to Imprivata support.
Click to enlarge
-
-
From the white device checkout screens:
-
Tap the information icon next to the Imprivata log. The Diagnostics screen opens.
-
Tap Upload log files.
-
Enter the case number and tap Upload to send logs to Imprivata support.
-
-
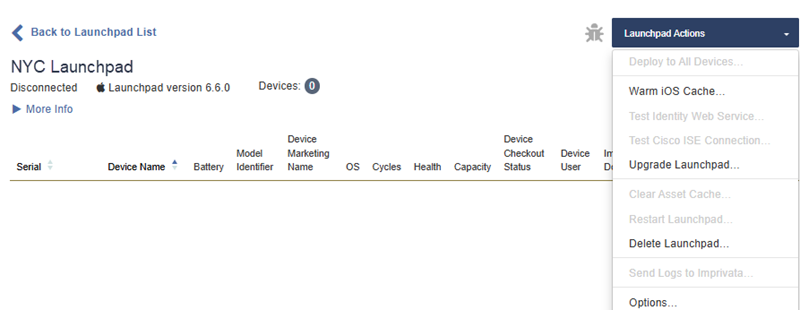
In the MAM console, go to the Launchpads tab and click the Launchpad name to view its details.
-
Under Launchpad Actions menu, click Options…:
Click to enlarge
-
From the Log Level list, select Debug as the log level. Click Save to restart the Launchpad. No need to enter any custom values here.
Click to enlarge

-
Proceed with a Workflow or other action that you need to troubleshoot. Make sure to carefully follow the same steps to reproduce the issue. The log files are automatically stored on your machine.
When you are done:
-
Submit a support ticket with detailed steps to reproduce the issue.
-
Indicate the date and time the issue occurred.
-
After you create the ticket, send Launchpad Logs via Launchpad Actions > Send Logs to Imprivata…
Logs can also be accessed via the Launchpad Menu > Help > Open Log Folder.
-
Close the Launchpad if it is running.
-
On the machine experiencing the issue, download Process Monitor tool from here.
-
Double-click to launch the tool.
NOTE:Note this tool requires elevated privileges.
-
The EULA dialog opens, click Agree.
-
If the filter dialog appears, click OK.
Data collection starts automatically; you should see events appearing in the Process Monitor window.
-
-
Launch the Mobile Access Management Launchpad and reproduce the problem.
For example, if the Launchpad is crashing, reproduce the crash while Process Monitor is running.
-
After the problem has been reproduced, close the Launchpad.
-
In Process Monitor go File > Save, then save the trace into a .pml file and email it to support@imprivata.com.
To report a bug, email Imprivata Support.
To submit a feature request, visit the Imprivata Customer Experience Center.
Applies to iOS devices only.
When you are troubleshooting an issue with MDM enrollment, it is often not clear whether the problem is with MAM or with your MDM.
Perform the following test to help you isolate the issue. There are different steps for DEP and non-DEP Workflows.
DEP Devices
-
Reset the affected iOS device to factory defaults.
-
Without using MAM, manually tap the screens on the device to complete setup.
IMPORTANT:If possible, use the same Wi-Fi network as Mobile Access Management.
-
Confirm that you are prompted for MDM enrollment on DEP devices.
-
Confirm that the expected username and password are accepted.
After you complete the setup, check your MDM console and ensure the device shows up as expected.
-
If the device is correctly enrolled, then the original issue is likely with Mobile Access Management.
-
If the device does not enroll in the MDM as expected, then there may be an issue with the MDM, or with a network component such as a firewall or proxy. Contact your MDM vendor for additional support.
Non-DEP Devices
-
Obtain the enrollment profile currently being used by MAM.
The profile can be downloaded Mobile Access Management by navigating to Admin > MDMs, select the MDM to test, and click Download.
-
Reset your test device to factory defaults.
-
Without using MAM, manually tap the screens on the device to complete setup.
IMPORTANT:If possible, use the same Wi-Fi network as Mobile Access Management.
-
After you are past the setup screens, install the enrollment configuration profile to your device. There are several options to do this:
-
If you are using a Mac, use AirDrop to transfer the file to the device. On the device, swipe up to reveal the control center, tap AirDrop and select Allow connections from everyone.
Then on your Mac, control-click on the profile, and choose Share > AirDrop. The Mac will search for available AirDrop destinations. Click on the name of the device — likely iPhone or iPad — to start the transfer.
-
For both PC and Mac, you may email the enrollment profile to a suitable email account, then use Safari on the iOS device to check webmail. Download the attached profile.
-
-
The device should begin to install the MDM enrollment profile. Tap the screens to install the profile.
After you complete the setup, check your MDM console and ensure the device shows up as expected. If the device is correctly enrolled, then the original issue is likely with MAM.
If the device does not enroll in the MDM as expected, then there may be an issue with the MDM, or with a network component s0uch as a firewall or proxy. Contact your MDM vendor for additional support.
This test leaves the non-DEP device unsupervised. Some MDM restrictions may not work as expected. In addition, the device will prompt you before any app installations. This behavior is expected during the test.
When you are troubleshooting an issue with device connectivity to your Imprivata Smart Hub or Launchpad, it is often not clear whether it is a hardware (device, Smart Hub, cable) or software (Launchpad) problem. Below are a series of methods to help you isolate a hardware issue.
Fill the Smart Hub Method
To verify that hardware is functioning correctly, plug in as many devices as you have ports. Connect the Smart Hub to the Launchpad computer and start the Launchpad application.
-
Verify all ports are illuminated blue or green.
-
Confirm that each device has power.
-
Ensure all devices are displayed in the MAM console.
If you notice any problems, continue to the Hardware Isolation method.
Hardware Isolation Method
If you are experiencing an issue in a reproducible way, and you have at least two Launchpads and Smart Hubs, you can perform the following test to quickly isolate the issue.
The issue may be an LED not illuminating, devices not appearing in the MAM console, or devices not checking out.
This test requires two setups:
-
Setup A – one computer/Smart Hub/device setup.
-
Setup B – a similar computer/Smart Hub/device setup.
-
Reproduce the issue on Setup A.
-
Confirm that Setup B does not have the same issue.
-
Disconnect the Smart Hub and devices from Setup A.
-
Take the Smart Hub, devices, and cables from Setup B, and attach them to the computer from Setup A.
-
Attempt to reproduce the issue.
If you can reproduce the issue with Setup A, then the root cause is not with the devices or Smart Hub or cables, but with the computer, Launchpad software, or the MAM console or configuration. Proceed with additional testing to further isolate the root cause.
If you cannot reproduce the issue with Setup A, then the root cause is with the devices, Smart Hub, cables, or with the MDM configuration of the devices.
Proceed with the Port-by-port method below for additional testing to further isolate the root cause.
Port-by-Port Method
Detailed steps for identifying and diagnosing hardware Smart Hub issues.
-
Keep the Smart Hub connected to the Launchpad.
-
Quit the Launchpad app.
-
Plug the Smart Hub into a power source.
-
Remove all devices and USB cables from the Smart Hub.
-
Ensure that one device has no passcode.
-
Plug this device into the Smart Hub’s USB port 1.
-
Confirm that the Smart Hub LED illuminates amber if it is charging, or green if it is fully charged.
-
Confirm that the device displays the lightning bolt icon to show it is connected to power.
-
Repeat the test with every port, using the same USB cable and device for each.
If any port or LED displays an error, contact Imprivata Support to initiate a hardware repair.
USB communication failures can sometimes manifest during a deployment.
If you encounter “kAMDSendMessageError” or “kAMDReceiveMessageError” errors, here are some things you can try:
-
Check your USB cable and the Smart Hub. Sometimes a faulty USB cable or Smart Hub can be the culprit.
-
Relaunch Mobile Access Management
-
Restart your computer
-
Attempt your deployment again
Check the system requirements for recommended Smart Hubs and additional information.