Configuring the Precise Biometrics Combination Smart Card and Fingerprint Reader
Imprivata Enterprise Access Management supports the Precise Biometrics Combination Smart Card and Fingerprint Reader for authentication via smart card and fingerprint.
The ARX Cryptokit software must be installed differently depending on whether the endpoint computer will be used for enrollment, or only for authentication:
-
Enrollment Configuration — To enroll a smart card, the user creates a PIN and enrolls their fingerprint with the AR Genie utility installed on an endpoint computer. To configure an endpoint computer and reader for enrolling a user's PIN and fingerprint, see Configure Endpoint Computers for Enrollment.
-
Authentication Configuration — For authenticating to the desktop with a smart card, only install the ARX Minidriver Credential Provider software on an endpoint computer. To configure an endpoint computer and reader for authentication only, see When setting up an endpoint computer for authenticating users only, follow these instructions. .
How Authentication Works
-
To authenticate to the desktop, the user inserts an enrolled and configured smart card into the Precision Biometrics reader.
-
The ARX Minidriver Credential Provider authenticates the PIN stored on the smart card; the user does not have to enter their PIN again after enrolling it.
-
The ARX software prompts the user to place their finger on the reader.
-
When the user places their finger on the reader, the ARX software authenticates the user's fingerprint against the fingerprint template stored on the smart card.
-
Enterprise Access Management only authenticates the smart card itself.
- See This section describes the following desktop authentication workflows: for details of the expected behavior when logging in.
Install the ARX CryptoKit software and drivers on an endpoint computer for enrollment. When installing ARX software for an endpoint computer that will be used only for authentication and not enrollment, see Configure Endpoint Computers for Authentication.
-
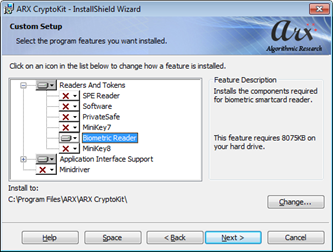
Install the ARX CryptoKit. In the Custom Setup window, select Readers and Tokens > Biometric Reader
-
-
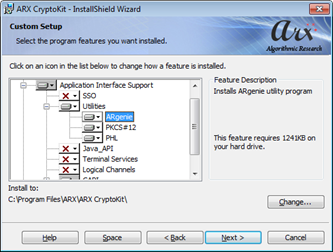
In the Custom Setup window, select Application Interface Support > Utilities > ARgenie (selected by default)
-
-
If requested, restart the endpoint computer after the installation is complete.
-
Connect a Precise Biometrics 200 or 250 MC reader and allow it to install drivers on the endpoint computer.
Create a PIN and enroll your fingerprint with the AR Genie utility in Advanced Mode:
- From the Windows Start button, go to All programs > ARX > CryptoKit
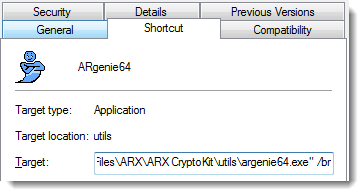
- Right-click ARGenie (or ARGenie64) > Properties
- In the Properties menu > Shortcut tab, add /br (with a space before the slash) to the end of the Target value.
- Click OK.
-
- From the Windows Start button, go to All programs > ARX > CryptoKit > ARGenie (or ARGenie64)
- The AR Genie utility opens.
- Plug in the Precise Biometrics reader if it is not plugged in already.
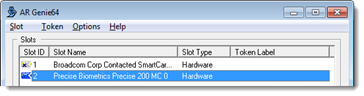
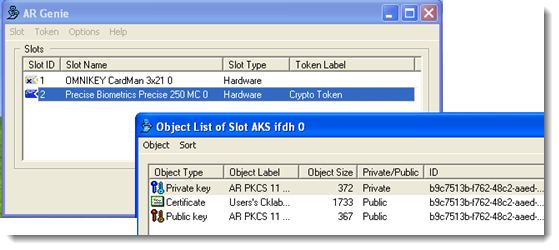
- Select the Precise Biometrics reader from the list of slots.
-
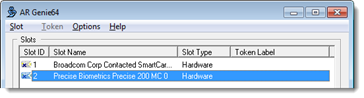
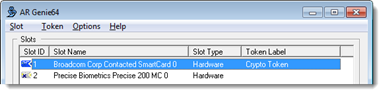
- Note the X on the Slot ID icon: Insert a smart card in the reader and the icon changes:
-
- Select Token > Format.
- A message appears: Do you really want to format the token? Click Yes.
- The Initialize PIN dialog opens. Create a PIN for this smart card (minimum 6 characters) and click OK.
- A message appears: Do you want to enroll the next finger? Click Yes.
- Follow the onscreen instructions to enroll your fingerprint. When you are done, the message Format token successful appears. Click OK.
Test Fingerprint and PIN Enrollment
Use the AR Genie utility to test the fingerprint and PIN enrollment:
Test Fingerprint Enrollment
- Remove the smart card from the Precise Biometrics reader and insert it again.
- On the AR Genie menu, select Token > Login
- Place the finger you enrolled during the formatting process on the reader.
- An error message will be displayed if login is unsuccessful (The AR Genie utility shows no success message.)
Test PIN Enrollment
If you have access to a smart card reader not equipped with a fingerprint reader, you can test your PIN enrollment with the AR Genie utility:
- Remove the smart card from the Precise Biometrics reader, and insert it in another smart card reader not equipped with a fingerprint reader. In this example, the ARGenie utility lists the computer's internal smart card reader at Slot ID 1.
-
- On the AR Genie menu, select Token > Login
- Enter the PIN you created during the enrollment process.
- An error message will be displayed if login is unsuccessful (The AR Genie utility shows no success message.)
Install a certificate and two keys on the smart card:
- Insert your smart card into the reader.
- To go to Microsoft Certificate Services: Open Microsoft Internet Explorer on the endpoint computer.
- In the address field, enter the following URL, with the address of your Microsoft Active Directory Controller: https://IP address/certsrv/
- Microsoft Certificate Services opens. Select Request a Certificate.
- On the Request a Certificate page, select submit an advanced certificate request.
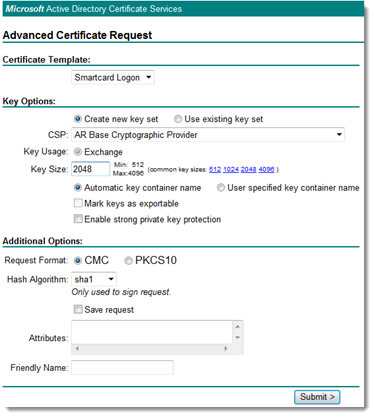
- On the Advanced Certificate Request page, select Create and submit a request to this CA.
- On the Advanced Certificate Request page > Certificate Template section, select Smartcard Logon from the drop-down.
- In the Key Options section, select Create new key set > and select CSP: AR Base Cryptographic Provider from the drop-down.
- In the Key Options section, select Key Size = 2048.
- Click Submit.
-
- The ARX Finger Verification window opens. Place your finger on the Precise Biometrics fingerprint reader to authenticate.
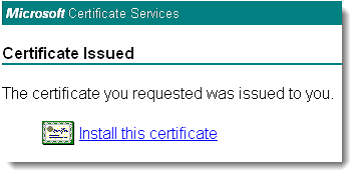
- Microsoft Certificate Services generates the request, sends it to the server, and opens to the Certificate Issued screen. Click Install this certificate to install the certificate on your endpoint computer; the AR Genie utility copies the certificate from your endpoint computer onto the smart card.
-
Optional — Import the Certificate and Keys Manually
You can also import a certificate and the keys directly within a PFX file: In the ARGenie utility, select Token > Import Key.
Verify the Installation
- In the ARGenie utility, double-click the Precise Biometrics reader. The Objects List window for the Precise Biometrics reader opens.
- Confirm three objects are present: the certificate, a private key, and a public key.
-
When setting up an endpoint computer for authenticating users only, follow these instructions.
NOTE: When installing ARX software for an endpoint computer that will be used for enrollment, see Configure Endpoint Computers for Enrollment.
Install Minidriver Credential Provider Only
Install the ARX Minidriver Credential Provider software. If the endpoint computer already has been used for enrolling PINs and fingerprints with the AR Genie utility, uninstall all ARX software and run the ARX Cryptokit MSI again.
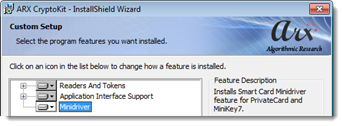
- Install the ARX CryptoKit. In the Custom Setup window, select the Minidriver Credential Provider:
-
- If requested, restart the endpoint computer after the installation is complete.
- Connect a Precise Biometrics 200 or 250 MC reader and allow it to install drivers on the endpoint computer.
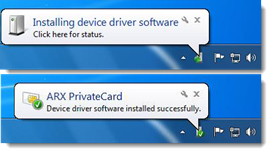
- After installing the Minidriver software (and restarting the endpoint computer if necessary), insert a smart card into the reader.
- The following messages appear from the Windows Notification Area:
-
Verify the Installation
To verify the card reader has been installed successfully, open the Windows Device Manager and locate ARX PrivateCard listed under Smart Cards.
Install a Certificate on the Endpoint Computer
Install a certificate from Microsoft Certificate Services on every endpoint computer where smart card authentication will take place.
NOTE: You can also install the certificate on endpoint computers by assigning a group policy.
- To go to Microsoft Certificate Services: Open Microsoft Internet Explorer on the endpoint computer.
- In the address field, enter http://IP address of the server/certsrv/
- Microsoft Certificate Services opens. Select Download a CA certificate, certificate chain, or CRL.
- Select Download CA certificate, then Save to save it to the Trusted Root Certificate Store.
-

Configure Smart Card Removal Behavior
On every computer where smart card authentication will take place, configure the behavior of the Windows desktop when the smart card is removed from the reader:
- Go to Start > Run
- Run secpol.msc. The Local Security Policy window opens.
- Go to Security Settings > Local Policies > Security Options.
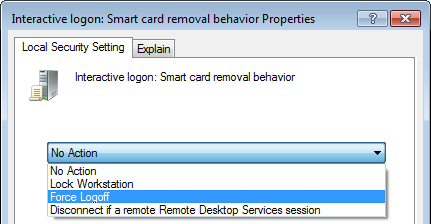
- In the Policy list, double-click Interactive logon: Smart card removal behavior
-
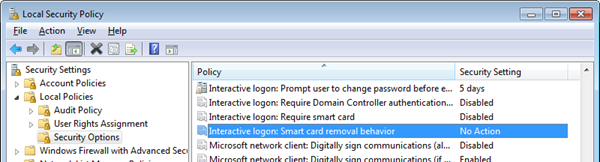
- Select a removal behavior.
- Click OK to save your changes, then close the Local Security Policy window.
-
BEST PRACTICE: Set the smart card removal behavior to Force Logoff.
-
Complete the following configurations to enable smart card authentication with Enterprise Access Management.
When configured as follows, the ARX Minidriver Credential Provider authenticates the user's PIN on the smart card. The ARX software also authenticates the user's fingerprint against the enrolled finger information on the smart card. Enterprise Access Management only authenticates the smart card itself, not the PIN or the fingerprint.
Set Registry Key for PIN Authentication
On every endpoint computer where smart card authentication will take place, create the registry key UseCustomPINDialog with a Type of DWORD and a Value of 1:
- 64—bit — HKLM\Software\SSOProvider\DeviceManager\Devices\PKISC\Cards\PrivateCardEx
When this registry key value is set to 1, the user will not have to enter their PIN manually. The user's PIN enrolled on the smart card will be authenticated by the ARX Minidriver Credential Provider.
When this registry key value is set to 0 or the key is not present, the user will be prompted to authenticate the PIN on the smart card by Enterprise Access Management.
Configure a User Policy for Smart Cards
Configure a user policy for smart card authentication:
- In the Imprivata Admin Console, go to Users > User Policies and select a user policy.
- On the Authentication tab > Desktop Access authentication section, select Smart Card or USB token using external certificate.
- Optional — you may allow temporary use of conditional primary methods, but it is not required.
- Optional — you may select additional desktop access authentication methods, but they are not required for this workflow.
- At the bottom of the page, click Save.
-

This section describes the following desktop authentication workflows:
- Enrolling your smart card with Enterprise Access Management when logging into the desktop with your smart card for the first time
- Logging into the desktop with your smart card after your smart card is enrolled with Enterprise Access Management
NOTE: The user has already enrolled his PIN and fingerprint with the ARX CryptoKit software. See Create a PIN and enroll your fingerprint with the AR Genie utility in Advanced Mode:.
The ARX Minidriver Credential Provider authenticates the PIN stored on the user's smart card and prompts the user to authenticate with their fingerprint. Imprivata OneSign only authenticates the smart card itself.
Enrolling a Smart Card with Enterprise Access Management
- The user inserts their smart card into the Precise Biometrics reader.
- The ARX Finger Verification window opens. The user places their enrolled finger on the Precise Biometrics fingerprint reader.
- The Imprivata login dialog opens. To enroll the smart card, the user must enter their Enterprise Access Management username and password and click OK.
- The ARX Finger Verification window opens again. The user places their enrolled finger on the Precise Biometrics fingerprint reader.
- The user is logged into the desktop successfully and the smart card is enrolled with Enterprise Access Management.
- When the user removes their smart card they are automatically logged off. See Configure Smart Card Removal Behavior
Logging into the Desktop with Your Smart Card
- The user inserts their smart card into the Precise Biometrics reader.
- The ARX Finger Verification window opens. The user places their enrolled finger on the Precise Biometrics fingerprint reader.
- The user is logged into the desktop successfully.
- When the user removes their smart card they are automatically logged off. See Configure Smart Card Removal Behavior