Configuring the Imprivata Authentication Plugin for Citrix
SAML Authentication for Citrix Introduced
The Imprivata Authentication Plugin for Citrix eliminates the need to send a user name and password between Enterprise Access Management and Citrix when authenticating Enterprise Access Management users. When the Imprivata Authentication Plugin for Citrix is enabled:
-
Enterprise Access Management functions as the Identity Provider — During user authentication, the Imprivata agent requests a SAML artifact from the Imprivata appliance.
-
Citrix functions as the Service Provider — The Imprivata agent uses the SAML artifact to authenticate the user to Citrix. Citrix StoreFront validates the SAML artifact with the Imprivata appliance.
The following sections explain how to install and configure the plugin. For complete details on configuring Imprivata Virtual Desktop Access with Citrix XenDesktop or Citrix XenApp, see Imprivata Virtual Desktop Access.
Before You Begin
Before you begin:
-
The Imprivata Authentication Plugin for Citrix requires a minimum version of Citrix Workspace app and is supported for Windows endpoints and for Linux thin clients with Imprivata ProveID Embedded enabled.
See Imprivata Enterprise Access Management for SSO Supported Components to confirm that your environment meets the minimum requirements.
-
Using the Imprivata Authentication Plugin for Citrix is limited to:
-
Applications that are automatically launched. When a Citrix store is configured with the plugin, and a user attempts to manually launch an application from this store, authentication fails.
If your workflow lets users manually launch application, be sure that these applications reside in a separate store that is not enabled for the plugin.
-
Citrix Workspace app
The plugin is not enforced for applications accessed from a web browser.
-
-
During installation, the plugin associates itself with the Citrix CustomForms protocol.
Citrix StoreFront limits the use of this protocol to one authentication method. To verify that another authentication method is not already configured, open the required store in the Citrix StoreFront Console, and go to the Manage authentication methods dialog.
-
Configuring the plugin requires the DNS name of an Imprivata appliance. An IP address is not supported.
NOTE: SAML authentication for Citrix is not supported in offline mode.
How to Install and Configure the Plugin on a Single Server
Complete the following steps to install and configure the Imprivata Authentication Plugin for Citrix to a single server.
To install the plugin:
-
Download the Citrix plug-in for SAML Authentication from the Imprivata Customer Experience Center.
-
Extract and run the Imprivata Authentication Plugin for Citrix msi.
Enable the plugin on the Citrix store.
To configure the store:
-
In the Citrix StoreFront Admin Console, go to the required store, and click Manage Authentication Methods.
NOTE: You must use (create if needed) a Citrix custom store. The default store is not supported.
-
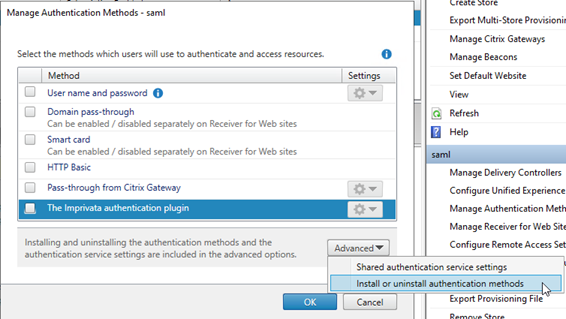
Click Advanced > Install or uninstall authentication methods.
-
Select Imprivata authentication plugin.
NOTE: The native Citrix SAML Authentication method can remain selected. When enabled, the Imprivata Authentication Plugin for Citrix is enforced on all endpoint computers with an Imprivata agent.
-
Next to Imprivata authentication plugin, click the gear icon, and then click Manage Imprivata authentication plugin.
-
Enter the FQDN of an appliance, and click OK.
NOTE: An IP address is not supported.
The plugin is enabled and the root CA certificate of the appliance is imported to the Microsoft Windows Server trusted certificate store.
To complete the configuration:
-
In the Imprivata Admin Console, go to the Computers menu > Virtual desktops page.
- Do one of the following:
Go to the Citrix XenDesktop section, and select Use SAML authentication.
Go to the Citrix XenApp section, and select Imprivata SAML credentials from the Authenticate using menu.
-
Enter the store URL, and save the connection details.
To configure the computer policy:
-
In the Imprivata Admin Console, click Computers > Computer policies.
-
On the Computer policies page, open the computer policy assigned to the endpoints.
-
On the Virtual Desktops tab, do one of the following:
-
Go to the Citrix XenDesktop section, and select Automate access to Citrix XenDesktop.
-
Go to the Citrix XenApp section, and select Automate access to Citrix XenApp.
The Store URL you configured appears under the Available Citrix servers section.
-
-
Select the Store URL, and save the computer policy.
How to Install and Configure the Plugin to a Server Group
Complete the following steps to install and configure the Imprivata Authentication Plugin for Citrix to a server group.
Install the plugin on each Citrix StoreFront server within the group.
To install the plugin:
-
Download the Citrix plug-in for SAML Authentication from the Imprivata Customer Experience Center.
-
Extract and run the Imprivata Authentication Plugin for Citrix msi.
Enable the plugin on each Citrix store within the server group.
To configure the store:
-
In the Citrix StoreFront Admin Console, go to the required store, and click Manage Authentication Methods.
NOTE: You must use (create if needed) a Citrix custom store. The default store is not supported.
-
Click Advanced > Install or uninstall authentication methods.
-
Select Imprivata authentication plugin.
NOTE: The native Citrix SAML Authentication method can remain selected. When enabled, the Imprivata Authentication Plugin for Citrix is enforced on all endpoint computers with an Imprivata agent.
-
Next to Imprivata authentication plugin, click the gear icon, and then click Manage Imprivata authentication plugin.
-
Enter the FQDN of an appliance, and click OK.
NOTE: An IP address is not supported.
The plugin is enabled and the root CA certificate of the appliance is imported to the Microsoft Windows Server trusted certificate store.
For illustrative purposes, these steps detail how to configure the following:
-
A server group contains two servers:
-
The server names are "example-01" and "example-02"
-
They share a base URL of "https://example.mycompany.com"
-
- Each server is configured with a single store:
The store name is "imprivata"
The store URL is "https://example.mycompany.com/Citrix/imprivata/
Configure the connection requires that you enter the following:
-
The Store URL.
-
A server URL. A server URL is used to reference the store from each server within the group.
This URL is created by replacing the Citrix base URL with the hostname of the Citrix StoreFront server.
To configure the connection to the Citrix StoreFront Server:
-
In the Imprivata Admin Console, go to the Computers menu > Virtual desktops page.
- Do one of the following:
Go to the Citrix XenDesktop section.
Go to the Citrix XenApp section.
-
Enter the store URL.
Example: "https://example.mycompany.com/Citrix/imprivata/"
-
Click Add another server, and enter the server URL of the first server in the group. Be sure to include the store name.
Example: "https://example-01.mycompany.com/Citrix/imprivata/"
-
Click Add another server, and enter the server URL of the second server in the group. Be sure to include the store name.
Example: "https://example-02.mycompany.com/Citrix/imprivata/"
- For each URL entry do one of the following:
If configuring a Citrix virtual desktop, select Use SAML authentication.
If configuring a Citrix published application, select Imprivata SAML credentials form the Authenticate using list.
-
Save the connection details.
To configure the computer policy:
-
In the Imprivata Admin Console, click Computers > Computer policies.
-
On the Computer policies page, open the computer policy assigned to the endpoints.
-
On the Virtual Desktops tab, do one of the following:
-
Go to the Citrix XenDesktop section, and select Automate access to Citrix XenDesktop.
-
Go to the Citrix XenApp section, and select Automate access to Citrix XenApp.
The Store URL and all of the server URLs you previously configured appear under the Available Citrix servers section.
-
-
Select the Store URL only.
It is not necessary to select the server URLs.
-
Save the computer policy.
Uninstall the Imprivata Authentication Plugin for Citrix
To uninstall the plugin:
-
Log into the Citrix controller on which the plugin is installed.
-
Open the Citrix Store Front console.
-
Go to Stores, right-click the store where the Imprivata Authentication method is enabled, and select Manage Authentication Methods.
-
Deselect the Imprivata authentication plugin, and then click Advanced.
-
Click Install or uninstall authentication methods.
Click to enlarge

-
Deselect The Imprivata authentication plugin, and click OK.
-
Restart the Citrix controller.
-
Uninstall the plugin using the Windows Control Panel Add/Remove Programs utility, and then restart the Citrix controller.