Managing User Accounts
Users are network users who have user accounts in the Imprivata enterprise. To have an Imprivata account, each user must have an account on a domain linked to an Imprivata appliance, or an Creating Imprivata Accounts for Non-Domain Users created from an external CSV file.
Users are synchronized with existing user directories. Synchronization can be selectively restricted to groups or organizational units (OUs). Synchronization can be configured to occur periodically. Multiple directories can be imported and a unified view of users is presented across all directory sources.
NOTE: For information on synchronizing the users list, see Synchronizing the Users List.
By default, when a user is imported into EAM:
-
Their Imprivata user status is set to Enabled.
-
Their enrollment status is set to Unenrolled.
User Status
The following table describes the user status states:
| Imprivata user status | Description |
|---|---|
| Enabled |
|
| Disabled |
|
For more information about synchronization settings, see Synchronizing the Users List. For more information about letting a disabled user authenticate as long a Windows authentication succeeds, see "Enforcing Imprivata OneSign Authentication" in Configuring Computer Policy General Settings.
Enrollment Status
The following table describes the enrollment status states:
| Enrollment status | Description |
|---|---|
| Unenrolled |
|
| Enrolled |
|
The Search for Users function on the Users page allows you to search for, sort, and list users by:
- Username, first or last name, and email address
- Enabled and enrolled status
- Domains, and by groups within the domains, and by organizational units (OUs)
- User policy
- Date and time of their last login
- Deployed applications (Single Sign-On (SSO) only)
- Administrator role
The Search function uses two elements:
- Search Type — Select the type of search to use.
- Search Criterion — Select the criterion by which to search the users list. Only users that meet the criterion are shown.
Both multi-character (*) and single-character (?) wildcards are supported in the Username, First Name, Last Name, and Email searches. If you do not enter a wildcard character at the beginning or end of the search string, then a multi-character wildcard is assumed at both the beginning and the end.
Each Search Type in the Search for Users drop-down list brings up a context-sensitive Search Criterion field or drop-down box. For example, if you select Username, then you can enter any character in the criterion field. If you select Enabled Status, then the criterion field is a drop-down box with the choices Enabled, Disabled, Expired, and Locked-Out.
After you perform a search, a Clear button is displayed beside the Search button. Click Clear to clear the search criteria and return to the User List.
Super Administrators can enable and/or disable many user accounts by importing a file that contains the usernames and their desired status. Users must already have Imprivata accounts. This can be useful when deploying an Imprivata application to many users who are part of a larger group that was imported with disabled accounts. The list can contain usernames of both accounts to be enabled and disabled.
NOTE: This procedure can only be performed by Super Administrators.
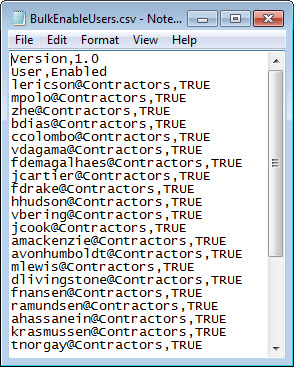
- Create a CSV file listing all the usernames and domains of user accounts to be enabled or disabled. The list must be in the following format:
- Version,1.0
- User,Enabled
- username@domain,<VALUE> where VALUE is TRUE to enable the account and FALSE to disable the account.
- The following image shows an example of a CSV file used to enable accounts:
-
- Go to the Users menu > Users page and click Bulk Actions. The Bulk Actions window opens.
- Click Enable and disable users.
- Browse to and upload the CSV file, then click Next. A preview is displayed, showing any errors such as usernames that do not match any name in.
-
NOTE: Usernames that do not match Imprivata accounts are not processed; they do not cause the operation to fail.
- Resolve any issues as needed, then click Go. The operation proceeds and the Users list is regenerated.
Super Administrators can enable and/or disable applications for many users by importing a file that contains the usernames, the applications, and their desired status. Users must already have Imprivata accounts and application profiles must be deployed to users. The list can contain applications to be both enabled and disabled.
NOTES:
- Enabling applications is not the same as deploying application profiles. Applications must be profiled and deployed before they can be enabled.
- This procedure can only be performed by Super Administrators.
To enable/disable many applications simultaneously:
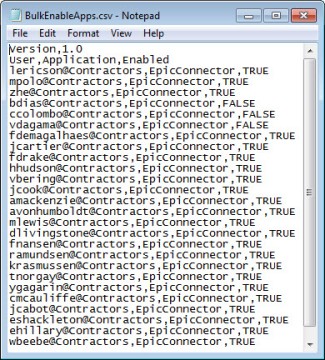
- Create a CSV file listing all the usernames and domains of user accounts to be enabled or disabled. The list must be in the following format:
- Version,1.0
- User,Application,Enabled
- username@domain,<APPLICATION>,<VALUE> where APPLICATION is the exact name of a profiled and deployed application and VALUE is TRUE to enable the application and FALSE to disable it.
- The following image shows an example of a CSV file used to enable and disable multiple accounts:
-
- On the Users page, click Bulk Actions. The Bulk Actions window opens.
- Click Enable and disable deployed applications.
- Browse to and upload the CSV file, then click Next. A preview is displayed, showing any errors such as usernames that do not match any name in OneSign.
- Usernames and application names that do not match Imprivata OneSign records will not be processed. They will not cause the operation to fail.
-
NOTE: There is no single list that shows multiple users and the enabled status of their applications. To verify the enabled status of an application for a user, you must view the user record.
- Resolve any issues as needed, then click Go. The operation proceeds and the applications are enabled or disabled for individual users as intended.
Filter the Users list by their Enterprise Access Management (formerly Imprivata Confirm ID) Remote Access enrollment status. Use these filters to monitor the progress of your Remote Access rollout. For example, filter the Users list by:
-
Remote Access authentication methods allowed
-
Enrolled users
-
Unenrolled users
-
Allowed to enroll for x days
-
In the Imprivata Admin Console, go to Users > Users.
-
Select View User Fields of > Confirm ID for Remote Access.
-
Go to Search for Users and select Enroll State.
-
Configure the remaining drop-down fields as needed.
- Click Search to view the results.
For complete details on rolling out Enterprise Access Management Remote Access to your users, see Legacy Remote Access Experience .
The Users page includes user remote access information if you configured Imprivata OneSign as an interceptor of remote network access. If you have not made a Imprivata OneSign Proxy to RADIUS connection, then the Remote Access option does not appear in the list.
NOTE: This refers to the legacy Imprivata OneSign remote access solution. For Imprivata Confirm ID Remote Access user information, including enrollment of Imprivata ID and phone numbers, see Viewing Imprivata Confirm ID Remote Access User Information.
Basic user identity information (name, email) is always reported, but additional information stored in the user directory (as described in Importing Additional User Attributes from the User Directory) can also be reported. The additional information is available in reports, and it appears on the Users page if you View User Fields of Extended User Attributes.
In the upper right corner of the Users page, click Create report to create a User Details report. The link brings you to the report filters for a User Details report on the Reports page. Reports are described in Using Reporting Tools.
The Imprivata database maintains a set of relevant user information acquired from the directory servers. Most information is an exact mirror of the information on the directory servers, updated every time you synchronize the database. In addition, Imprivata-specific attributes for each user are stored in the Imprivata database.
You can:
-
Assign/revoke Administrator privileges.
-
Edit auto-generated email addresses, or add an email address.
-
Apply a user policy.
-
Clear fingerprint or other strong authentication enrollment data.
-
Clear password self-services enrollment data.
-
Enable or disable a user’s Imprivata account.
-
Enable or disable SSO for a user’s applications individually.
-
Delete the user’s credentials for individual applications.
Editing User Account Information
To view or edit a user’s Imprivata account information, click the user’s name on the User List to open a user record editing form.
Imprivata Admin Consoles are users who are assigned an Administrator role. Administrator roles and the procedures for creating them are detailed in Managing Administrator Roles.
Users with any Administrator role have access to the Imprivata Admin Console. A Super Administrator can assign an Administrator role to a user without changing anything else in the user account.
To assign an Administrator role to a user:
-
On the Users page, click the username of the user.
-
On the Administrator Role line, select a role from the drop-down list.
-
Click Save.
You can revoke a user’s Administrator privileges without changing anything else in the user account. You cannot revoke your own Administrator role or disable your own account.
To create user accounts, you can:
- Add individual users, as described in this section.
- Synchronize the Imprivata database with a directory server.
The new user must have an account on a directory server that is already an Imprivata directory. The next time you synchronize the database, the new user’s Imprivata account will be updated to match the information in the directory server.
To add a new individual user:
-
On the Users page, click Add. The Add user page opens.
-
For the user to have Administrator privileges, select an administrator Role.
-
The new user’s Imprivata account is enabled by default. If you do not want the account enabled yet, select Disabled from the drop-down list before saving the information. For more information see You can enable or disable for multiple users simultaneously. .
-
Click Save. The new user’s username is verified against the username in the LDAP (except in the case of an Creating Imprivata Accounts for Non-Domain Users). If the username does not exist in the directory, then the account is not created. If the username does exist, then you are returned to the User list.
The new user now has an Imprivata account. If the new user needs an Imprivata agent, see Deploying the Imprivata Agent.
There are two ways to create non-domain user accounts in the Imprivata system. You can:
- Add the individual user as described in this section.
- Import user accounts from an Imprivata Directory Domain, described in Creating Imprivata Accounts for Non-Domain Users.
To add a new individual user:
-
On the Users page, click Add. The Add user page opens.
-
Deselect Have an account in any external user directory?
-
Fill in the Name, Email, and Username fields.
-
Optional — Next to the Imprivata Domain field, click New to create a new Imprivata Directory Domain.
-
The new user’s Imprivata account will be enabled by default. If you do not want the account enabled when you click Save, select Imprivata User status Disabled.
For more information, see You can enable or disable for multiple users simultaneously. .
-
Select a User Policy.
- Click Save. You are returned to the User List.
The new user now has an Imprivata account. If the new user needs an Imprivata agent, see Deploying the Imprivata Agent.
To delete the accounts of one or more users:
- On the Users page, select the users to be deleted. To delete many accounts, run a search for those you want to keep, then use the Select These Users feature and deselect those you want to keep.
- Click the Delete button. You are prompted to confirm you want to delete the selected user account. On acceptance, deletion is immediate.
This procedure deletes the user records from the Users List. All user account information for each user is deleted. It does not affect user information outside of Enterprise Access Management. Users whose accounts are deleted will subsequently reappear (without SSO credentials) if you do another database synchronization that includes their accounts. Users who are authorized to use one of the strong authentication methods must also re-enroll with their strong authentication credentials. If a username is changed in the user directory, the new name appears in Enterprise Access Management after the synchronization.
NOTE: Before deleting the account, you may need to be sure SSO users are enrolled for password self-services, and leave time for the users to retrieve their credentials. See Imprivata OneSign Self-Service Password Reset.
You can enable or disable for multiple users simultaneously.
To enable or disable user accounts:
- On the Users page, select the users to be enabled or disabled.
- Click Enable or Disable. The change is effective the next time the user authenticates to Imprivata OneSign. Disabled user accounts are not counted against the Imprivata license limit. For details on configuring Enterprise Access Management when some of your users are not yet imported, enabled, or enrolled in Enterprise Access Management, see Configuring Users Not Imported, Enabled, or Enrolled in Imprivata OneSign.
NOTES:
- Before disabling users, you may need to be sure users are enrolled for password self-services, and leave time for the users to retrieve their passwords. See Imprivata OneSign Self-Service Password Reset.
- You can also enable and disable multiple user accounts with the Bulk Actions feature, detailed in Enabling and Disabling Many User Accounts.
You can apply user policies to users in the following ways:
-
An administrator with permission to assign a user policy can apply it to one or more users from Users page. Users must be selected manually from the available list.
-
A Super Administrator can assign the policy to multiple users simultaneously using a CSV file.
To apply one or more users to policy manually:
-
On the Users page, select the users who will be subject to the policy.
-
Click Apply Policy. The Apply Policy dialog box opens.
-
The change takes effect the next time the user’s Imprivata agent contacts the Imprivata server.
Users cannot access their accounts until they have installed an Imprivata agent. One notification method is described in Deploying the Imprivata Agent. You can also use the Notify button on the Users page:
-
Select the users to be notified.
-
Click Notify. A dialog box opens where you can select an Agent Type for the user.
- When you Notify a new user, Imprivata sends the user an email with the information that an account now exists, with a link to a web page on the Imprivata server where the new user can download the Imprivata agent; see Setting the Mail Server and Standard Messages.
NOTE: To edit the default text of the email, go to the Computers menu > Deploy agents option > Self-install procedure section, and click the notification message link in Step 2.