Manually Launching Citrix XenApp Applications
This
Before You Begin
Review the following:
-
Verify that the Citrix XenApp environment is functioning normally, independent of Imprivata, before installing and configuring Imprivata components.
-
Review the Imprivata Enterprise Access Management with SSO Supported Components matrix to confirm that your environment meets all of the minimum or recommended Citrix requirements.
Session persistence (roaming) is managed by your virtual environment, not Imprivata Virtual Desktop Access. If your virtual environment is configured correctly for session persistence, Imprivata Virtual Desktop Access seamlessly roams user sessions, on authentication, to the endpoint computers in your environment.
NOTE: For more information about configuring session persistence, see your vendor–specific documentation.
BEST PRACTICE: Limit the delivery of an application to one instance per user. If the application is distributed across multiple servers in the farm, limiting the instance ensures that the Citrix broker roams the session that the user was previously using. For more information about configuring application delivery, see the Citrix documentation.
Session persistence maintains the connection between an endpoint and the Citrix Storefront after load balancing is performed. A common way to maintain session persistence is to use the endpoint source IP address. However, customers who use Network Address Translation (NAT) in front of a NetScaler load balancer cannot use this persistence method, because endpoints appear to have the same IP address at the load balancer.
Those customers must use the NetScaler COOKIEINSERT session persistence method. This method causes the NetScaler to insert a cookie into client requests, which the NetScaler uses to track the server to which the connection belongs.
To enable session persistence using COOKIEINSERT, perform this procedure after you have completed all steps in the main Installation Sequence section further below.
-
Configure the Citrix NetScaler’s Persistence type to be COOKIEINSERT and specify a cookie name to use, for example, persistcookie.
-
Specify the same cookie name in your endpoints using either method a or b.
In both methods, VALUE is the cookie name you specified in the Citrix NetScaler:
-
For Imprivata ProveID Embedded Linux endpoints:
Add a new configuration option to the imprivata.conf configuration file on the endpoints, using one of two methods:
-
Add this new section to the imprivata.conf file:
[citrix]cookie-insert = VALUE -
Or run this command from the endpoint system prompt:
/usr/lib/imprivata/runtime/bin/configuration-editor citrix --cookie-insert VALUE
-
-
For Windows endpoints:
Configure the cookie name using this Registry key:
HKLM\Software\SSOProvider\VDI\CookieInsertName String VALUE;
-
-
Reboot the endpoints.
Troubleshooting
An Imprivata agent log file entry that indicates a problem with this session persistence method is:
Failed to get COOKIEINSERT token – The Imprivata agent failed to get the cookie from the header.
Make sure that the cookie names are the same on the NetScaler and the endpoints.
After installing Citrix Workspace app, additional configuration is required to support Enterprise Access Management.
If you have not completed the configuration, see Configuring Citrix Workspace App for Imprivata Enterprise Access Management.
Imprivata agents communicate with known Citrix stores. The URL required to configure the Imprivata agent connection to Citrix depends on how the Citrix store is configured:
-
Store URL – If the store is configured with a Store URL, the Imprivata agent communicates with Citrix using the respective Web Site URL.
Example: If the store is configured with
https://example.com/Citrix/SalesStore, then configure the Imprivata agent connection withhttps://example.com/Citrix/SalesStoreWeb. -
XenApp Services URL – If the store is configured with a XenApp Services URL (the Storefront legacy URL or the Storefront URL), the Imprivata agent communicates with Citrix using the same XenApp Services URL.
Example: If the store is configured with
https://example.com/Citrix/SalesStore/PNAgent/config.xml, then configure the Imprivata agent connection withhttps://example.com/Citrix/SalesStore/PNAgent/config.xml.
Additional Citrix configuration is required to support native connections to Citrix StoreFront stores. The Citrix store must be configured with the following authentication methods to support Enterprise Access Management:
-
User name and password
-
Domain pass-through
-
HTTP basic — Even if the store is configured for HTTPS, this authentication method is required.
To configure the required authentication methods:
-
Open Citrix Studio.
-
Go to Citrix StoreFront > Receiver for Web.
-
Select the store you want to manage.
-
In the Store Web Receiver pane, click Choose Authentication Methods.
-
Click Add/Remove Methods and enable the required methods.
Review the Expected User Workflow
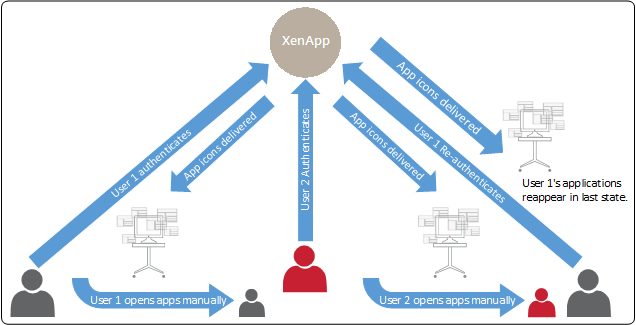
The following diagram illustrates the expected workflow when the Enterprise Access Management environment is configured to let users manually launch Citrix XenApp applications.
Installation Sequence
Before you install the Imprivata agent on endpoint computers, verify that the Citrix XenApp environment is installed and configured correctly:
-
Install the Citrix XenApp Server software.
-
Install the Citrix Web Interface software or Citrix Storefront.
-
Install a supported version of Citrix Workspace app on all endpoint computers where you plan to install the Imprivata agent.
-
Install and configure the XenApp published applications to be used.
-
Verify the Citrix XenApp store settings and note the respective store URLs (Web Site or XenApp Services URL). See the Citrix user documentation for more details.
To install the Imprivata agent on the Citrix Server, follow the directions for installing a Imprivata Citrix or Terminal Server Agent
See
Imprivata agents communicate with known Citrix stores. To configure the connection:
-
In the Imprivata Admin Console, go to the Computers menu > Virtual Desktops page > Citrix XenApp section.
-
In the first field, enter a Web Site URL or a XenApp Services URL.
-
Select Allow authentication from XenApp-enabled devices.
-
Click Save.
Create and apply a user policy that enables access to Citrix XenApp applications.
Step 5a: Create a User Policy
To create a user policy:
-
In the Imprivata Admin Console, go to the Users menu > User policies page.
You can select an existing user policy from the list, or make a copy of the Default User Policy as a starting point. If you want to edit an existing user policy, click the existing user policy name, and skip to step 5.
-
To copy the Default User Policy, select Default User Policy, then click Copy.
-
Click Default User Policy (2).
-
Rename the user policy in the Policy Name field.
-
Click the Virtual Desktops tab.
-
Select Enable virtual desktop automation.
-
Select Automate access to applications or published desktops.
-
Select a roaming option:
-
Roam open applications — Select this option to roam all applications with an active session. This includes applications that are configured to automatically launch, as well as those that a user has manually launched.
- Roam automatically launched applications — Select this option to roam applications that are configured to automatically launch:
If an application session is present, only the automatically launched application is roamed.
If an application session is not present, the application is automatically launched again.
NOTE: Under certain circumstances, applications that users manually launch are also roamed. This typical happens when the session is present, and the application is hosted on the same Citrix server as the applications that are configured to automatically launch.
-
- Click Save.
Step 5b: Apply a User Policy
To apply the user policy:
-
In the Imprivata Admin Console, go to the Users menu > Users page.
-
Select the users to which you want to apply the user policy.
You can view additional pages of the Users list without losing your selections. Imprivata keeps track of all the users you have selected and displays a counter at the top of the page.
BEST PRACTICE: To select multiple users more efficiently, use the Search for Users tool at the top of the Users page. Search for Users offers several search parameters for refining your results.
-
Click Apply Policy.
-
Choose the policy from the drop-down list and click OK.
Create a computer policy for the endpoint computers that are supporting published applications.
Step 6a: Create a Computer Policy for Endpoint Computers
To create a computer policy:
-
In the Imprivata Admin Console, go to the Computers menu > Computer policies page.
You can select an existing computer policy from the list, or make a copy of the Default Computer Policy as a starting point. If you want to edit an existing computer policy, click the existing computer policy name, and skip to step 5.
-
To copy the Default Computer Policy, select Default Computer Policy, then click Copy.
-
Click Default Computer Policy (2).
-
Rename the computer policy in the Name field.
-
Go to the Virtual Desktops tab > Citrix XenApp section.
-
Select Automate access to Citrix XenApp to have Imprivata automatically handle login behavior for Citrix XenApp.
-
You can control the behavior when an endpoint computer is locked. Under When a XenDesktop endpoint is locked, choose one of the following:
-
Keep the XenApp client and user session active — Preserves the user session. When a user logs back in to this endpoint computer (or another endpoint computer with XenApp enabled), their XenApp applications are preserved just as they were when this endpoint computer was locked.
-
Shutdown the XenApp client and disconnect the user session — Helps optimize resource consumption and minimizes the total number of active sessions in use in the enterprise. When a user logs back into this endpoint computer (or another endpoint computer with XenApp enabled), their XenApp applications relaunch.
-
-
Optional — For ProveID Embedded devices, select Enable Published Applications to enable manually-launched XenApp published applications.
-
Select the servers that the endpoint computers should use.
-
Click Save.
Step 6b: Apply a Computer Policy to Endpoint Computers
Apply the computer policy you just created to endpoint computers.
Manually Assigning the Computer Policy
To assign the computer policy:
-
In the Imprivata Admin Console, go to the Computers menu > Computers page.
-
Select the computers to which you want to apply the computer policy. You can use Search for Computers to enter search criteria.
-
Select Apply Policy.
-
Select Choose a policy for selected computers, select the policy from the list, and then click Apply Policy.
Automatically Assigning the Computer Policy
Computer policy assignment rules let you assign a policy to existing endpoint computers and make sure that the policy is automatically assigned to endpoint computers that are added later.
To automatically assign the computer policy:
-
In the Imprivata Admin Console, go to the Computers menu > Computer Policy Assignment page.
-
Click Add New Rule.
-
Name the rule and select the assignment criteria.
-
Select the policy you created and click Save.
Troubleshooting
Change the Clock Format on the ProveID Embedded Desktop
By default, the Imprivata ProveID Embedded desktop displays the time in the 12 hour clock format.
The clock format is managed by a configuration file (Imprivata.conf) on the Imprivata ProveID Embedded device. To change the display to the 24 hour clock format you can:
-
Use the configuration editor
-
Modify the Imprivata.conf file directly
To update the format using the configuration editor, run the following:
-
Enable the 24 hour format:
/usr/lib/imprivata/runtime/bin/configuration-editor apps-clock --24h -
Enable the 12 hour format:
/usr/lib/imprivata/runtime/bin/configuration-editor apps-clock --12h
To update the format by modifying the configuration file:
- Go to /usr/lib/imprivata/runtime/etc/.
- Open the Imprivata.conf file:
Enable the 24 hour format:
[applications.clock]use-24h=trueEnable the 12 hour format:
[applications.clock]use-24h=false
Optimize Citrix XenApp Session Sharing
In certain network environments, session sharing does not occur when users start multiple XenApp applications at the same time.
To optimize resource consumption, you can minimize this behavior by extending the period Citrix waits for an application to start before it starts the second application in a second session. The default time-out value is 20 seconds.
To extend the time-out period, add the registry key SucConnTimeout to HKEY_LOCAL_MACHINE\SOFTWARE\Citrix\ICA Client\Engine\Configuration\Advanced\Modules\WFClient\ with a Data Type of REG_STRING and a Value of <20 or more seconds>.