Configuring the Screen Details
After you provide a name for the profile and select the screens to include in the profile, you can configure each screen. This may require a number of iterations.
The details you provide will accomplish these results:
-
Refining the Screen Recognition Information — Teach the Imprivata APG to recognize the screen when it is presented.
-
Configuring the Screen Details — Associate the screen’s credential fields with the Imprivata APG variables. This lets the Imprivata APG capture the user’s credentials when the screen is presented. Credential capture happens one time for each enabled screen that requests credentials.
-
Programming Credential Proxy — Configure the Imprivata APG to proxy the captured, encrypted credential information to the screen any time the screen opens.
NOTE: If you have not yet learned screen parameters, then go to Learning the Screen Parameters before proceeding.
After you configure a screen, you configure the remaining screens the same way. Screens that require no user input are much simpler, but the steps are the same.
Clicking Configure Another Screen returns you to the Configure Screen page. After you have configured all screens, you should test the application profile. See Testing the Application Profile.
NOTE: It helps to think of screens functionally, rather than graphically. Some applications use multiple screens to request the same credentials. With wildcards, you can often configure a single Imprivata APG screen to satisfy the requests of similar application screens.
After the Imprivata APG learns the screen fields and controls, refine the information to make sure that it reflects the screen you want and no other screen. The goal is for the Imprivata APG to recognize this screen when it opens, and to never recognize another screen as this one.
- The Imprivata APG learns basic identification information about the screen. This information is usually sufficient for the profile. You can delete text that is too restrictive or replace some characters with wildcards.
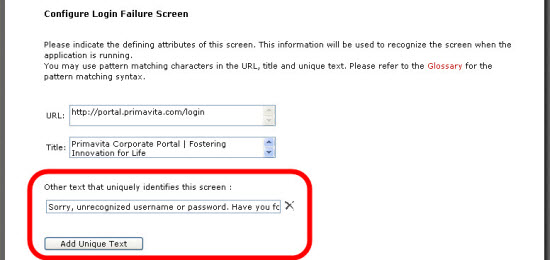
- (Windows and Web applications only) If there is some text on the screen that always appears and is unique to the page, then for Do you want to specify unique text? select Yes and enter it in the field provided. Adding unique text is not usually necessary, unless two or more screens in the profile use the same URL and title. Windows applications can also use a not option to indicate text that is not found on this screen, but is found on another. The following image shows an example of unique text that differentiates a login failure screen from a login screen:
-
- Skip the Meaning in Imprivata APG drop-down list for now. You use it in Configuring the Screen Details.
- If you are not sure of the identity of a control, click the Locate Field icon for it. The matching control blinks on the application screen.
- (Web applications only) Select Obscured? only if user input from the screen is obscured or replaced with encrypted data, asterisks, or other characters.
- (Login and Change Password screens only) Near the bottom of the form is an option for matching other, different screens that fulfill the same function. In some unusual circumstances, it is necessary to use the Imprivata APG to recognize one screen as another. This feature is detailed in Programming Alternate Screen Usage (Windows and Web Applications Only).
- To make sure that the Imprivata APG can recognize the screen, drag the Test Recognition magnifier to the screen. If you do not get a success message, you may have entered too much information. Select each field and modify or delete information as needed.
- Go to Configuring the Screen Details.
NOTE: You can edit the fields as needed to provide the required degree of flexibility and precision for your needs. Wildcard characters and other tools are detailed in Advanced Screen Recognition Techniques.
Programming Alternate Screen Usage (Windows and Web Applications Only)
For Windows applications Login and Change Password screens only, you can allow the screens to serve an alternative use as Single Sign-On (SSO) success or failure. Use this feature when the screen you are profiling can be used to recognize success or failure for another profiled screen.
Two Examples
- A user tries to change a password, fails, and the login screen opens. In this case, the login screen can be used to identify a failed change password operation. Assign the login screen an additional usage as a change password failure screen relative to the change password screen.
- A first-time user authenticates to an application successfully, and is immediately presented with a change password screen. In this case, the change password screen can be used to identify a successful login. Assign the change password screen an additional usage as a login success screen relative to the login screen.
Procedure
To program alternative screen usage for a login or change password screen:
- This screen, as shown in the following image, performs a second function. It can be used to indicate success or failure for another screen. Select the other screen from the drop-down list on the right.
-
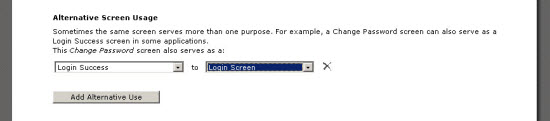
- From the drop-down list on the left, select the screen type that best represents the success or failure function that this screen fulfills.
- To delete an alternative usage, click the X icon to the right of the drop-down box.
Credential capture happens one time for each user for each enabled screen that requests credentials. After the user’s credentials have been captured, the Imprivata APG handles all subsequent authentication requests until the credentials are cleared by an Administrator or the application profile is disabled or deleted.
The Imprivata agent runs on the computer and monitors the desktop for profiled screens. When a profiled authentication screen opens, if the Imprivata agent does not yet have credentials for it, then the Imprivata agent goes into Credential Capture mode. Without changing the user’s workflow, the Imprivata agent captures and encrypts the credentials. This happens only one time per application screen.
There are two ways to configure the Imprivata APG to capture user credentials.
- The default mechanism uses the screens native to the application. This simple method works for the vast majority of applications.
- The custom credential capture screen is an advanced option useful for many Java applications and for applications that obfuscate the credentials before Imprivata APG can capture them. If the default mechanism cannot identify all the credential fields, see Advanced Credential Capture Techniques.
NOTES:
- You cannot use Custom screens for credential capture.
- Applications that share credentials in a credential store must have the same fields learned. If one application has more fields than another application profiled in the store, then choose Ignore This Field in the Meaning in OneSign column.
Using the Native Application Screen
The Imprivata APG scans the screen and identifies fields for user input. The Imprivata APG uses an internal set of field names with specific meanings. In this step, you match the names of the fields that the application requests with the names of the fields that the Imprivata APG uses.
For example, the application might use the label p or passwd for the field in which the user enters a password. The Imprivata APG uses Password for that function.
To configure the fields:
- The Imprivata APG lists the user input fields from the selected screen. For each field label, select the matching Imprivata APG meaning from the Meaning in OneSign drop-down list. At the bottom of the list is an Ignore this Field option.
- If a field is not present in some versions of the screen, then select the Always Present? option to make sure it is not used to recognize the screen. If this option is not selected, then the Imprivata agent rejects screens that do not have the field, even if they are otherwise correct.
- For each user-input field, click the Locate Field icon and watch the application screen. Each field should flash when the corresponding Locate Field icon is clicked. If the icon is grayed-out, then the control is hidden from users. Locating fields is an optional step to help you error-check the profile and to find poorly-labeled controls.
- (Web applications only) If user input to the field is obfuscated (the case for many password fields), select the Obscured? option. This is seldom necessary.
- (Windows applications and Web applications with Java components) If the Get Text? or Send Text? options are selected, leave them selected for now.
- When you finish, go to Programming Credential Proxy.
NOTE: If the Imprivata APG cannot find some credential input controls, then try re-learning the screen while holding down the Alt key. This learns more screen controls, but is not always necessary. For more probes, see Advanced Screen Learning Techniques. If this fails, then use a custom credential capture screen. See Advanced Credential Capture Techniques.
The third and final step provides the information used by the Imprivata agent to proxy the user’s credentials. The Default Proxy Mechanism enters the requested credentials into the fields and submits them the same way the user does. The default proxy mechanism works for most applications.
There are a variety of options for submitting the credentials, depending on the type of application you are profiling.
Using Customized Keystrokes and Mouse Clicks
Some applications cannot correctly proxy credentials with a profile that uses the default proxy behavior. For these applications, use the advanced features detailed in Advanced Credential Capture Techniques.
Using the Default Behavior
If you opt to use the default proxy mechanism, then you can select the one-time proxy setting and the autosubmit setting (detailed below) and click Done Configuring This Screen.
One-Time Proxy Setting
If the application returns a logged-out user to the login page, then the Imprivata APG recognizes the login page and re-authenticates the user. If the Autosubmit feature (described below) is also selected, then the user can get stuck in a loop, forever logging out of the application and being logged in again.
- If Autosubmit is in use, and the application returns a logged-out user to a recognized login page, then select First Time Only to ensure the user is authenticated to the application only one time per session.
- If either of the above conditions are not true, then leave this at Each Time to allow SSO for multiple sessions of the application during a single session.
Autosubmit Setting
After the Imprivata APG has filled in the user’s credentials, the user can submit the credentials personally, or the Imprivata APG can submit the credentials for the user. In conjunction with a password policy, autosubmission increases security by making it impossible for the user to know or to intercept the credentials after they have been changed by OneSign.
To enable the autosubmit feature:
- Select Yes.
- (Optional) In some rare cases, the Imprivata APG is unable to autosubmit the form or dialog box. In these cases, use the Tab Submission feature: open the page and, without using the mouse, count the number of tabs it takes to activate the submit key. Select that value from the drop-down box provided. This is usually not necessary.
NOTE: Some web applications do not count the user-input fields from the top left corner of the page. If the tab-submission feature does not work correctly, count tabs backward from the last field and try again.
The Imprivata APG may have identified other controls, including the control to be used to submit the credentials. If you want the credentials to be autosubmitted, then select the submission control from the drop-down list.
After you finish learning a screen, the image that represents that screen appears with a check mark on the Application Screens page.
Relearning the Screen
If at any time you want to discard your edits and start with a freshly learned screen, or if you come up with a better version of the screen to use for profiling purposes, relearning the screen is as easy as learning it: just drag the magnifier icon to the target screen again. All fields are purged and replaced with the new information.
You can define custom flags within the Imprivata APG to help ensure optimal SSO behavior. There are screen-level flags, and environment-specific, application-level, and container-level flags.
You can select a number of flags in the Imprivata APG, depending on what you are learning. The flags are context-sensitive: you set screen-level flags on the individual Configure Screens pages, application-level flags on the Application Screens page, and container-level flags from the Edit Container page.
You can specify an OS environment for application and container flags as shown in the following image:

When you add a new flag or its value changes from the default value, the flag appears in the Custom defined screen flags list. If you reset a flag to its default value, it disappears from the list. If you delete one of the listed flag settings, the flag reverts to the default value. The following image shows a screen flag added to an Application Profile:

NOTE: Misuse of flags can make troubleshooting difficult. Use flags only under direction of Imprivata Support. Additional flags and information are available from Imprivata Support.
Edit XML appears at the bottom of the page. The link opens a text editor with the XML code for the screen.
NOTES:
- Editing the
AppProfiles.XMLdirectly is risky. If you make a mistake and the file does not conform to the schema, none of the profiles work. - Do not edit the DGS or CID attributes under any circumstances. These identification values are for internal use only.
Some applications may exhibit different authentication behavior on different operating systems. The first OS learned becomes the default profile for all users. If the application exhibits different credential capturing or proxying behavior on one or more other supported operating systems, then add those operating systems to the profile. This is seldom necessary.
To add a new operating system:
- Open the Imprivata APG on a computer using the operating system to be added.
- Open the application profile to the Configure Screens page.
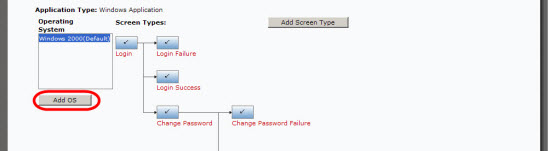
- Click Add OS. The following image shows the location of the Add OS button:
-
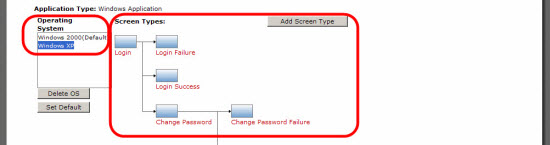
- The OS of the computer you are on is added. Profiled screens are duplicated and appear with no check mark until learned. You can only add the OS of the computer on which you are working. The following image shows that Windows XP operating system was added, but the screen has not been learned:
-
- Detail each screen.
NOTE: Add OS only appears if the current OS is different from any OS already learned for the application profile.