Configuring Passive Proximity Card Authentication
Imprivata supports passive proximity card authentication with most standard proximity cards and USB card readers from RF IDeas Inc. Proximity card authentication can be combined with password, Imprivata PIN (as an alternative to a password), or finger biometrics as second factors to provide strong two-factor authentication.
This topic details proximity card authentication. Instructions and best practices for pre-enrolling and allowlisting proximity cards in bulk are detailed in Managing Proximity Cards.
Hardware Requirements
Each proximity card-enabled user needs a proximity card, and each computer that supports proximity card authentication requires a card reader. There are no special server configuration steps when implementing proximity card authentication. Microsoft Windows includes the necessary drivers. For a complete list of supported proximity cards and readers, see Enterprise Access Management Supported Components .
Some RF IDeas proximity card readers can beep to acknowledge the user’s proximity card. Enable this feature by selecting Beep card reader when user taps card in the Card Readers section of the General tab of the computer policy for affected computers.
Two-Factor Authentication with Passive Proximity Cards
For two-factor authentication, you can require proximity cards to be used with a network password, Imprivata PIN, or fingerprint authentication for some or all users via user policies. First and second factors of authentication are specified on the Authentication tab of a user policy.
Monitoring and Reporting Proximity Card Authentications
You can get real-time notifications of many network events, including enrollment for proximity card. See Configuring Event Notifications.
Disassociating Proximity Cards
If a proximity card is lost, damaged, stolen, or must be taken out of circulation for any other reason, you can disassociate a card from its enrolled user via the user’s user record. Disassociated cards can be re-enrolled by another user.
Each user's proximity card must be enrolled before it can be used to authenticate to Enterprise Access Management. The enrollment process maps the card number to the user’s user ID.
Having Users Enroll Their Own Proximity Cards
When a user tries to authenticate with an unrecognized proximity card, the proximity card enrollment screen appears.
If the Proximity Card logon option is grayed out, check to be sure the proximity card sensor is securely plugged into the endpoint computer’s USB port.
If multiple proximity cards are detected, then you see a list of detected cards so you can select the user account to log into. If an Imprivata PIN has been configured, enter and confirm a new Imprivata PIN.
Pre-Enrolling Proximity Cards in Bulk
Administrators can pre-enroll and allowlist proximity cards in bulk. See Managing Proximity Cards
In some cases, the number displayed in the Imprivata Admin Console and in the proximity card enrollment screen does not match the number printed on the proximity card. The mapping used internally by Enterprise Access Management is unique, consistent, and accurate for all Enterprise Access Management use; there is no need to change or update the card number.
Deleting Enrollment Data
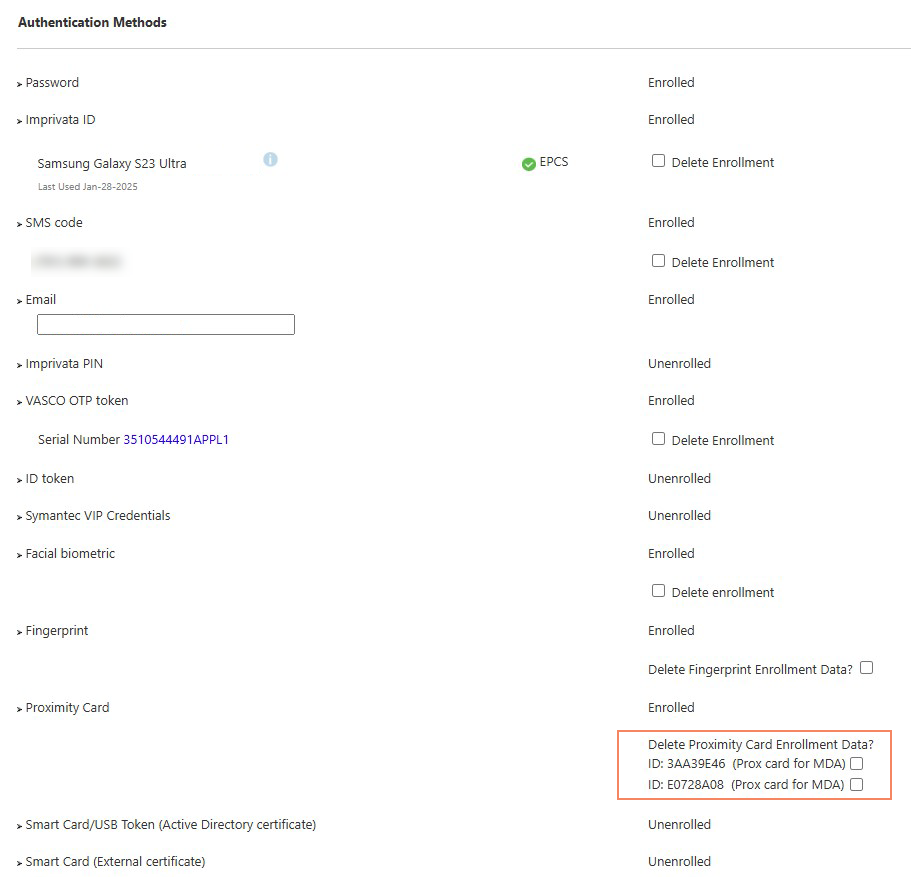
You can delete the enrollment data for proximity card users from each user’s user record (Users menu > Users > select a user record). Select the Delete Proximity Enrollment Data? option associated with the card you want to delete. The following image shows an example of deleting enrollment data:
Click to enlarge
To create and run an "Enrollment" report, go to the Imprivata Admin Console under Reports > Add new report.
When an unenrolled proximity card is tapped at an endpoint computer, the Imprivata proximity card enrollment wizard is launched.
However, this enrollment fails for users who are not yet imported, enabled, or enrolled in Enterprise Access Management. The default error message is "You are not allowed to enroll proximity cards." You can change this to a custom error message when an unenrolled user taps a proximity card at an endpoint computer.
Conditions
- Proximity card usage is not allowed for this user policy.
- The user is not imported, enabled, or enrolled in Enterprise Access Management.
Customization
This error message is customizable via registry key. The error message can contain up to 100 characters, after which it will be truncated.
- If the registry key value is empty, then the message, "
You are not allowed to enroll proximity cards" appears (or a localized version, if applicable). - If the registry key value is set, the default is replaced with the registry value. The message is not localized.
Create the NonOneSignProxError registry key with a Data Type of string and the Value is the message text:
- 64—bit endpoint computers: HKLM\SOFTWARE\SSOProvider\OneSign
For configuration best practices when some of your users are not yet imported, enabled, or enrolled, see Configuring Users Not Imported, Enabled, or Enrolled in Enterprise Access Management.
You assign proximity card authentication and all other authentication methods through the user policies that you assign to each user.
Allowing Users to Enroll a Replacement Card
If you restrict the number of cards assigned to each user, you can allow users with this policy to enroll a replacement card when they first use it to log in. The new card is effective immediately and all other cards assigned to the user are immediately disabled.
When enabled, the user can only enroll a replacement card if the user can authenticate the enrollment. For example, if your desktop access policy requires two-factor authentication, your users will not be able to enroll a new proximity card if they only have a password.
Set up another authentication method besides password and proximity card.
Alternatively, set up a single computer dedicated to proximity card enrollment. A computer policy for this endpoint that allows password-only authentication overrides your user policy that requires two-factor authentication.
Revoking Proximity Card Authentication Privileges
Revoke proximity card authentication privileges through the user policies that you assign to each user. Create a different user policy and assign it to the user.
Users can lock their shared workstation before they leave it by tapping their passive proximity cards on the reader.
On an unlocked shared computer, the Imprivata agent bubble tells the user who is currently logged in. If another user wants to use this workstation, the user can tap the proximity card one time to lock the screen and then tap it again to log in.
To allow a user to lock a computer by tapping a passive proximity card on the reader:
- In the Imprivata Admin Console, go to Computers > Computer policies and select a policy.
- Go to Advanced settings > Proximity card lock behavior section, select Allow lock only.
- To allow user switching with a single tap of the newcomer’s card, select Allow locking and user switching. This works only on computers on which the Imprivata shared kiosk workstation is agent installed.
On Windows endpoints, you can exclude specific proximity card readers so that users can utilize the readers for other purposes other or to prevent unintentional logins or logouts.
For example, on a Windows endpoint, where there are two different models or manufacturers of proximity card readers, you can exclude one from being used as a badge tap reader but still have it be available for use by other applications.
To exclude a proximity card reader:
-
Log into the Windows endpoint computer.
-
Open the registry editor and go to the Providers registry key:
HKLM\SOFTWARE\SSOProvider\DeviceManager\Devices\Prox\Providers -
Locate the subkey specific to the proximity card manufacturer you want to exclude.
-
Create a REG_MULTI_SZ key SkipReaders with a value of hex(7):00.