Create an iOS Backup
iOS Backup files include device settings from the Settings app, home and lock screen images, icon arrangement and app content and settings. Backups do NOT contain apps or iTunes media.
Mobile Access Management allows you to restore a single backup to many devices and we support encrypted and non-encrypted backups. In this way, you can control settings that are not available to MDM or DEP. For example, using a backup you can set the following:
| Feature | Can be restored? | Notes |
|---|---|---|
| Airplane Mode |

|
|
| WiFi |
|
Useful if Airplane mode is on |
| Bluetooth |
|
May require similar devices for master & clone |
| Cellular > Cellular Data |
|
|
| Notifications > AMBER Alerts |
|
|
| Notifications > Emergency Alerts |
|
|
| Notifications > Public Safety Alerts |
|
|
| Sounds > Vibrate on Ring |
|
|
| Sounds > Vibrate on Silent |
|
|
| Sounds > Ringer and Alerts Sound Level |
|
|
| Sounds > Change with Buttons |
|
|
| Sounds > Keyboard Clicks |
|
|
| Do Not Disturb > Do Not Disturb |
|
|
| Do Not Disturb > Scheduled |
|
|
| Do Not Disturb > Activate |
|
|
| General > Software Update > Automatic Updates |
|
|
| General > Handoff |
|
|
| General > Background App Refresh |
|
|
| General > Date & Time > 24-Hour Time |
|
|
| General > Keyboards > Enable Dictation |
|
|
| Display & Brightness > Auto-Lock |
|
|
| Battery > Low Power Mode |
|
|
| Privacy > Location Services |
|
|
| Passwords & Accounts > AutoFill Passwords |
|
|
| Apple ID (iTunes Store) |
|
Mobile Access Management's Backup Scrubbing must be disabled |
| Apple ID Password |

|
Apple ID Passwords are never preserved |
| Restrictions Passcode |
|
|
| Battery Percentage on/off |
|
|
| Text Size |
|
|
| Raise to Wake |
|
|
| Enterprise App Trust |
|
Useful if you do not have MDM |
| Accessibility: Large Text, Reduce Motion, Assistive Touch |
|
|
| Add/Set Keyboards |
|
|
| Text Replacements |
|
|
| Contacts |
|
Contact list is preserved from master to slave |
| Apps |
|
Apps are not stored in backups |
| iOS Version |
|
iOS versions are not stored in backups |
Some settings are never preserved within backups.
-
You can not save a device passcode
-
You can not grant permissions for camera or microphone for specific apps
When creating your master backup, remember that any settings will be duplicated to all your devices. Try to avoid adding an Apple ID on the master. Also Imprivata recommends starting with an erased device each time, to be sure you don’t have any undesired settings.
Mobile Access Management helps you by automatically "scrubbing" the backup to remove Apple ID, MDM, saved WiFi networks, and supervision. MAM also "depersonalizes" the backup so that a common backup may be used across any iOS device type, and nearly any iOS version.
Follow the instructions below to create your back up, compress it and upload it to Mobile Access Management.
Step 1: Configure your Master Device
Non DEP
-
Make the master from an erased iOS device. The device does not to be supervised but it can be.
-
Configure the device as desired.
DEP
-
Your MDM DEP profiles must contain Mobile Access Management’s Supervision Identity. If you do not want your devices to pair with hosts other than MAM, Imprivata recommends creating two DEP profiles:
-
Master Device: this DEP profile allows pairing for the master device so that it can pair with iTunes to create the backup.
-
All other devices: For the rest of devices you’re restoring to, you can disallow pairing, but this DEP profile must also include Mobile Access Management’s Supervision Identity.
-
Step 2: Create the backup using iTunes
-
Open iTunes, but do not connect the master device yet.
-
In iTunes open Preferences > Devices and select Prevent iPods, iPhones, and iPads from Syncing automatically.
-
Connect the master device to the computer. If prompted on the device, tap Trust. If prompted on the computer, allow iTunes to access information on the device. Click Continue.
-
In iTunes, select Set up as a new iPad/iPhone/iPod.
-
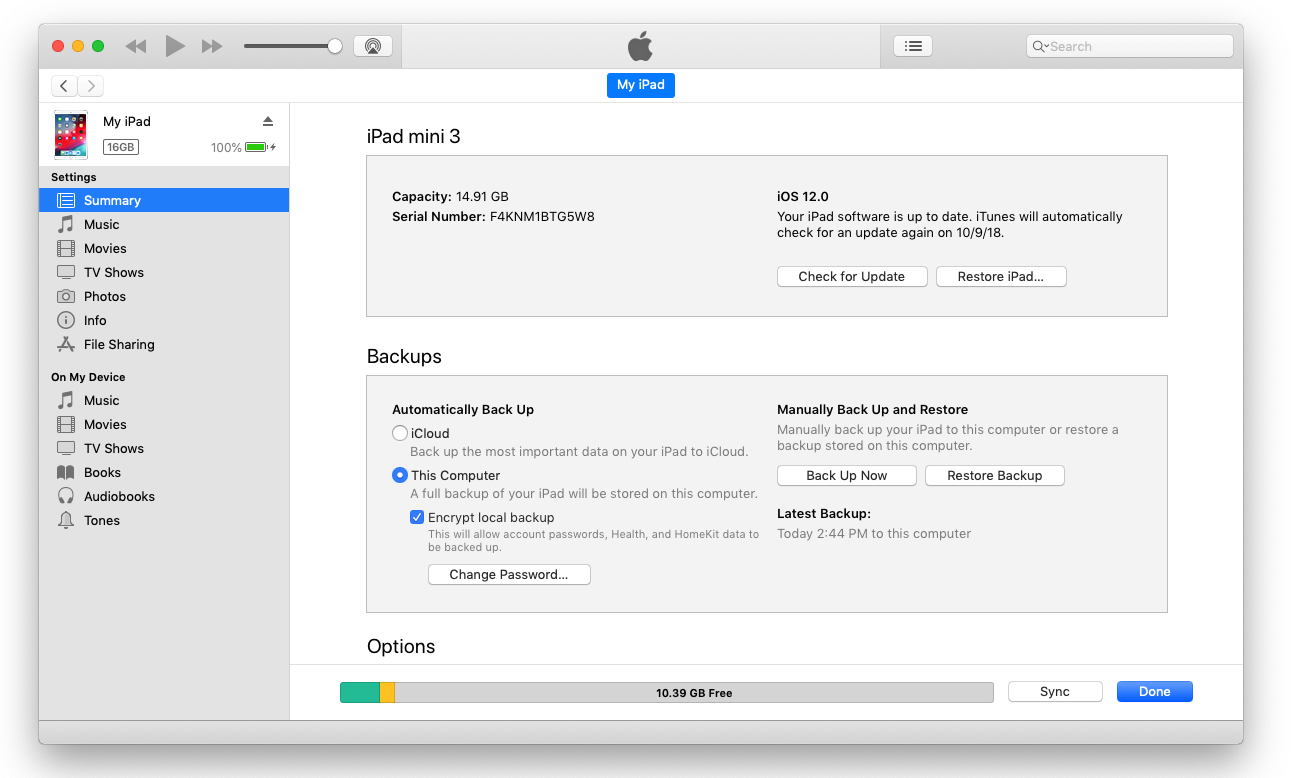
In the Backups section, select This computer.
-
Optional: If your MDM requires encryption, or you would like to encrypt your backup, select Encrypt local backup and set a password when prompted. You’ll need to enter this password when the backup is uploaded to Mobile Access Management.
-
Click Back Up Now.
Click to enlarge
Step 3: Locate the Backup folder
On Windows backups are stored in %AppData%\Apple Computer\MobileSync\Backup\. Macs store backups in ~/Library/Application Support/MobileSync/Backup/.
On Mac, an easier way to locate the backup is to open iTunes > Preferences > Devices. Control-click on the backup you want and select Show in Finder.
Continue below to compress the backup files.
DEP
Step 1:
Prepare the DEP profile in your MDM and your Master Device
-
You need a Mac to create this process. You’ll need a DEP device running iOS 10.3.3 or greater.
-
Your MDM DEP profile must contain two supervision identities: Mobile Access Management‘s and Configurator’s.
To create a supervision identity in Configurator, use Configurator 2.5 or later.
-
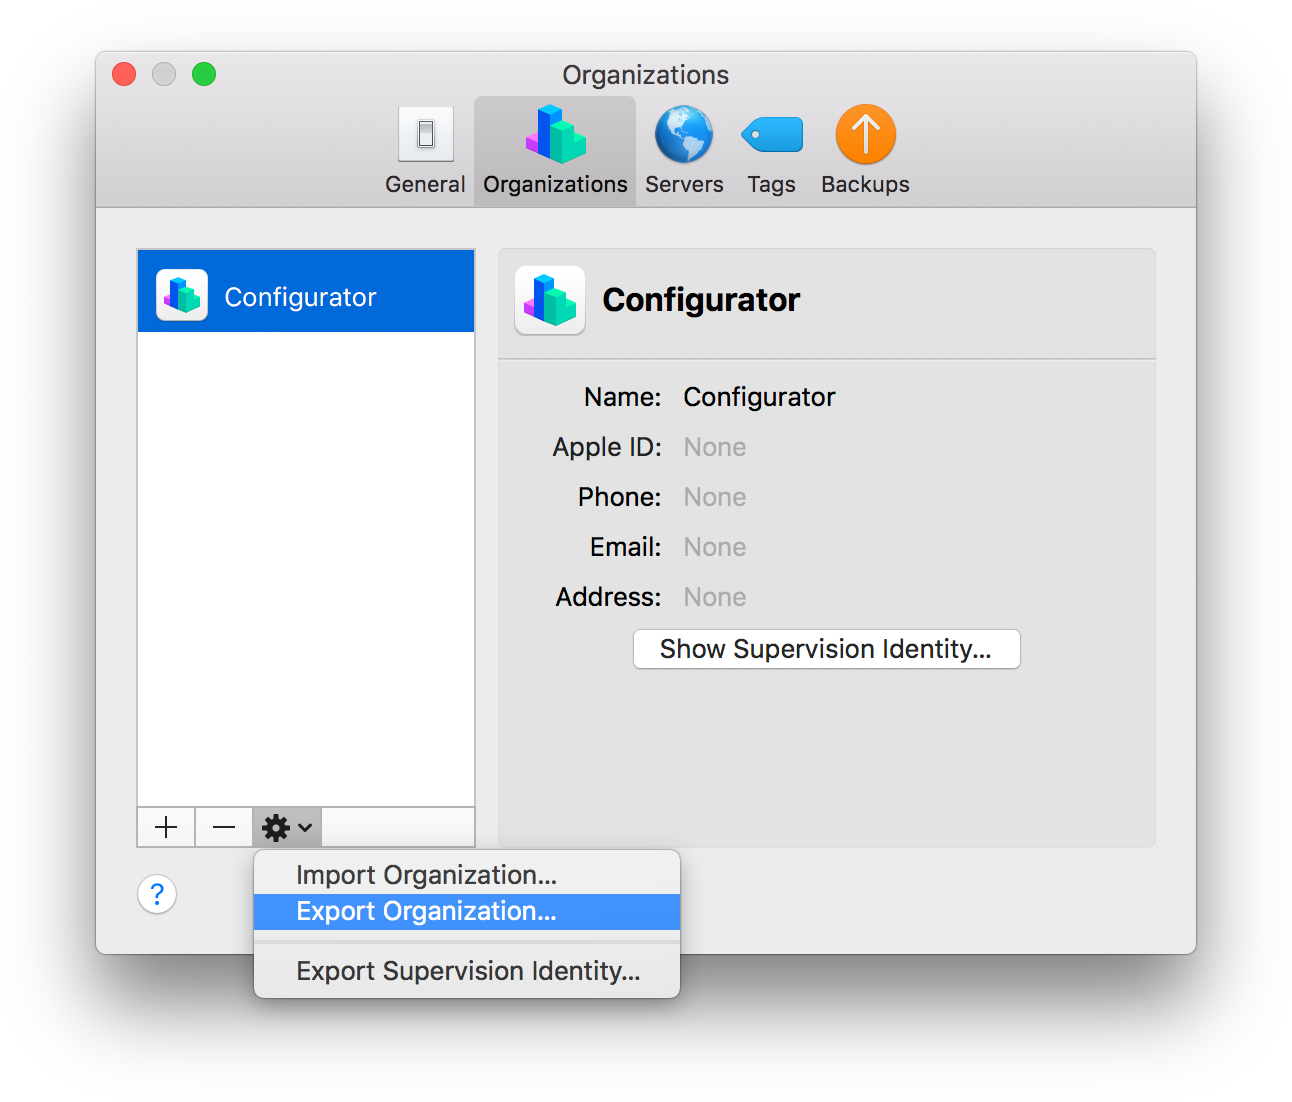
Open Configurator’s Preferences.
-
Click on the "Organizations" tab

-
Select the organization you want use to export the supervision identity. If you don’t have an Organization setup you can create one by clicking on the + sign to create a new organization. You can skip the Apple ID, and choose Generate a new supervision identity.
-
Click on the gear icon and select Export Supervision Identity… give a name and save it in a location you find it later.
Click to enlarge
-
Enter a password to encrypt the private key.
-
Upload both supervision identities (Mobile Access Management and Configurator) into your MDM’s DEP profile by following these instructions.
-
Once that is done, ensure your master device has this DEP profile assigned to it. If already set up, you’ll need to erase your device for the profile to take effect.
-
Finish setting up the master device with your desired settings.
Step 2: Create the backup using Configurator
-
Connect the device to your Mac, and launch Configurator. The device should appear in the main Configurator window.
If you see a warning that the device did not attach, you may have not properly exported or uploaded Configurator’s supervision identity in Step 1.
-
Optional: If your MDM requires encryption, or you would like to encrypt your backup, go to Actions > Advanced> Enable Encrypted Backups… and set a password when prompted. You’ll need to enter this password when the backup is uploaded to Mobile Access Management.
-
Control-click on the device, and select Back Up from the menu.
Step 3: Locate the Backup folder
The backup will be located in /Users/<YOUR_USERNAME>/Library/Application Support/MobileSync/Backup/. The backup folder is named with the device’s UDID. You can check the timestamp on the folder to find the latest one.
You can also use iTunes to locate the backup file, as both Configurator and iTunes store these files. Open iTunes > Preferences > Devices tab > and you will see your backups there. Select the backup you want to use, right click on it and select Show in finder to open up the folder.
Continue on to Step 4.
Step 4: Compress the Backup for use with Mobile Access Management
The backup folder is named with the device’s UDID. You can sort by date and time, and find the most recent folder.
We need to compress these backups files before we can upload them to Mobile Access Management.
-
Open the folder to display the list of folders within:
Click to enlarge
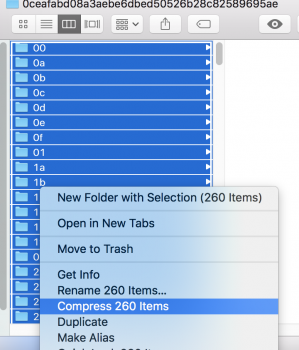
-
Select all files and folder inside the folder as shown in the image above.
IMPORTANT:Do not select the backup folder itself, only the files and folders contained within.
-
On Windows, right-click and send to Compressed (zipped) folder. On Mac, control-click and choose Compress.
A zip file will be created, e.g. "Archive.zip".
-
Rename the zip file as desired. You may keep the .ZIP extension, or rename it to the traditional .iosdevicebackup.
-
Move the file to another location, such as your Desktop.
The backup is now ready to be uploaded to Mobile Access Management.
You’re done! You should now quit iTunes (or Configurator), upload your backup to Mobile Access Management and test the restore.
Test on a different device from your master. The mastering process may require a few more trips to the master device to tweak your settings, and the process will be easier if you keep your master around.