Configuring Countdown to Lock Mode
Imprivata MDA extends Imprivata authentication management and single sign–on to mobile devices and apps. The solution helps customers balance security with accessibility and convenience for end users. This is done by giving you the ability to configure Imprivata MDA to achieve your goals.
About Imprivata MDA and MDMs
Imprivata MDA is available in the Google Playstore, and can be downloaded and distributed to your mobile devices using Mobile Device Management (MDM) software. Your implementation of Imprivata MDA must be configured for the MDM that you are using.
Planning for Countdown to Lock
For the purpose of this topic, some key items to clarify:
-
Imprivata MDA with Countdown to lock – A feature of the Imprivata MDA solution which can be enabled or disabled when Imprivata MDA is implemented.
-
Imprivata MDA standalone – The standard Imprivata MDA configuration, without Countdown to lock enabled.
A key difference between the Countdown to Lock feature and the standard Imprivata MDA inactivity lock is that the feature allows your organization to use the native Android lock screen.
As you plan your implementation of Imprivata MDA, it is critical to the success of the deployment to think through the balance of security with accessibility to these shared devices and the impact on the daily work of end users and clinician staff.
The most important recommendation that Imprivata can give is to consult with your clinical staff and understand how these shared devices are being used. Additionally, Imprivata has a team of professional services and clinicians who are experts in helping to ensure a successful deployment. Your account manager can help you take advantage of these services.
How it Works
The Countdown to lock mode enables you to configure when, and how often, a clinician is required to authenticate to a shared device. It displays a reminder to the clinician, counting down the time until the screen locks. When enabled, Countdown to lock mode allows the Android native lock screen to be used in between the time when Countdown to lock is invoked.
Imprivata MDA and Android Alerts
Imprivata MDA supports app notifications that adhere to Android standards for notifications. Some app developers will use a non-standard way or custom notifications. Imprivata MDA does not support third party app notifications that use custom views or overlays to customize notification UI. Imprivata MDA does support notifications with standard title, text, subtext, notification actions as well as notification category set to Android SDK defined strings.
For more information on Android alarms, see the Android developer documentation for standard Android notifications and custom notifications.
Inactivity Timers
Consider the following information regarding various inactivity timers that affect Imprivata MDA and their configuration.
| Item | Description |
|---|---|
|
Countdown to Lock timer |
The timer for the Countdown to lock feature. Configured through the CountdownToLockMinutes AppConfig parameter in Imprivata MDA. |
|
Imprivata MDA timer |
The Imprivata MDA inactivity timer. This timer is independent of the Countdown to Lock timer. Configured through the Imprivata Admin Console > Computers > Mobile Policy > Inactivity re-authentication setting. For more information, see Configure the Mobile Policy and User Authentication. |
|
Android timer |
The native Android timer Configured through your MDM For more information, see Deploy Imprivata MDA via your MDM. |
Workflow
In this example workflow, inactivity timers are configured as follows:
-
Countdown to lock timer: 12 hours
-
Android screen timeout: 1 minute
-
Imprivata MDA inactivity timers: 5 minutes
-
Imprivata MDA logout timer: 1 hour
The following workflow assumes a clinician is starting their shift for the day that will last 12 hours.
|
|
7:00AM - At the start of a shift, a user selects a device and swipes up on the native Android lock screen.
|
|
|
If the user is not using the phone during the shift (i.e. there is no activity) the following occurs:
|
|
|
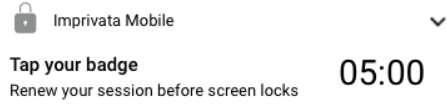
6:55PM - As the Countdown to lock time approaches the 12-hour threshold, and before the Countdown to lock timer expires, a reminder screen displays:
The user can interact with the reminder by tapping their badge or entering their Imprivata PIN to renew the session or to log out. |
|
|
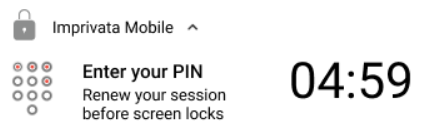
After the countdown timer expires, the user is prompted to tap their badge or enter their Imprivata PIN to renew their session. No work will be lost if the same user authenticates. |


The Countdown to Lock screen lock only occurs under the following conditions:
-
When the user taps the Imprivata MDA app icon.
-
When the countdown timer expires.
-
When the user logs out of Imprivata MDA by using the Log out button accessed from the countdown notification.
-
When a new user taps into the device.
-
When the device reboots.
Limitations
Consider the following limitations of Countdown to Lock:
-
Imprivata MDA Countdown to Lock mode is not supported with Intune dedicated devices, as it is not supported with Intune's Managed Home Screen deployment.
Configuring the Countdown to Lock Mode
Configure Countdown to Lock using AppConfig
The Countdown to lock mode is configured by the MDM AppConfig.
-
See the Imprivata MDA AppConfig Reference for supported keys.
-
For additional information on configuring apps via AppConfig, see your MDM documentation.
To configure the Countdown to lock mode:
Add the following two keys to your MDM:
-
LockMode - enables the Countdown to lock mode.
-
The AppConfig Configuration Key field for this feature is "LockMode".
-
The AppConfig Value Type for this feature is "String".
-
The AppConfig Value is CountdownToLockMode.
-
-
CountdownToLockMinutes - the number of minutes to count down before locking the device.
-
The AppConfig Configuration Key field for this is "CountdownToLockMinutes".
-
The AppConfig Value Type for this feature is "String".
-
The AppConfig Value is the number of minutes to count down. The minimum is 20 minutes. The default is 240 minutes.
Renew the Session Using an Imprivata PIN
To configure Imprivata PIN as the method to renew the session, instead of proximity cards:
-
When configuring the mobile policy, enable the policy for a username and password + an Imprivata PIN.
-
Select Unlock with Imprivata PIN instead of proximity card, and specify the grace period.
The grace period is the time during which subsequent authentications require an Imprivata PIN only.
-
Make sure that the timeout for Authentication with password and unlock with PIN is longer than the Countdown to lock timer.
-
To enable Countdown to Lock mode in Omnissa Workspace ONE:
-
In the Workspace ONE UEM console, click Apps & Books > Applications > Details View and click Assignment. Select the assignment group.
-
Click Application Configuration and click Add.
-
Set up the app configuration with the two following app configs:
-
Add Lockmode:
-
In the Configuration Key field, enter LockMode.
-
In the Value Type, select String.
-
In the Configuration Type, enter CountdownToLockMode.
-
-
Add CountdownToLockMinutes:
-
In the Configuration Key field, enter CountdownToLockMinutes.
-
In the Value Type, select String.
-
In the Configuration Type, enter the number of minutes to count down. The minimum number of minutes is 20. The default is 240 minutes.
-
-
Known Issues
For a list of known Imprivata MDA issues, see the Imprivata MDA release notes.