Configuring Imprivata Mobile Device Access
Imprivata Mobile Device Access extends Imprivata authentication management and single sign–on to mobile devices and apps. Configuring Imprivata MDA requires you to:
-
Review the required Android device settings and permissions.
-
Review the AppConfig reference.
-
Enable Imprivata MDA in your Imprivata enterprise.
-
Import and deploy the Imprivata mobile app profiles.
-
Configure the mobile policy and user authentication.
-
Configure the Imprivata user policy authentication methods.
-
Configure your MDM to deploy the Imprivata MDA app to your devices and configure application specific settings.
Imprivata MDA is a separately licensed feature. For more information, see Imprivata Licensed Features.
Before You Begin
Review the following before deploying Imprivata MDA.
Before you begin:
-
Review the list of workflows, applications, and supported devices for Imprivata MDA.
Imprivata MDA requires that you use an Mobile Device Management (MDM) solution to deploy the Imprivata MDA app and other apps to your mobile devices.
For more information, see Deploy Imprivata MDA via your MDM
For a list of supported MDMs, see Supported Components.
Imprivata MDA requires specific device settings and permissions. The following table details these requirements:
| Setting | Requirement |
|---|---|
| Android Device Settings | |
|
Android native lock screen |
Disabled, if not using the Imprivata MDA Countdown to Lock feature. |
| Screen timeout | Set the value to the maximum time allowed by the device. Imprivata MDA controls this behavior. |
| Native Launcher |
|
| Power saving mode | Disabled. |
| Wireless connection |
|
| Autofill Service |
Required if you plan to use the Google Autofill Framework. Set the Autofill Service to use Imprivata MDA. For more information, see Configuring Imprivata Mobile Device Access with the Google Autofill Framework |
| Android Permissions | |
| Access to the Device ID is required. |
Required. Imprivata MDA requires access to the device ID to report on individual login and device activity. NOTE:
If your MDM cannot enable this permission, you can provide access the first time you launch Imprivata MDA on the device. |
| Draw over (overlay) other apps |
Required. The Draw over (overlay) other apps permission must be enabled manually on each device after the installation. |
| Activate the Accessibility Service |
Required. The Accessibility Service must be enabled manually on each device after the installation. |
| Read and access notifications |
Required. Permission to read and access notifications must be enabled manually on each device after the installation. |
| App must be granted Lock Task Permissions |
|
|
The following Android packages cannot be restricted:
|
Consider the following:
|
|
The app must be configured with the following:
|
Consider the following:
|
If you are an existing Imprivata Enterprise Access Management customer, the badges currently deployed to your users may not support the necessary NFC frequency required by the mobile devices. Mobile devices leverage NFC Technology which is the 13.56 MHz MIFARE NFC Frequency.
If your current badges do not support this frequency, there are two options available:
-
Replace existing badges with new badges that support dual frequency (both 125 kHz and 13.56 MHz).
-
Use stickers (sometimes called "pucks") which can be attached to a badge to allow for 13.56 MHz frequency to be read.
The following table should be used as a reference for the Mobile Device Management (MDM) AppConfig keys used by Imprivata MDA.
Depending on your MDM's interface, some AppConfig keys are displayed with specific UI labels.
See the Notes column in the table below for specifics.
| AppConfig Configuration Key | AppConfig Value Type |
AppConfig Value |
Description | Notes |
|---|---|---|---|---|
| ConfigFlags | String | browserLogoutLast |
Sets the order of MDA logout operations to log the browser out last. This AppConfig allows backwards compatibility to support the order of logout operations used in earlier releases of MDA. |
Imprivata MDA 8.2 makes changes to the order of logout operations. For more information, see MDAOrder of Logout Operations. |
| ConfigFlags | String | bootLockDelay=60 |
Delays the start of Imprivata MDA when a device is rebooted. This supports the ability for users to enter their SIM card PIN before locking the device.
|
Supported by Imprivata MDA 8.2 and later. |
| ConfigFlags | String | fidoEnrollmentOn |
Allows users to enroll their unenrolled FIDO security keys from the Imprivata MDA app. If treatNfcTapAsProx is set, Imprivata MDA will ignore fidoEnrollmentOn. |
Supported by Imprivata MDA 8.2 and later. |
| ConfigFlags | String | dexControlOn |
Use Samsung DeX functionality. The device prompts for the required Device Administrator permissions and activates required Knox SDK license. Enables the Samsung DeX session to stop when MDA is signed out. |
Supported by Imprivata MDA 8.1 and later. See Samsung DeX. |
| ConfigFlags | String | treatNfcTapAsProx |
For customers with proximity cards that communicate with the same protocol as FIDO security keys, treatNfcTapAsProx enables proximity card-only mode.
|
Supported by Imprivata MDA 8.1 and later.
|
| ConfigFlags | String |
emergencyCalls emergencyCalls:<phone number> emergencyCalls:<phone number>|skipConfirmation |
Allows the user access to the phone dial pad so they can make phone calls from the Imprivata MDA lock screen, without the user needing to authenticate to the device. To define a preconfigured phone number, set the <phone number> value to the phone number needed. Supports US and International phone number formats. skipConfirmation removes the confirmation dialog box that pops up before a call. |
Supported by Imprivata MDA 8.1 and later. See Emergency Calls |
| ConfigFlags | String | forbidForegroundServiceNotificationCanceling |
Sets the Imprivata MDA foreground service notification to be non-cancellable.
|
Supported by Imprivata MDA 8.0 and later. |
| ConfigFlags | String | verboseLogsOn | Collect Imprivata MDA verbose logs. | Overrides the Verbose Logging switch on Imprivata MDA Settings page. |
| ConfigFlags | String | logcatOn | Send Imprivata MDA logs to Logcat. |
Helpful for troubleshooting purposes. For security reasons, by default, Imprivata MDA only sends error logs to Logcat. |
| ConfigFlags | String | msalLoginShowUserConsent | When present, the MSAL consent screen is shown to the user; omitting this flag causes Imprivata MDA to bypass the consent screen automatically. |
Supported by Imprivata MDA 8.0 and later. |
| ConfigFlags | String | msalLoginTimeout=<ms> |
Overrides the MSAL sign-in timeout. Default is 15000 ms. Example: msalLoginTimeout=30000. |
Supported by Imprivata MDA 8.0 and later. |
| ConfigFlags | String |
msalLoginOn |
Automatically sign the user in to Microsoft apps when using shared device mode. |
Supported by Imprivata MDA 8.0 and later. |
| ConfigFlags | String | followMsalGlobalSignout | Automatically sign the user out of Microsoft apps when using shared device mode. |
Supported by Imprivata MDA 8.0 and later. |
| ConfigFlags | String | disablePhoneStateListener | Read proximity cards during voice calls, when Voice call (VoIP) apps (authentication required to answer call) option in the Mobile Policy is configured. |
See Mobile Policy. |
| ConfigFlags | String | autostartApps=[appPackagenames] | Automatically launch the apps on checkout. | |
| ConfigFlags | String | autostartDelayMillis=<milliseconds> |
Allows a delay, in milliseconds, before Imprivata MDA starts processing AutostartApps. |
|
| ConfigFlags | String | autostartPeriodMillis=<milliseconds> |
Allows a delay, in milliseconds, between AutostartApps launch attempts. |
|
| ConfigFlags | String | lockOnCharge |
Lock the device when Imprivata MDA detects the device is charging Used with logoutOnCharge |
|
| ConfigFlags | String | logoutOnCharge |
Log the user out from the apps when Imprivata MDA detects the device is charging. Used with lockOnCharge |
|
| ConfigFlags | String | allowOfflineMode | Enables offline mode, allowing authenticated users to Imprivata MDA to unlock the device and have SSO available when in offline mode. | |
| ConfigFlags | String | offlineToOnlineReauth |
Require the user to reauthenticate when Imprivata MDA transitions from offline to online, only when the user session was last unlocked in offline. The flag has no effect on online established sessions. Used in combination with allowOfflineMode. |
|
| ConfigFlags | String | defaultAuthDomain:<yourDomain> |
Set the domain selected by default when the user authenticates to Imprivata MDA with their username and password. . |
See Configure a Default Domain. Depending on your MDM interface, this AppConfig may appear as: The domain selected by default when authenticating on MDA with username and password. |
| ConfigFlags | String | allowUntrustedEAMCertificate |
|
Enabled by default in Imprivata MDA 7.15 and later |
| ConfigFlags | String | forceTrustedEAMCertificate |
Imprivata MDA checks for Imprivata appliance server certificate validity and allows you to check whether Imprivata appliance certificate is configured correctly.
|
Supported by Imprivata MDA 7.15 and later. See Trusted Communication to the Imprivata Appliance
|
| ConfigFlags | String | deviceSdkLogout |
Use the Zebra SDK for all SDK based logout methods. Setting deviceSdkLogout is equivalent to setting the following three values:
|
|
| ConfigFlags | String | deviceSdkClearData | Use the Zebra SDK for clearing data based on the SDK. | |
| ConfigFlags | String | deviceSdkClearData | Use the Zebra SDK for clearing cache based on the SDK | |
| ConfigFlags | String | deviceSdkForceStop | Use the Zebra SDK to force stop based on the SDK. | |
| ConfigFlags | String | numericPinOnly | Set the device's keypad to numeric only |
If numericPinOnly is not set, the default behavior of Imprivata MDA is to allow the keypad to be alphanumeric |
| ConfigFlags | String | preventAccidentalTyping |
Prevent users from accidentally typing characters into credentials screens. |
|
| ConfigFlags | String | autofillOn | Allow the Autofill Service to use Imprivata MDA. |
See Configuring Imprivata Mobile Device Access with the Google Autofill Framework. |
| MobilePolicyOverride | String |
For the supported values, see the table of supported mobile policy values available for override. |
Override a limited set of properties of the EAM mobile policy using AppConfig setting. | |
| ConfigFlags | String | com.package.name:forceStop| clearCache|clearData |
Run additional logout actions or different logout methods for the same app. | |
| ConfigFlags | String | allowScreensaver | Allows Imprivata MDA to coexist with device screensavers and not block their use. | |
| ConfigFlags | String | zams |
Allows Zebra Access Management System |
Works with ZAMS v.2.2.9 or later See Configure Imprivata MDA with Zebra Access Management System (ZAMS) |
| ServerIP | String | <Imprivata appliance address> | The server address of the Imprivata appliance | Depending on your MDM interface, may appear as Server address or OneSign server address. |
| OneSignServerCertificate | String | certificate |
Upload the Imprivata appliance certificate to the MDM when deploying Imprivata MDA to a device |
Depending on your MDM interface, may appear as OneSign server certificate. |
| AdminAccessCode | String | <The Admin passcode> | Sets the passcode for admin access. | Requires a minimum of 8 characters. |
| ExternalDeviceSerial | String |
|
Sets Serial number of the device, depending on your MDM. | Imprivata MDA requires access to the device ID to report on individual login and device activity. |
| LandscapeDevices | String | Comma-separated list of mobile device model numbers | Change the mobile device's orientation from portrait to landscape mode. |
Optional. Device numbers can be found in Android settings, but may depend on the device vendor and Android version. Example: Versity 9540, SM-G95OU1, Pixel 4 |
| LockMode | String | CountdownToLockMode | Enables the Countdown to lock mode. | Optional. |
| CountdownToLockMinutes | String | 240 | Sets the number of minutes to count down before locking the device. |
Default value is 240 minutes (4 hours). Minimum value is 20 minutes. |
| DeviceInfoPattern | String | <string with Variables> |
Sets a string pattern containing the supported variables to identify the device, that will be replaced with actual device-specific strings. |
Optional. Variables - obtained from system settings:
The variables can be combined with a customized text string to identify the device. Example: This is $DeviceName, $AndroidShortVersion Results: This is Galaxy Note 5, A11 |
Enable Imprivata MDA and Deploy Profiles
Complete the following steps to configure Imprivata MDA.
Imprivata MDA requires access to the Imprivata ProveID Web API.
To enable access to the Imprivata ProveID Web API:
-
In the Imprivata Admin Console, click the gear icon , and then click API Access.
-
Select Allow full API access via ProveID Web API and ProveID Embedded.
-
Select Imprivata Mobile for Android.
-
Click Save.
Imprivata provides pre-configured mobile app profiles. Deploying the profile enables the app for single sign–on.
To import the profiles:
-
Log in to the Imprivata Customer Experience Center.
-
Click Product Downloads > Mobile and select Imprivata Mobile Device Access.
-
Download the MDA Application profiles (all versions) package. The application profiles download to your computer.
-
Extract the profiles to a location that is accessible to the Imprivata Admin Console.
A single XML file (
MDA_AppProfiles_<date>.xml) includes all of the supported profiles. -
In the Imprivata Admin Console, open the Applications menu, and click Single sign–on application profiles.
-
Click Add App Profile > Import from file.
-
Browse to the XML file, and import it.
The following sections detail how to modify a Web or native mobile app profile.
Web App — Add the Login URL
Before deploying a Web app, you must configure the login URL.
To configure a web app profile with a login URL:
-
In the Imprivata Admin Console, open the Applications menu, and click Single sign–on application profiles.
-
Locate the required web app profile, and click Edit Profile.
-
Enter the login URL, and save the profile.
Native App — Configure User Switch and Logout Behavior
(Optional) By default, on user switch or logout a native app is quit. Additional behavior can be enabled.
To configure user switch and logout behavior:
-
In the Imprivata Admin Console, open the Applications menu, and click Single sign–on application profiles.
-
Locate the required native app profile, and click Edit Profile.
-
Select one or more of the following, and save the profile:
-
Force stop — Stops all related app services.
-
Clear cache — Clears all cached images and files.
-
Clear all data — Clears the cache and deletes all data associated with the app.
-
Do nothing
-
Native and Web App — Enable a Profile to Automatically Submit User Credentials
(Optional) With the exception a mobile app that is integrated with the Imprivata MDA SDK (partner app), users must manually submit their credentials when the application opens.
You must enable the profile to automatically submit user credentials.
To enable the profile:
-
In the Imprivata Admin Console, open the Applications menu, and click Single sign–on application profiles.
-
Locate the required app profile, and click Edit profile.
-
Select Automatically submit user credentials, and click Save.
No additional app configuration is required. If credentials are not successfully submitted, the app does not support the behavior. In this case, an authentication failure does not occur. The default behavior is enforced, and users must submit their credentials manually.
App Credential Considerations
When you deploy an Imprivata mobile app profile, you specify the type of credentials the app uses. The type of credentials an app can use depends on whether it is a partner app. A partner app is one that has been integrated with Imprivata MDA using the Imprivata MDA SDK:
- Partner apps can:
Use their own credentials
Share credentials with the Imprivata domain or another desktop application.
-
All other supported apps can only share credentials with the Imprivata domain or another desktop application only.
If an app is sharing credentials with a desktop application, be sure that the single sign–on profile associated with desktop application has been added to a credential store.
You can view existing credential stores in the Imprivata Admin Console from the Shared credential stores page (Applications menu > Credential stores). For more information about creating and managing a credential store, see Using Shared Credential Stores.
Deploy an App Profile
To deploy an app profile:
-
In the Imprivata Admin Console, select the app profile, and click Deploy.
-
Go to the Deployment section, and select Deploy This Application?.
-
(Optional) To deploy the application to a subset of users, deselect Deploy to All Users and Groups?, and specify the membership.
- (Optional) If the app is sharing credentials, go to the Credentials section, select This application shares credentials?, and do one of the following:
To use the Imprivata domain credentials, select with the domain only, and select the required domain username format.
To share credentials with a desktop application, select with other applications, and select the credential store that is configured with the other application.
-
Click Save.
For more information about either option, see Credential Sharing.
Configure the Mobile Policy and User Authentication
The mobile policy applies to every device enabled for Imprivata MDA.
You can override mobile policy device settings by AppConfig using your MDM.
To configure the mobile policy, in the Imprivata Admin Console, open the Computers menu, click Mobile policy, and configure the following sections:
To configure device settings:
-
Go to the Access Management section.
-
(Optional) Select Allow guest mode.
By default, users must authenticate to access the device. When enabled, users can tap Guest to access the device without having to authenticate. When a user access the device in this way, single sign–on is not available.
-
(Optional) Select Automatically log out a user.
By default, a user's session remains active until the user logs out or a user switch occurs. You can specify a duration after which time the authenticated user is automatically logged out.
-
(Optional) Select Inactivity re-authentication.
By default, a user's session remains active until the user logs out or a user switch occurs. You can specify a duration after which time the device is locked and the user is required to re–authenticate.
-
(Optional) By default, users authenticate using a proximity card. You can:
-
Add an Imprivata PIN or password as a second factor.
Select Turn on grace period for second authentication factor, and specify the grace period.
The grace period is the time during which subsequent authentications do not require the second factor.
-
Enable the policy for a username and password + an Imprivata PIN.
Select Unlock with Imprivata PIN instead of proximity card, and specify the grace period.
The grace period is the time during which subsequent authentications require an Imprivata PIN only.
Use this setting when configuring Countdown to lock mode to renew a session using the Imprivata PIN.
-
By default, all open Google Chrome and Zebra Web browsers are closed when a user logs out or during a user switch.
To change the default web browser data settings:
-
Go to the Web Browser Management section.
-
(Optional) Enable one of the settings:
-
Do nothing
-
Force stop all browsers — Stops all related browser services.
-
Clear cache on all browsers — Clears all cached images and files.
-
Clear data on all browsers — Clears the cache and deletes all data associated with the browser.
-
By default, the Imprivata appliance does not check whether user credentials have been changed outside of EAM (out of band). If a user has updated their password out of band, authentication fails.
When enabled, Imprivata MDA checks for an out of band password change before authentication:
-
If detected, the user is prompted to reenter their credentials.
-
After the user successfully authenticates, the new credentials are saved.
To check for an out of band password change:
-
Go to the Authentication section.
-
(Optional) Select Validate stored domain credentials before authenticating.
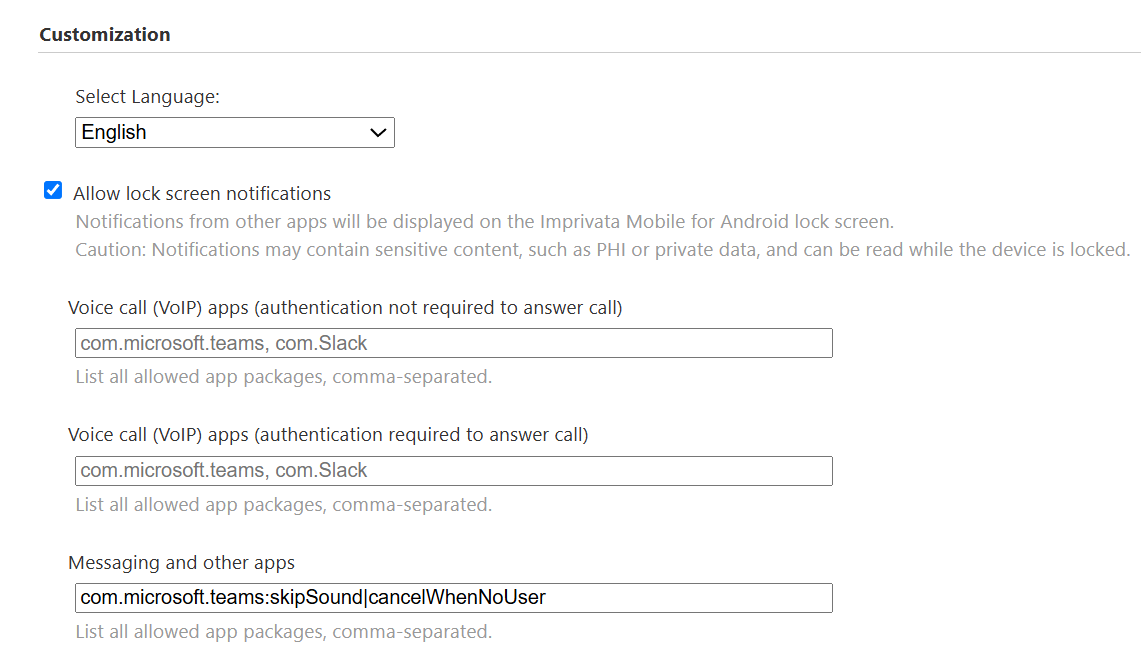
Customization settings let you:
-
Specify which push notifications are allowed to appear on the home screen.
By default, Imprivata MDA blocks the push notifications from all apps from appearing on the home screen.
To configure customization settings:
- Go to the Customization section.
-
In Imprivata MDA 7.14 and later, the language is controlled by the device level localization settings, commonly configured in your MDM, and not by the mobile policy.
-
(Optional) Select Allow lock screen notifications, and enter the package name for each application whose push notifications should be allowed. Configurations in each setting apply only to a related notification type.
IMPORTANT:Notifications may contain sensitive information, such as PHI or private data, and can be read while the device is locked.
Users can interact with notifications based on the following settings:
-
Voice call (VoIP) apps (no authentication required to answer call) — Users can answer or decline a voice call from the Imprivata MDA home screen.
-
Voice call (VoIP) apps (authentication required to answer call) — A notification appears on the home screen stating that there is an incoming call. Users must authenticate to the device to answer or decline the voice call.
-
Messaging and other apps — A notification appears on the home screen stating that there is a notification. Users must authenticate to the device to read it.
The following attributes are supported for each of these settings, separated by the pipe character "|":
-
skipSound indicates that MDA will not play a notification sound for the app for the notification type.
-
cancelWhenNoUser indicates that MDA will not display a notification on the MDA lock screen when there is no logged in user.
For regular messaging notifications, add the notification canceling flag to the Messaging and other apps setting.
Example
-
skipEmptyCategory indicates that MDA will not display empty grouping notifications for alarm notifications and foreground service notifications that don't carry any useful information for the user.
-
partialWake indicates that when a notification is received, the screen won't be turned on, but the CPU will awaken.
-
skipWake indicates that when the device is in sleep or doze mode and a notification is received, the device will not wake.
-
-
-
(Optional) Select Allow floating Home button. Applies to Workspace ONE Launcher configuration.
-
If you do not know the package name, you may be able to use its Imprivata MDA profile or its Google Play Store app URL to find it:
While the profile for a partner app cannot be edited, others can be opened to view settings.
-
To use an app profile to identify a package name, go to the Single sign-on application profiles page, locate the required app, and click Edit profile.
-
To identify the package name for a partner app, or any other third-party app on the device, you can use its Google Play Store app URL.
From the Google Play Store, search for the app, and then open its page.
The package name forms the end part of the URL after the "?id=".
For example, https://play.google.com/store/apps/details?id=com.imprivata.Messaging
-
To configure the User policy, in the Imprivata Admin Console, open the Users menu, click User Policies, and configure the following sections:
As detailed in Imprivata MDA Authentication and Single Sign–on Workflows, the user policy must be configured to support the required authentication workflow.
To configure the user policy:
-
In the Imprivata Admin Console, open the Users menu, and click User policies.
-
Open the required user policy, go to the Desktop Access Authentication section, and do one of the following to specify the primary and second authentication methods:
-
For a proximity card as the primary factor, select Proximity Card, and then select Password or Imprivata PIN as the second factor.
-
For a FIDO security key as the primary factor, select Security Key, and then select one of the following options as the second factor: No second factor, Password, Imprivata PIN, Face recognition or Password, or Face recognition or Imprivata PIN.
NOTE:Imprivata MDA does not support the options for Fingerprint, Fingerprint or Password, and Fingerprint or Imprivata PIN as second factors when FIDO security key is the primary.
The options for Face recognition or Password and Face recognition or Imprivata PIN require EAM 25.4 or later.
-
For username and password as the primary factor, select Password.
-
For face recognition, additional prerequisites and configurations are required in your IdP and in your Imprivata enterprise before you select Face recognition. See Face Recognition as an Authentication Method.
-
-
In the Authentication method options section, for your first and second authentication methods, configure the required settings for each authentication method.
Example 1
For Imprivata PIN, go to the Imprivata PIN section and configure settings for PIN length, expiration, PIN complexity, and other settings.
NOTE:A complex Imprivata PIN is supported.
Example 2
For FIDO security keys, go to the Security key section and configure settings for the number of security keys, grace period, replacement enrollment, and other settings.