Configuring Computer Policy General Settings
The computer policy general settings located on the General tab of the Computer policy page include the options described in the following sections.
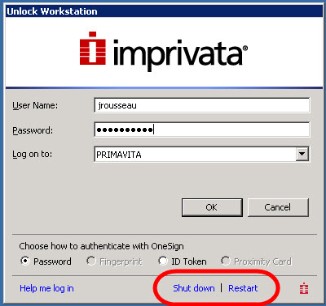
Imprivata replaces the functionality of the Microsoft graphical identification and authentication (GINA) library and the Windows Credential Provider (Windows Vista and Windows 7). This includes control of the Windows shell and its associated Windows shutdown and restart functions from the login window.
You can restore this functionality from a computer policy by selecting Allow users to shut down and restart workstation from lock screen on the General tab.
The following image shows the login screen of a computer that users can restart:
Imprivata displays the name of the currently logged-in user in a variety of notifications, such as when learning application credentials, and walkaway security warnings.
You can select from four ways to show the user display name for inactivity, lock screens, and bubbles. In the Imprivata Admin Console, go to your computer policy > General tab > Display name format section:
-
First and last names — Mary Underwood
-
First name, last initial — Mary U.
-
First name only — Mary
-
Username only — munderw82
Users can be prompted when a new version of the Imprivata agent is available on the Imprivata server. Users can agree to an auto-update if the auto-update feature is enabled.
You have two options to control how an agent is upgraded on computers with this policy:
- Do nothing — If you want to upgrade computers with this policy via push technology.
- Prompt the user to download and install upgrade — If you want users of these computers to have the choice of when to upgrade.
This is not necessary if you notify users to self-install or if you push MSI files. You can also set this to No if you want to delay an update to a more convenient time. If you need to configure a local Administrator account to be used for installing/modifying the Imprivata agent on users’ computers, see Set Up Users for Self-Install.
NOTES:
-
If there is a new version of the Imprivata agent available, install it on the server by means of an Upgrade IPM as detailed in Upgrading IPMs.
-
It is important to keep the Imprivata agent updated on the computers of all users who use Imprivata OneSign SSO. Application profiles may not work correctly on Imprivata agents that are older than the agent that profiled the application.
You can ensure that all network users authenticate to Enterprise Access Management or else be denied access to the network.
Most authentication methods authenticate the user to Enterprise Access Management first, and then through Enterprise Access Management to Windows. Users who authenticate with password only or with smart cards authenticate to Windows first, so it is possible that a smart card or password user whose account has been disabled in Enterprise Access Management might authenticate successfully to Windows and be denied access to Enterprise Access Management. In this case, the user has Windows access even though the user’s Enterprise Access Management account may be of questionable status.
Depending on your security and compliance requirements, it may be important to prevent some or all users from reaching the desktop without having authenticated to Enterprise Access Management first.
This feature enforces Enterprise Access Management authentication by working through a series of decision points. The agent has the most recent computer policy, downloaded from the Enterprise Access Management server at the agent’s last successful refresh interval.
-
The user attempts authentication and fails. The local Imprivata agent knows the identity of the user and has denied authentication for some reason.
-
The agent unlocks the desktop or not depending upon how the user’s identity matches this setting in the computer’s computer policy.
Settings and Examples
If Imprivata OneSign authentication fails, but Windows authentication succeeds, should the user be allowed to log in to the computer?
- Yes — Allows all users on computers with this policy to access the computer even if Enterprise Access Management authentication fails. Users who bypass Enterprise Access Management on this computer can act without their activity being recorded in the audit trail.
- For example, a user fails Enterprise Access Management authentication on a computer as a result of some unidentified technical difficulty. The Imprivata agent is disabled, so the user’s activity cannot be audited. The computer policy permits any user to authenticate to the computer anyway, so the desktop unlocks and the user can work.
- No — Enforces Enterprise Access Management authentication for all users on this computer, with no exceptions.
- For example, a user fails Enterprise Access Management authentication on a computer as a result of some unidentified technical difficulty. The Imprivata agent is disabled, so the user’s activity cannot be audited. The computer policy prohibits any user from authenticating to the computer, so the desktop remains locked.
- These local users or local groups — Opens options and choosers that let you select which users will be allowed to bypass Enterprise Access Management on this computer.
- For example, a user fails Enterprise Access Management authentication on a computer as a result of some unidentified technical difficulty. The Imprivata agent is disabled, so the user’s activity cannot be audited. The computer policy allows certain users to unlock the desktop. The user is a member of an allowed group, so the desktop unlocks and the user can work.
- The technical difficulty persists. The first user leaves, locking the desktop. Another user approaches, but this user is not in an allowed group. The user attempts to authenticate and fails. The desktop remains locked.
To prevent users from disabling the agent directly, see the next section.
The following settings are available in the Card Readers section on the General tab of a computer policy. Some settings are reader-specific.
- Beep card reader when user taps card — When selected, card readers beep when users tap their proximity card.
NOTE: If the computers associated with this policy use nano proximity card readers, the Microsoft Windows operating system creates the beep. As a result, the Microsoft Windows volume control can override the configuration. For example – if the Windows speaker is muted, users do not hear the beep.
When implementing proximity card authentication with RF IDeas pcProx Plus 82 card readers (model RDR-80582), select the appropriate proximity card formats for each computer policy.
- Configuration 1 and Configuration 2 — The two proximity card formats supported in the user policy. The default card formats are HID Prox: RDR-608x Compatible (Configuration 1) and RDR-758x Equivalent (Configuration 2).
Note: If your environment includes virtual machines using tap-in/tap-out, ensure that the reader configurations in the computer policies for both the the virtual machines, and the physical endpoints are identical.
- Enable legacy mode for HID card readers — Allows card ID information captured by an HID 5325 reader to match the information captured by an HID 5025 reader. This means that users enrolled using the HID 5325 can maintain their enrollments - they are not required to re-enroll for the newer HID 5025 reader.
Additional configuration is required to enable legacy mode. For each endpoint computer to which the HID 5025 reader is deployed:
- Download the HID OMNIKEY Workbench (Workbench) utility from HID.
- Verify that the reader is connected to the endpoint computer.
- Open Workbench and click OS Settings.
- In the EscapeCommandEnable section, select Enable and click Apply.
- Disconnect and then reconnect the reader.
- Click Reader Settings > HID OMNIKEY 5025-CL 0. Verify that PAC Bits in Historical Bytes is enabled.
- Close Workbench.
- Program HID 5x27 card reader configurations — When selected, the HID OMNIKEY 5x27 series of proximity card readers are configured to work with Imprivata OneSign. The readers are configured to read HID iCLASS Seos proximity cards only. Using the HID user interface to configure the card readers is not required. This feature is only supported if every card in Imprivata deployment is an HID iCLASS Seos proximity card.
You can configure the computer policy to treat smart cards as a proximity card. When prompted for credentials, users authenticate by inserting their smart card. Inserting the smart card is treated as a proximity card tap, while removing the smart card is treated as a proximity card tap-out.
Configuring smart card proximity cards requires that you:
- Configure the computer policy to treat smart cards as proximity cards.
- Verify that any related user policies are configured to let users authenticate with a proximity card.
To configure smart card proximity cards:
- Open the computer policy (Computers menu > Computer policies).
- Go to the General tab > Smart card readers section.
- Select Treat smart card authentications as proximity card authentications and click Save.
- (Optional) If you have set override and restrict settings for the computer policy, go to the Override and Restrict tab > Desktop Access Authentication Restrictions section, and confirm that the computer policy is configured to allow the Proximity Card authentication method. If it is not, select Proximity Card and click Save.
- Open each related user policy (Users menu > User policies).
- Go to the Authentication tab > Desktop Access authentication section and confirm that the policy is configured for Proximity Card. If it is not, select Proximity Card and click Save.
BEST PRACTICE: Update the messages that users see to notify them that their smart card is used for authentication. You can update the login screen message from the Customization tab of the computer policy (see Branding the Login and Self-Service Experience), and you can update the warning message for a locked endpoint from the Walk-Away Security tab (see Configuring Walk-Away Security for Unattended Workstations).