Basic Check Out Workflow - iOS
This topic applies to iOS Workflows. For Android Workflows, see this article.
You will need to create three Workflows: Device Prep, Check Out, and Return .
Device Prep
As part of Device Prep, you perform the basic provisioning of the device. At a minimum, you should include the following actions:
-
Perform MDM command – Deletes the device from the MDM, which ensures that the enrollment is treated as "new". – Pre- Enrollment Action > Delete from MDM.
-
Erase
-
Add Wi-Fi
-
Set Name
-
Set Language and Locale – Skips the Language and Locale setup screen on the device
-
DEP Enrollment
-
Check in Action
Your MDM should install the Imprivata Locker app on enrollment for these devices.
Ignore the warning and do not include a Wi-Fi profile in the Return and Checkout workflows. Your device will already have a Wi-Fi profile from the Prep Workflow, and reinstalling the Wi-Fi profile during the return or check out process may cause the Workflow to fail.
Check Out
This Workflow unlocks the device after a successful badge tap or username/password entry. When the Workflow is run, the attribute “[Device User]” will have the username of the person checking out the device.
Include the following actions:
-
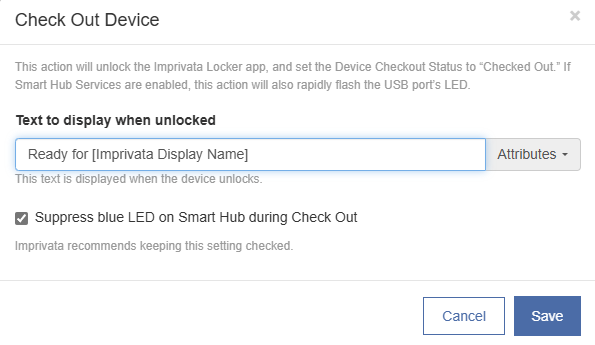
Check Out Device — this action unlocks the Imprivata Locker app, displays a screen with the user’s ID, and sets the device status to “Checked Out”.
If you have Smart Hub services enabled, it will also rapidly flash the white LED next to the device.
BEST PRACTICE:Imprivata recommends keeping the Suppress blue LED on Smart Hub during Check Out option selected.
Instead of displaying the blue LED indicating a "deployment in progress", the Smart Hub will flash the white LED, indicating that the device is ready to be removed from the dock.
Click to enlarge
-
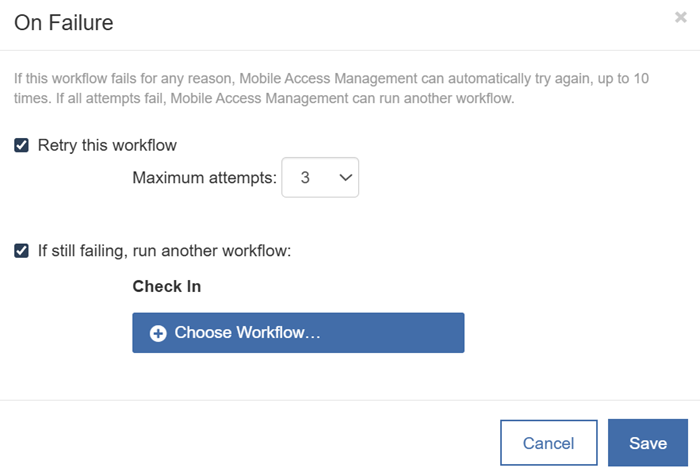
On Failure — Mobile Access Management only considers a checkout complete when the device being checked out is unplugged.
When you add a new Check Out Device workflow, the On Failure action is added as an action, with the action defaulted to Reboot and Check In.
-
-
Edit the On Failure action to run another workflow if the Check Out workflow fails.
-
Existing customer Check Out workflows are not modified.
-
Click to enlarge

-
-
Set Wallpaper — if you used the black wallpaper, then on checkout, you will want to add your friendly wallpaper with your organization’s logo. Imprivata also recommends embedding text onto the Lock Screen stating "Checked Out to [Device User]" or something similar.
NOTE:To add the user's name to the device lock screen, see Configure Personalized Lock Screen using Live Activities.
Return
This Workflow locks down devices when connected without needing to run a full Prep Workflow. Include the following actions:
-
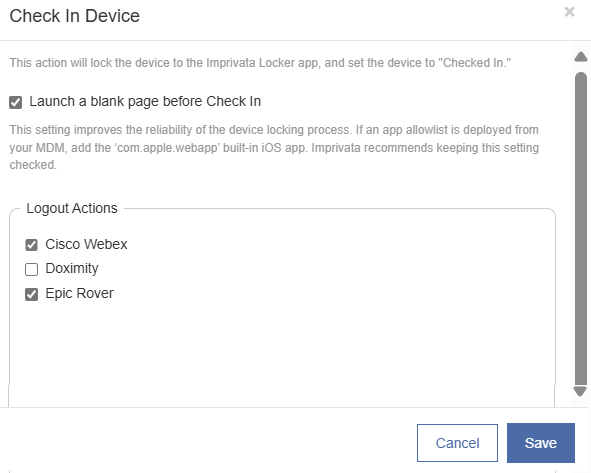
Check In Device — Launches and locks the Imprivata Locker app, sets the status to “Checked In” and clears the Device User attribute.
Click to enlarge
-
On Failure — In the unlikely event check-in fails, Imprivata recommends adding an On Failure action to your Workflow to ensure your device is locked and checked in.
-
Under Advanced, add an On Failure action. Select Retry this workflow and select the number of attempts you would like. Three (3) attempts is a best practice.
-
Configure a Workflow action to run after the number of failures is exceeded.
Click to enlarge
-
-
Set Wallpaper — a black wallpaper is a visual clue that devices are locked. You may wish to use this intimidating wallpaper.
-
Perform MDM Command > Clear Passcode — if you are using passcodes in your organization, you must clear the passcode via MDM in order to check successfully in devices. For more information, see the Clearing Passcodes article.