Using Microsoft Intune to Deploy Imprivata MDA
Use Microsoft Intune to deploy Imprivata MDA.
The following sections detail how to:
-
Set up Android Enterprise Device Management in one of the following scenarios:
-
Set up devices to be corporate-owned, fully managed devices or
-
Set up devices to be corporate-owned, dedicated devices.
-
-
Enroll devices
-
Add Imprivata MDA to Intune
Prerequisites
Standalone Tenant
You must have a standalone tenant in Microsoft Intune to manage Android Enterprise devices as one of the following enrollment types:
-
Corporate-owned, fully managed user devices. For corporate-owned, single user devices used exclusively for work and not personal use. Administrators can manage the entire device and enforce policy controls.
-
Corporate-owned, dedicated devices. For corporate-owned, single use devices. Administrators lock down the usage of a device for a limited set of apps and web links.
To manage Android enterprise devices, link your managed Google Play account to Microsoft Intune.
Important Considerations for Corporate Owned Dedicated Devices with Managed Home Screen
Consider the following items for corporate owned dedicated devices with Managed Home Screen:
-
For all Imprivata Android mobile app profiles in Imprivata Enterprise Access Management, all apps should be configured to Do Nothing for logout, because logout would not succeed and would only make the logout time longer, as Imprivata MDA will spend time attempting to log out of apps.
The Mobile policy setting for Web Browser Management should be set to Do Nothing.
NOTE:Both the Android mobile app profiles and the Mobile policy are required to be set to Do nothing because Imprivata MDA cannot run Clear data/Clear cache/Force stop on a device enrolled as an Intune dedicated device (with optional MHS).
-
Apps that need to have data cleared on logout should be listed in the Intune policy. For more information, see Step 4: Configure Device Restrictions Profile to Clear Data from Apps.
-
Clear cache and Force stop cannot be configured for Intune Managed Home Screen because neither actions are handled by Imprivata MDA nor by Intune policy.
-
Apps that support MSAL (primarily Microsoft apps) don't require additional configuration for logout because MSAL logout is enabled by default.
-
Imprivata MDA Countdown to Lock mode is not supported with Intune dedicated devices, as it is not supported with Intune's Managed Home Screen deployment.
-
Imprivata MDA configured with Intune's Managed Home Screen on Android 12 does not support NFC authentication methods.
-
Android 13 and later devices support Intune's Managed Home Screen with NFC authentication methods.
Android version NFC tap Imprivata MDA handled Clear data/cache, Force stop Imprivata MDA handled logout Intune handled logout Android 13 and later Works Not allowed by Intune Dedicated deployed (including MHS) -
Imprivata MDA SDK integrated apps
-
x-callback-url
-
Universal links
-
MSAL logout
Clear all data defined by Dedicated device app actions profile Android 12 Doesn't work Not allowed by Intune Dedicated deployment (including MHS) -
Imprivata MDA SDK integrated apps
-
x-callback-url
-
Universal links
-
MSAL Logout
Clear all data defined by Dedicated device app actions profile -
Device Requirements
Devices must meet the following requirements as an Android Enterprise device:
-
Android OS version 12 or later
-
Run an Android build that has Google Mobile Services (GMS) connectivity. Devices must have GMS available and must be able to connect to GMS.
Group Assignment
The configuration tasks contain tasks for creating user groups of the Security group type, and device groups dependent on the mobile device enrollment type.
General information on creating user groups and device groups is outside the scope of this topic. For more information, see your Microsoft Intune admin center documentation.
Enrollment Profiles
Set up the Intune enrollment of devices to one of the following enrollment profiles, depending on your deployment needs:
-
Corporate-owned, fully managed enterprise devices.
-
Corporate-owned, dedicated devices.
Create an App Configuration Policy for Configuration Key/Value Pairs
In the Intune admin center create and app configuration policy to allow you to use configuration designer to add or edit configuration key/value pairs for AppConfig:
-
Go to Apps > App Configuration > Create and select Managed apps.
-
In the Name box, type a name for the policy.
-
For Platform, select Android Enterprise.
-
For Profile Type, select Fully Managed, Dedicated and Corporate-Owned.
-
For Targeted app, click Select app.
-
In the Associated app section, find Imprivata Mobile Device Access. Click OK and then click Next.
-
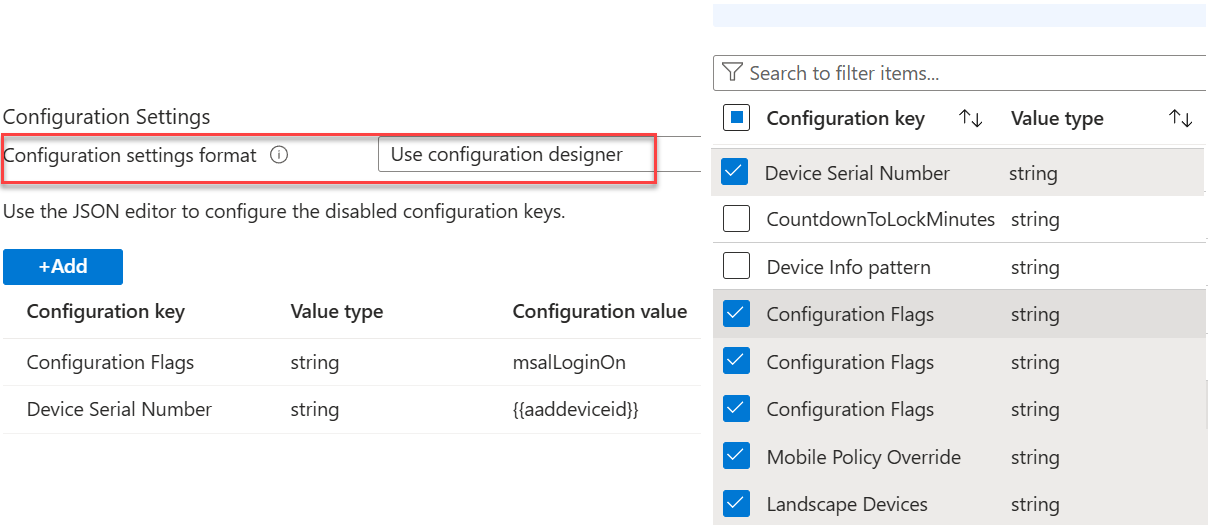
In the Configuration settings section, set the Configuration settings format to Use configuration designer.
-
Click Add.
-
In the right pane, select the AppConfig fields to set, and click OK. The configuration keys are added to Configuration Keys list.
Click to enlarge
-
For each configuration key/value pair, type the value in the Configuration value box.
-
-
Click Next.
-
On the Assignments page, select user groups or devices to apply the AppConfig to, click Next, and then click Create.
User Permissions
At the time of this writing, some permissions can be turned on remotely; others cannot. This may change in future releases.
For more information, see the Microsoft Intune documentation.
The following permissions cannot be turned on remotely, as granting them requires user interaction:
-
Accessibility
-
AutoFill permission
-
Notifications service
-
Drawing over other apps
Automatic Granting Permissions — All Corporate Apps
To allow permissions automatic granting for all corporate apps on the device, create a device restrictions profile and change the default permissions to Auto grant.
Automatic Granting Permissions — Specific App
To allow permissions automatic granting for a specific app, create an app config policy and add the necessary permissions for the app.
Set Up Android Enterprise Fully Managed Device Management
The Microsoft Intune deployment steps are provided as a guide to help you configure the integration.
Imprivata provides information for settings in the Intune admin center, but Microsoft may change them at any time. Always see your Microsoft Intune documentation for the most current information.
See the Imprivata MDAAppConfig Reference for supported MDM AppConfig keys.
For corporate-owned, fully managed devices, perform the following tasks:
-
Log in to the Microsoft Intune admin center.
-
To prepare to manage mobile devices, set the mobile device management (MDM) authority to Microsoft Intune.
NOTE:Set this item only once when you are first setting up Microsoft Intune for mobile device management.
-
Connect your Intune tenant account to Android Enterprise account, if not already done.
-
Enable corporate-owned user devices for enrollment:
-
Select Devices > Android > Enrollment> Corporate-owned, fully managed user devices.
-
In the Enrollment Profiles section, to allow users to enroll corporate-owned devices, click Yes for Allow users to enroll corporate-owned, fully managed user devices.
Intune generates a corporate device enrollment token (a random string) and a QR code for your Intune tenant. This single enrollment token is valid for all of the users and won't expire.
Copy the enrollment token to send to your end users, or post it to your helpdesk site to enable end-users to enroll their devices.
-
Enroll a device by scanning the QR code or using the token value. Intune enrollment begins with a factory reset of the device.
To enroll a device:
-
Wipe the device by using the full factory reset.
- Turn on the newly reset device.
-
On the Welcome screen, select your language
-
Connect to the Wi-Fi, and then choose NEXT.
-
Accept the Google Terms and conditions, and then choose NEXT.
-
On the Google sign-in screen, enter afw#setup instead of a Gmail account, and then choose NEXT.
-
Choose INSTALL for the Android Device Policy app.
-
Continue installation of this policy. Some devices may require additional terms acceptance.
-
On the Enroll this device screen, enroll the device using one of the methods:
-
Allow your device to scan the QR code.
-
Enter the token manually.
-
-
Log in with your Active Directory user credentials in order to establish the device primary user.
-
Install the necessary apps.
-
Verify that the enrolled device appears in the admin center.
Set Up Android Enterprise Dedicated Device Management
The Microsoft Intune deployment steps are provided as a guide to help you configure the integration.
Imprivata provides information for settings in the Intune admin center, but Microsoft may change them at any time. Always see your Microsoft Intune documentation for the most current information.
See the Imprivata MDAAppConfig Reference for supported MDM AppConfig keys.
For corporate-owned, dedicated devices, perform the following tasks:
To set up Android Enterprise dedicated device management:
-
Log in to the Microsoft Intune admin center.
-
To prepare to manage mobile devices, set the mobile device management (MDM) authority to Microsoft Intune.
Set this item only once when you are first setting up Microsoft Intune for mobile device management.
-
Connect your Intune tenant account to Android Enterprise account, if not already done.
-
Select Devices > Android > Enrollment> Corporate-owned, dedicated devices.
-
Create the enrollment profile by performing the following steps:
-
Type a name in the Name box. You'll use this name when assigning the profile to the device group.
-
For the token type, select Corporate-owned dedicated device with Entra ID shared mode.
This token enrolls devices as a standard Android Enterprise dedicated device and, during enrollment, deploys Microsoft's Authenticator app configured into Microsoft Entra ID Shared device mode.
-
For the Token expiration date, specify the date when the token expires. Google enforces a maximum of 90 days.
-
Click Next and Create.
Intune generates a corporate device enrollment token (a random string) and a QR code for your Intune tenant. This single enrollment token is valid for all of the users and won't expire.
Copy the enrollment token to send to your end users, or post it to your helpdesk site to enable end-users to enroll their devices.
-
In the Microsoft Intune admin center, create a security group for dedicated devices with the following settings:
-
Group type is Security.
-
Membership type is Dynamic device.
-
In the Dynamic membership rules of the group, add the following expression:
-
Select the enrollmentProfileName Property
-
Select the Equals Operator
-
Enter the name of the enrollment profile in the Value box.
-
Before You Begin
In Microsoft Intune, go to Client apps and deploy any apps you want to the devices.
Create the Device Restrictions Profile for Kiosk Devices
Create a Device restrictions profile to configure devices as kiosk devices and deploy the Managed Home Screen app.
To create a device restrictions profile:
-
In the Microsoft Intune admin center, browse to Devices > Android > Configuration profiles.
-
Click Create profile and specify the following:
-
Select Android Enterprise from the Platform drop-down list.
-
Select Device restrictions under Fully Managed, Dedicated and Corporate-Owned Work Profile from the Profile type drop-down list.
-
Type a name for the profile.
-
Type a description (optional) and click Next.
-
Open Device experience.
-
Select Dedicated device from the Enrollment profile type drop-down list.
-
Select the preferred kiosk mode from the Kiosk mode drop-down list.
-
Create a custom app layout and configure the home screen.
-
Assign this new profile to the user group created in Step 2: Set Up the User Group for Dedicated Devices.
Apps that require data to be cleared during logout should be listed in the Intune policy.
To configure the device restrictions profile to clear data:
-
Open or create a device restrictions profile.
-
In the device restrictions profile, open the Applications section.
-
Scroll to Dedicated devices: Clear local data in apps not optimized for Shared device mode.
-
Click Add and select the apps to clear data on user switch. For example, select the Google Chrome app to clear data from the browser on logout.
-
Click OK.
For customers using Intune dedicated device enrollment type with MHS, the only way to achieve Epic Rover1 logout during user switch is to configure Epic Rover to Clear data, at the Intune device profile level.
Epic Rover data clearing for logout requires setting the initial Epic Rover configuration through AppConfig - this ensures that Epic Rover will still have necessary configuration for the next user after user switch and data clearing.
To configure the device restrictions profile for Epic Rover to clear data:
-
Open or create a device restrictions profile.
-
In the device restrictions profile, open the Applications section.
-
Scroll to Dedicated devices: Clear local data in apps not optimized for Shared device mode.
-
Click Add and select the apps to clear data on user switch. This must include the Epic Rover app.
-
Click OK.
The configuration should look like this:
[4]
Create an App Configuration policy to configure the Managed Home Screen app.
To create an App Configuration policy:
-
In the Microsoft Intune admin center, browse to Apps > App configuration policies.
-
Click Add > Managed devices.
-
Type a name for the profile.
-
Type a description (optional).
-
Select Android Enterprise
-
Select Fully Managed, Dedicated.
-
Click select apps and select Managed Home screen. Click OK and Next.
-
In the Configuration Settings section:
-
Select Use configuration designer from the Configuration settings format drop-down list.
-
Add Enable sign in setting, and other settings, such as additional session PIN or others.
-
To send the device serial number to MDA, select Device Serial Number and select Serial Number for the Value type.
Alternately, use the JSON format as follows:
Copy{
"key": "ExternalDeviceSerial",
"valueString": "{{SerialNumber}}"
}
-
Deploy Imprivata MDA, Managed Home screen, and other apps, as required apps, to the user group created in Step 2: Set Up the User Group for Dedicated Devices.
Enroll a device by scanning the QR code or using the token value. Intune enrollment begins with a factory reset of the device.
To enroll a device:
-
Wipe the device by using the full factory reset.
- Turn on the newly reset device.
-
On the Welcome screen, select your language.
-
Connect to the Wi-Fi, and then choose NEXT.
-
Accept the Google Terms and conditions, and then choose NEXT.
-
On the Google sign-in screen, enter afw#setup instead of a Gmail account, and then choose NEXT.
-
Choose INSTALL for the Android Device Policy app.
-
Continue installation of this policy. Some devices may require additional terms acceptance.
-
Log in to the Microsoft Intune admin center.
-
Browse to Devices > Enroll Devices > Android Enrollment > Corporate Owned Dedicated devices.
-
Open the profile created in Step 1: Set Up Dedicated Devices.
-
Click Token > Show token. On the device Enrollment page, scan the token from the profile.
A notification displays that this isn't a private device. Click Next.
-
In the next enrollment phase, the work apps are installed. Click Install.
After the required apps are installed, click Next.
-
Click Set up to register the device. When the registration is complete, click Done.
Adding Imprivata MDA to Microsoft Intune
Create and deploy an application for Imprivata Mobile Device Access to Intune.
To deploy an application for Imprivata Mobile Device Access:
-
Log in to the Microsoft Intune admin center.
-
Select Apps > Android Apps and click Add.
-
Select Managed Google Play app from the App type dropdown and click Select.
-
In Managed Google Play, search for "Imprivata MDA" and click Approve.
-
Select Keep approved when app requests new permissions.
-
Click Sync. The app is added to the Android apps list.
To assign the Imprivata Mobile Device Access app to a user group, click the item in the list.
-
Click Properties.
-
In the Assignments section, click Edit.
-
Depending on your needs, specify the mode in which to assign the application:
-
Required. After enrollment, the application is installed on the device automatically.
-
Available for enrolled devices. The application is available but not automatically installed after enrollment.
-
- Add the needed user groups to the app assignment and click Review + save.
Deploying with the Intune Launcher
This task assumes that you have created one or more user groups to assign the Microsoft Launcher and Imprivata Mobile Device Access apps to.
-
Log in to the Microsoft Intune admin center.
-
Select Apps > Android Apps and select Microsoft Launcher from the list of apps.
If Microsoft Launcher is not displayed in the list of apps, click Add and search for it from Managed Google Play apps, click Approve and click Sync.
-
Assign the Microsoft Launcher application to the required user groups:
-
Click Microsoft Launcher application, and click Properties.
-
In the Assignments section, click Edit.
-
Depending on your needs, specify the mode in which to assign the application:
-
Required. After enrollment, the application is installed on the device automatically.
-
Available for enrolled devices. The application is available but not automatically installed after enrollment.
-
- Add the needed user groups to the app assignment and click Review + save.
-
Configure Microsoft Launcher as the Default Launcher
Create a device configuration profile that makes the Microsoft Launcher the default, so users will not need to choose between the native launcher and Microsoft Launcher.
-
Select Devices > Configuration profiles > Create profile.
-
Select Android Enterprise for the platform.
-
Select Fully managed and dedicated devices.
-
Select Device restrictions and click Create.
-
On the Device restrictions page, enter a name in the Name box and click Next.
-
On the Configuration settings page, expand the Device experience section, and select Fully managed from the Enrollment profile type list.
- For Make Microsoft Launcher the default launcher, click Enable. Click Next.
-
On the Assignments page, select the user groups to include and click Create.
-
Add Imprivata Mobile Device Access to the Home Screen of Microsoft Launcher
To add Imprivata Mobile Device Access to the home screen of Microsoft Launcher:
-
Select Apps > App configuration policies.
-
Click Add and select Managed devices.
-
On the Create app configuration policy page, specify the information for the policy:
-
Enter a name for the policy in the Name box.
-
Select Android Enterprise from the Platform list.
-
Select Full Managed, Dedicated, and Corporate-Owned Work Profile Only from the Profile Type list.
-
For the Targeted app, click Select app and select Microsoft Launcher from the list.
-
On the Settings page, in the Configuration Settings section, select Enter JSON data from the Configuration settings format list.
The JSON data format is displayed.
-
Scroll down or search for the "com.microsoft.launcher.HomeScreen.Applications" key.
-
Update the key and value pairs in the JSON for
com.microsoft.launcher.HomeScreen.Applicationsfor the Imprivata Mobile Device Access package:Copy"key": "com.microsoft.launcher.HomeScreen.Applications",
"valueBundleArray": [
{
"managedProperty": [
{
"key": "package",
"valueString": "com.imprivata.imda"
},
{
"key": "class",
"valueString": ""
}
]
}
] -
Click Next.
-
On the Assignments page, select the user groups to include, and click Next and Create.
Imprivata Mobile Device Access is added to the home screen of Microsoft Launcher on devices.
-