Use Omnissa Workspace ONE to Deploy Imprivata MDA
The following sections detail how to:
-
Add Imprivata Mobile Device Access to the Workspace ONE Unified Endpoint Management (UEM) through the Google Play Store.
-
Deploy Imprivata MDA to the users across your organization.
-
Optionally, deploy Imprivata MDA for use with Workspace ONE Launcher Check in and Check out.
Prerequisites
User Group Assignment
Creating user groups is outside the scope of this topic. If you have not created users groups in the Workspace ONE UEM console, do so before continuing. They are required to assign the required Workspace ONE policies.
NOTE: For more information on creating user groups, see the Omnissa documentation.
Android Profile Restrictions
Imprivata MDA requires one of the following restrictions payloads:
-
Deploy the device with a Restrictions profile having the Allow Modifying Applications in Settings option enabled.
-
Do not deploy any restrictions to a device.
For more information on restrictions profiles and their settings, see the Omnissa documentation.
Workspace ONE Launcher Support
To deploy Imprivata Mobile Device Access to devices running the Workspace ONE Launcher, verify that you are using version 4.x.
To verify the version:
-
In the Workspace ONE UEM console, click Devices > Device Settings.
The Settings screen appears.
-
Click Android > Service Applications.
The AirWatch Launcher Version field specifies the version that is currently deployed.
Critical Alarm Sending Apps and Lock Task Mode
Imprivata recommends that Imprivata MDA be the only app on the device that is running in Lock Task mode.
However, when the Imprivata MDA app is configured to run with Lock Task mode, other apps that send Critical Alarms will not be able to show a Critical Alarm over the Imprivata MDA lock screen.
Add any apps that send Critical Alarm notifications to the allowlist in the following places:
-
In the Imprivata Admin Console, by adding the app packages to the Allow lock screen notifications list in Mobile Policy.
-
In your MDM configuration, by allowing the apps for Lock Task mode.
In Omnissa Workspace ONE, for proper Lock Task configuration for the app sending Critical Alarm notifications, the app should be allowlisted in all Lock Task profiles where the Imprivata MDA app is allowlisted.
For example, if a device is enrolled to Workspace ONE with the Workspace ONE launcher, the apps sending alarm notifications should be allowlisted in the Lock Task payload, as well as the ExtraLockTaskPackages custom XML payload.
Adding Imprivata MDA to Workspace ONE UEM
The deployment steps in this topic may change in future, as Omnissa makes changes to the Workspace One UEM console.
For current information, see the Workspace ONE documentation.
See the Imprivata MDA AppConfig Reference for supported MDM AppConfig keys.
The recommended way to add the Imprivata MDA app is from the Google Play Store.
To add Imprivata MDA:
-
In the Workspace ONE UEM console, click Resources > Apps > Native.
The List View screen appears.
-
Click Public, and then click Add Application.
The Add Application screen appears.
-
From the Platform list, select Android.
-
In the Name field, enter "Imprivata Mobile Device Access", and then click Next.
-
Under Apps, click Imprivata Mobile Device Access, and then click Select.
Imprivata MDA should be the first app that appears on the left.
The Edit Application - Imprivata Mobile Device Access screen appears. No values need to be configured here.
-
Click Save and Assign.
You are redirected to the Workspace ONE UEM console to assign the app. For more information, see Assigning Imprivata MDA.
NOTE:Clicking Cancel does not cancel the upload. If you click Cancel, Imprivata MDA is added to the Workspace ONE UEM and remains available to be assigned at another time.
Assigning Imprivata MDA
Assigning Imprivata Mobile Device Access requires that you:
-
Specify the user groups that are to receive the app.
-
Configure Imprivata Mobile Device Access required settings.
To assign users:
-
On the Distribution screen, name the assignment.
-
In the Assignment Groups field, enter the name of the user group or smart group.
-
Configure how to deploy Imprivata MDA:
-
Auto — Deploys and installs Imprivata MDA to the device upon enrollment.
If the device is already enrolled, the system prompts users to install it. This setting is typically used in production environments.
- On Demand – Deploys Imprivata MDA to the device only. Users must manually install it.
-
-
From menu on the left, click Application Configuration, and then enable Managed Access and Send Configuration.
-
In the OneSign server address field, enter the address of an Imprivata appliance.
-
In the Device Serial Number field, enter "{DeviceSerialNumber}".
Imprivata MDA requires access to the device ID to report on individual login and device activity. The first time it is launched on the device, Imprivata MDA attempts to obtain the device serial number and build device ID.
-
Click Create.
-
Click Save, and then click Publish.
The assignment appears in the Details View.
Deploying Imprivata Mobile Device Access
How you deploy Imprivata Mobile Device Access to your users depends on whether the devices are configured to use the native system launcher or the Workspace ONE launcher.
All of the Imprivata Mobile Device Access functionality is available in either deployment type. Choosing one deployment type over the other is based on the level of access your organization wants users to have on the mobile device.
Consider the following:
-
Native system launcher—The native system launcher gives users greater access to the device.
For example, users can change system settings, customize the home screen, and generally manage the device as if it were there own.
-
Workspace ONE Launcher—The Workspace ONE Launcher gives you greater control of the device by limiting what users can access.
For example, you can define a specific set of apps that are available to users, while preventing access to system settings and other functionality.
For more information about the Workspace ONE Launcher, see the Omnissa documentation.
Scenarios
The following table provides a summary of the scenarios and best practices for using Workspace ONE to deploy Imprivata MDA.
See the Imprivata MDA AppConfig Reference for supported MDM AppConfig keys.
| Deployment Scenario | Guidance |
|---|---|
| Without Workspace ONE Launcher |
|
| Workspace ONE Launcher, not in shared mode |
|
| Workspace ONE Launcher in shared mode |
|
A profile consists of the general profile settings and a specific payload. Omnissa recommends that profiles contain only a single payload.
Deploying to the native system launcher requires that you create two profiles:
-
The first policy distributes Imprivata Mobile Device Access to your users and devices.
-
The second policy enables permissions for all of the apps on the devices.
Policy 1 - Distributing Imprivata Mobile Device Access
In the first policy, deploy Imprivata Mobile Device Access:
-
In the Workspace ONE UEM console, click Devices > Profiles and Resources > Profiles.
The Profiles screen appears.
- Click Add > Add Profile, and then click Android.
- Complete the following General settings:
Enter a name.
In the Smart Groups field, add the required user groups.
-
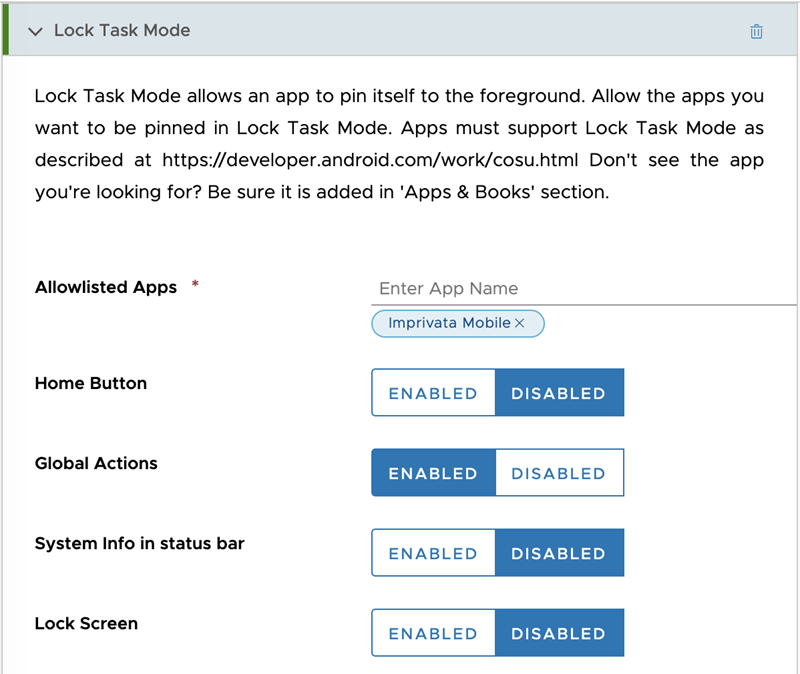
Expand the Lock Task Mode section to specify the lock task mode settings.
-
From the Allowlisted Apps field, select Imprivata Mobile Device Access.
-
For the Home Button, select Disabled.
-
For the Global Actions, select Enabled. This allows device reboot.
-
For the System Info in status bar, select either Enabled or Disabled, depending on whether you want the status bar to be shown. Notifications will not be shown when this setting is enabled.
-
For the Lock Screen, select Disabled.
-
(Optional). To improve authentication performance, select Allow Keyguard.
-
-
Click Save and Publish.
Deploying Imprivata Mobile Device Access using Single App Mode
This method may be useful for older Intelligent Hubs.
Otherwise, use the preferred methods in Deploying Imprivata Mobile Device Access above.
Single App Mode enables Imprivata Mobile Device Access to function in Lock Task mode.
Imprivata recommends that Imprivata Mobile Device Access be the only app on the device that is running in Lock Task mode.
To deploy Imprivata Mobile Device Access using Single App Mode:
-
In the Workspace ONE UEM console, click Devices > Profiles and Resources > Profiles.
The Profiles screen appears.
- Click Add > Add Profile, and then click Android.
- Complete the following General settings:
Enter a name.
In the Smart Groups field, add the required user groups.
-
Click Single App Mode, and then click Configure.
The Single App Mode screen appears.
-
From the Allowlisted Apps field, select Imprivata Mobile Device Access, and then click Save and Publish.
The Profiles screen appears and lists the new profile.
Policy 2 - Enabling Permissions
Enabling permissions prevents users from being prompted to allow permissions manually. Imprivata Mobile Device Access requires permission to:
-
Draw over (overlay) other apps.
-
Read notifications and access notifications.
Imprivata Mobile Device Access also requires permission to activate Draw over (overlay) other apps, Read notifications and access notifications and Accessibility Service. These cannot be enabled automatically. These items must be enabled manually on each device after the installation.
To enable permissions:
-
In the Workspace ONE UEM console, click Devices > Profiles and Resources > Profiles.
The Profiles screen appears.
-
Click Add > Add Profile, and then click Android.
- Complete the following General settings:
Enter a name.
In the Smart Groups field, assign the same user groups that was assigned to the previous profile.
-
Click Permissions, and then click Configure.
The Permissions screen appears.
-
From the Permission Policy list, select Grant all permissions, and then click Save and Publish.
The Profiles screen appears and lists the new profile.
A profile consists of the general profile settings and a specific payload. Omnissa recommends that profiles contain only a single payload.
Deploying to the Workspace ONE Launcher requires that you create two profiles.
-
The first profile distributes the Workspace ONE Launcher profile.
In addition, this profile makes all of the required Android packages accessible to the device, but hidden from users. These packages are required for secure user switching and proximity card authentication.
-
The second profile enables permissions for all of the apps on the devices and enables Lock Task mode.
Imprivata recommends that Imprivata Mobile Device Access be the only app on the device that is running in Lock Task mode.
To deploy the Workspace ONE Launcher profile:
-
In the Workspace ONE UEM console, click Devices > Profiles and Resources > Profiles.
The Profiles screen appears.
- Click Add > Add Profile, and then click Android.
- Complete the following General settings:
Enter a name.
In the Smart Groups field, add the required user groups.
-
Click Launcher, and then click Configure.
-
Select Multi App.
The Launcher Canvas appears.
-
Click Layout, and then configure elements such as the icon grid and orientation preference.
-
Under the App section, select Public from the list.
-
Under the Launcher section, in Advanced Launcher settings, select Use Legacy Launcher APIs.
-
Drag and drop Imprivata Mobile Device Access to the Launcher Canvas, and then organize any other required apps.
- Select Miscellaneous from the list, click Add an App, and then enter the following:
In the Application Name field, enter "Settings".
In the Application ID field, enter "com.android.settings", and then click Add.
- Using the Miscellaneous value, continue to add the remaining required packages:
System UI (com.android.systemui)
NFC (com.android.nfc)
Accessibility (com.samsung.accessibility) - Required for Samsung devices.
-
Open the Hidden Apps tab, and drag and drop Settings, System UI, NFC, and if required, Accessibility to the Launcher Canvas, and then click Save.
The Settings screen appears.
- In the Administrative Passcode field, enter a password that lets authorized users perform administrative tasks on the device, and then complete the following:
Go to the Settings section, and disable Screen Lock.
Go to the Utilities section, and disable Allow Keyguard and Allow Recent Task List.
-
Save the settings, and then click Save and Publish.
The Profiles screen appears and lists the new profile.
Enabling permissions prevents users from being prompted to allow permissions manually. Imprivata Mobile Device Access requires permission to:
-
Draw over (overlay) other apps.
-
Read notifications and access notifications.
NOTE:Imprivata Mobile Device Access also requires permission to activate Draw over (overlay) other apps, Read notifications and access notifications and Accessibility Service. These cannot be enabled automatically. These items must be enabled manually on each device after the installation.
To enable permissions:
-
In the Workspace ONE UEM console, click Devices > Profiles and Resources > Profiles.
The Profiles screen appears.
-
Click Add > Add Profile, and then click Android.
- Complete the following General settings:
Enter a name.
In the Smart Groups field, assign the same user group that was assigned to the previous profile.
-
Click Permissions, and then click Configure.
The Permissions screen appears.
-
From the Permission Policy list, select Grant all permissions.
-
Deploy a profile for Lock Task Mode with the following settings:
Allowlisted Apps: Imprivata Mobile.
Home button: Disabled
Global Actions: Enabled
System Info in status bar: Disabled
Lock Screen: Disabled
Click to enlarge
-
Deploy a profile for ExtraLockTaskPackages with the following parameters:
Copy<characteristic
type="com.airwatch.android.androidwork.launcher"
uuid="568bc89d-1df8-4ce9-a041-e5a24acdb7ec">
<parm name="ExtraLockTaskPackages" value="com.imprivata.imda" />
</characteristic> -
(Optional) If using Workspace ONE Launcher Check In and Check Out:
In the Launcher profile, switch the setting Allowlist Activities on Checkin Check-out Screen to On.
Add the following values to the Package Names and Class Name fields:
Package Name Class Name com.imprivata.imda com.imprivata.imda.ui.LoginPortraitActivity com.imprivata.imda com.imprivata.imda.ui.LoginLandscapeActivity -
Click Save and Publish.
The Profiles screen appears and lists the new profile.
Workspace ONE Launcher Check In and Check Out
This is an optional feature.
Workspace ONE includes features for shared device checkout. This section explains how to link Imprivata MDA with Workspace ONE, so that the checkout features are synchronized between the two systems.
A checkout in Imprivata MDA — via a proximity card tap, for example — assigns the device to the user in your MDM. This triggers any user-assigned apps or policies for the device.
Prerequisites and Limitations
Take note of the following prerequisites and limitations:
-
This feature requires the Workspace ONE Intelligent Hub app v25.02 or later.
-
Workspace ONE and Imprivata Enterprise Access Management usernames and passwords must match; the users must be synchronized with Active Directory.
-
The usernames must be in the SAM username format.
-
Does not support authentication for users belonging to Workspace ONE Organization Group (OG) other than OG of the device's staging user.
-
If you configure Workspace ONE to clear application data on checkin, you should add Imprivata MDA to the DonotClearAppDataSet list. Otherwise Imprivata MDA's permissions are cleared as well, and must manually be granted after each checkin event.
To add Imprivata MDA to the DonotClearAppDataSet list, see Step 5 of the procedure.
NOTE:For more information on clearing application data, see the "Clear Application Data" and the "Selective App Cache Clearing" sections of your Workspace ONE documentation. Selective app cache clearing is available in Workspace ONE Launcher 3.3 and later.
Expected User Check In and Check Out Workflow with Imprivata MDA
-
At the beginning of the shift, the user uses Imprivata Enterprise Access Management to automatically log into Launcher with a proximity badge tap.
-
In Workspace ONE, a user Checkout event is recorded.
-
The user gains access to applications configured for either EAM or Omnissa Access.
-
At the end of the session, the user logs out of Imprivata MDA and returns to the Imprivata MDA authentication screen.
-
In Workspace ONE, a user Checkin event is recorded.
Step 1: Create the Device Staging User
To enroll devices in shared mode, configure a device staging user. This user does not need to be a real physical user; it can be a user whose only purpose is to enroll (stage) shared devices.
-
In the Workspace ONE UEM, create a new user to use for device staging.
- Allow the user to stage devices in shared mode. Under the Advanced tab in the Add user page, set the following options:
Set Enable device staging to Enabled.
Set Single User Devices to Disabled.
Set Multi User Devices to Enabled.
Set Android Shared Device Mode to Launcher.
-
Click Save.
Step 2: Set Up the Organization Group
During a device checkout for a specific user, it receives Workspace ONE profiles related to the Workspace ONE organization group. All of the profiles designated for Share Devices should be assigned to the Organization Group:
To set up the Organization Group:
-
In Workspace ONE UEM, create the Organization Group, ensuring that all of the profiles designated for shared devices are in this group.
Ensure that the Allow user to enroll into additional Organization Groups is set to Disabled.
-
Add the device staging user created in Step 1: Create the Device Staging User.
-
Add all users to the newly created organization group. Ensure that all users are in the same organization group.
Step 3: Deploy Workspace ONE Profiles to the New Organization Group
-
Deploy the following Workspace ONE profiles to the newly-created Organization Group:
-
Launcher app profile.
-
ExtraLockTaskPackages profile.
See the ExtraLockTaskPackages section for notes on deploying with different releases of Workspace ONE.
-
-
In the Launcher profile, switch the setting Allowlist Activities on Checkin Check-out Screen to On.
Add the following values to the Package Names and Class Name fields:
Package Name Class Name com.imprivata.imda com.imprivata.imda.ui.LoginPortraitActivity com.imprivata.imda com.imprivata.imda.ui.LoginLandscapeActivity -
Set up Imprivata MDA for Lock Task mode.
Click to enlarge
-
Grant all permissions to Imprivata MDA.
Step 4: Allowlist the Imprivata MDA App Signature for Workspace ONE SDK Use
-
Change Workspace ONE Admin Console current Organization Group to the OG that is configured for the Checkin/Checkout (CICO) workflow.
All profiles should be assigned to the organization group with the device staging user created in Step 1: Create the Device Staging User, and all other users have been assigned.
-
In Workspace ONE, open Groups & Settings > All Settings.
-
Add the Imprivata MDA signature to Hub settings for Workspace ONE SDK use, via Settings > Apps > Settings and Policies > Settings.
-
Change the current settings to Override.
-
Set Custom Settings to:
Copy{
"trustedKeys" : [
"MIIFhjCCA26gAwIBAgIUKTphZxuwuT+KwXviKrjRYwJJgQ0wDQYJKoZIhvcNAQELBQAwdDELMAkGA1UEBhMCVVMxEzARBgNVBAgTCkNhbGlmb3JuaWExFjAUBgNVBAcTDU1vdW50YWluIFZpZXcxFDASBgNVBAoTC0dvb2dsZSBJbmMuMRAwDgYDVQQLEwdBbmRyb2lkMRAwDgYDVQQDEwdBbmRyb2lkMB4XDTE4MDYyOTEyNTQzOVoXDTQ4MDYyOTEyNTQzOVowdDELMAkGA1UEBhMCVVMxEzARBgNVBAgTCkNhbGlmb3JuaWExFjAUBgNVBAcTDU1vdW50YWluIFZpZXcxFDASBgNVBAoTC0dvb2dsZSBJbmMuMRAwDgYDVQQLEwdBbmRyb2lkMRAwDgYDVQQDEwdBbmRyb2lkMIICIjANBgkqhkiG9w0BAQEFAAOCAg8AMIICCgKCAgEAj/NFYJsFvf/nG9uweYQ7ponm1GacgzGB1TPN7sWBbEmxWwgPJn6zg6koUz7goSOyXVNz+zlvZoj6tpaV7uFUF/8eE0rJapE2SGAYdRfIeEEaSQj5zhmgo2ZGs4xZWHdTZ7VgmgJBm+XTcTJU92o/JEbmV3HMTX3yEWcfsBB6eRzzZfFdn2fF8kVo6Krfz9/dy8mkZ9evPBIX9EKh03AoJhyFOSIjfLqLIH8gd+w3CyrJVPaRkBE9nGLtvUDOCUGn3ak5YoGwho1aaed8Lk1THmKf2RqG8/CPsJM/9EsJq97DI9G2uDMbwcgAfbWjha7+jHFyaN9bTQV4UfNsBestW+knTnMhf7RBiWDmRmS0v4vQmDPNcAqXvpJYpUIH94qVU2czdjyplKCjkuTUaJuq73pXfWNP7gM79jRddUSYNFrzHvf+OM9vrRApztkQv0mHSKVHzBR2qECmhsX0LN0aE9yxhrUX0NruCR+muy29YUEdNee7nY3QelxSuvyE2b9pGpA7mhL14TfxEtcVrSHy/+TsmW7ymVIL1FMR/rdf9uURfv0IasghK4bASv6XoX3dQKqbJfuk9qQnyDXjDjKyM7mAQ01J1YT9a/hwje3EqyRvMC8Hur6y8ACoA1qlN0UmHgeqqE274cZwIfyLnyN4hntdFa76jTgnYTD8fEgB6WUCAwEAAaMQMA4wDAYDVR0TBAUwAwEB/zANBgkqhkiG9w0BAQsFAAOCAgEAQ1+fzQNbBSGpuj/SlnVwIkP3M4rlE72j6K7kp6dqUwJA1BRzdVrT3MiaQ0h4ASVGUNvuJBCcjKtB3hM1Zwvt/tZmNK8l7qD9Waj2UOQ7hYm6OjgfHT2oq/NfUUH8RGKCYdSzexjJ+nsIPFA9BBXIGmUTJBTDZrwLHxpvZx/hfCm0xSYPa2A/BNL/TIvAQRICIX6RWaGHqGMH/nwYoBJ885cBz4QyzAXOeJFgkj+yXDGHdTfi/f2iQzJroSnLVLXkXX1dkCKTYMnb1LYJfp8JJUTL9fPSS4i5BPRlo7ZQWDUBpt7ES261NY36/VVaPIpjywj7sqQMIEvb70YcphczqQWWQnModL1yKIjTvdJe1mdUvQLUXJRyosUb9/avcbV58YRiOJEsnJuAexSpBOROwigwYtZwQTq73P4+za5o1jgP+/G57lqHEs3C3Nse2+5o38ribtclCYA4tXSvzUWUuJc1cxg//9i13ItwG8ur5ykz1ST+jTnOq4utdQmOUFj0TO1vKYMwpqC9/fpZ+Xq1i8MKhebbeA14BVYaU3I8GWV1/Boem4D0oTTClXxh4dqboALvR2bB++ziRfChfNGOHtlqNSgv+YCIFm9llmwNRBCOFtqAufpzjZDumBYRyM4XSEjQ+lq5IGMS/8vXQ1MNlceBGNSnFeqFRZCknGCPE5I="
]} -
Save the changes.
If more than one app signature will be specified, the signature hashes should be comma separated in the
trustedKeysarray:Copy{
"trustedKeys" : [
"app1 signature hash",
"app2 signature hash",
"app3 signature hash"
]}
-
Step 5: Configure Workspace ONE Shared Device Mode to Not Clear Imprivata MDA App Data on Checkin
Selective app cache clearing is available in Workspace ONE Launcher 3.3 and later.
The Workspace ONE UEM console setting Clear App data on logout will clear the data of all the assigned allowed application after logging out.
Administrators can provide a set of applications for which the data should not be cleared between checkin/checkout by using the following XML:
<characteristic type="com.airwatch.android.kiosk.settings" uuid="568bc89d-1df8-4ce9-a041-e5a24acdb7ec">
    <parm name="DonotClearAppDataSet" value="com.imprivata.imda"/>
</characteristic>
Other package names can be added to the value attribute of the <param> element. Package names should be comma separated.
For each package name included in the data set, the App Cache will not be cleared on checkin/checkout.
Step 6: Enable Shared Device Mode
Enrollment is triggered after a factory reset during the first device boot. The device should be enrolled for the Device Staging user configured for Shared Device Mode.